![]()

- Step 1: Verify/add your modem
- Step 2: Verify that dial-up networking is installed
- Step 3: Verify/add the dial-up adapter and TCP/IP protocol installation
- Step 4: Configure your TCP/IP Properties
- Step 5: Set up the dial-up networking icon
- Step 6: Set the dial-up properties for Windows 95 only
- Step 6: Set the dial-up properties for Windows 98 only
- Step 6: Set the dial-up properties for Windows ME only
- Step 7: Connecting to FIRN
![]()
To prepare your Windows 95/98/ME computer to connect to FIRN you will have to configure your control panel (steps 2-6 below). This one-time process will take about 20 minutes. Once you have your computer properly configured, connecting to FIRN will be fast and easy (step 7 below).
a. Click Start at the bottom of the screen.
b. Select Settings.
c. Select Control Panel.
d. In the Control Panel, double-click the Modems icon.
e. When the Modems Properties dialog box (Figure 27) appears, verify that your modem is listed.
f. If your modem is listed, click OK and go to Step 2. If not, then proceed with these directions.
g. In the Modems Properties dialog box, click Add.

Figure 27. Modem Properties dialog box
h. Leave Don’t detect my modem unchecked, click Next and follow the directions.

Figure 28. Install New Modem dialog box
i. If Windows gives you a message that it cannot auto detect your modem, click Next and highlight your modem maufacturer and model on the lists (Figure 28).
j. Click Next again and, if prompted, select the correct communications port for your modem.
k. Click Next and you should see a message indicating that your modem has been set up successfully.
l. Click Finish to close the Install New Modem dialog box.
m. Click Close on the Modems Properties box, returning to the Control
Panel.
a. In the Control Panel, double-click the Add/Remove Programs icon.
Figure 29. Add/Remove Programs Properties dialog
box
b. When the Add/Remove Programs Properties dialog box (Figure 29) appears,
click the Windows Setup tab and do the following:
![]()
Step 2: Verify that dial-up networking is installed

Click Communications in the list.
Click Details...
Make sure the box next to Dial-Up Networking is checked. Click OK.
c. When you return to the Add/Remove Programs Properties dialog box, click
OK again. You may be asked for your Windows 95/98/ME CD. Follow the
directions until the software has been installed.
a. In the Control Panel, double-click the Network icon, opening the
Network dialog box (Figure 30).
Figure 30. Network dialog box
b. If both Dial-Up Adapter and TCP/IP are shown in the list,
go to step e. If it is missing, continue with step c.
c. If you need to install the Dial-Up Adapter, click Add in the Network
dialog box and follow these directions:
![]()
Step 3: Verify/add the dial-up adapter and TCP/IP protocol
installation

Click Adapter and then click Add.
Scroll through the list of Manufacturers and highlight Microsoft.
Click Dial-Up Adapter under Network Adapters.
Click OK.
d. If you need to install TCP/IP, click Add in the Network dialog box and follow these directions:
Click Protocol and then click Add.
Scroll through the list of Manufacturers and click Microsoft.
Scroll through the list of Network Protocols and click TCP/IP.
Click OK.
e. The Network Configuration Control Panel window should now contain both the Dial-Up Adapter and TCP/IP components.
f. It is important that you verify that the TCP/IP is bound to the Dial-Up
Adapter. Click on Dial-Up Adapter in the list of network components. Click
the Properties button. Click the Bindings tab. Verify that the TCP/IP box
is checked. If it is grayed out, reboot the computer and check it again.
a. In the Control Panel, double-click the Network icon, opening the
Network dialog box (Figure 30, again).
b. Click on TCP/IP in the list of network components. Click the Properties
button. A window, similar to the one in Figure 31 on the next page, will appear.
Notice the tabs at the top of the window. You will click on these tabs to
move to different sections of the TCP/IP Properties.
c. IP Address tab: Select the Obtain an IP Address Automatically
option.
d. WINS Con�guration tab: Select the Disable WINS Resolution
option.
e. Gateway tab: No changes are needed.
f. Bindings tab: If the Client for Microsoft Networks option is checked,
remove it.
g. Advanced tab: No changes are needed.
Figure 31. DNS Configuration tab
h. DNS Con�guration tab: Make the following changes:
![]()
Step 4: Con�gure your TCP/IP Properties

Select the Enable DNS option.
Host box: firn
Domain: �rn.edu
DNS Server Search Order: Enter 150.176.12.50 and click Add.
Enter 128.227.128.24 then click Add again.
i. Click the OK button at the bottom of the window.
j. Click the OK button in the Network Con�guration window.
k. Click the Yes button when Windows prompts you to reboot.
![]()
Step 5: Set up the dial-up networking icon
a. Double-click the My Computer icon on the desktop.
b. Double-click the Dial-Up Networking icon or link. A window, similar to the one in Figure 32, will display.
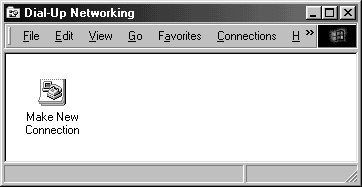
Figure 32. Dial-Up Networking
c. Double-click the Make New Connection icon. This will invoke the Make New Connection wizard. Wizards allow you to con�gure settings and proceed to the next step of the wizard by clicking the button at the bottom of the window. (See Figure 33.)
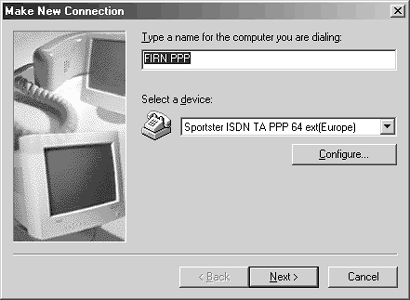
Figure 33. Make New Connection Wizard
d. Type in FIRN, or the name you wish to call the icon you’re about to create to connect to FIRN. The description of your modem should be listed in Select a modem (or Select a device). If it is not, click the down arrow and click the correct modem.
e. Click Configure. A window, similar to the one in Figure 34, will appear.

Figure 34. General tab
f. General tab: Verify that the Port setting is correct. Select the Maximum speed in bits per second for the port being used for your PPP session. For a 14.4 Kbps modem, set the maximum speed to 57,600. For a 28.8 or faster modem, set the maximum speed to 115,200. Do NOT select Only connect at this speed.
Note: if you cannot select the speed that you know your modem is capable of using, make sure that the right model of modem was selected.
g. Connection tab: No changes are needed.
h. Options tab: Check the option to Bring up terminal window after
dialing.
When you have completed making changes to your modem properties, click the
OK button. You will return back to the Make New Connection wizard.
i. Click the Next button at the bottom of the wizard window. A window similar to Figure 35 should display.

Figure 35. Setting the dial-up number
j. Enter the closest FIRN dial-up number. Include the area code only if it is needed. Click the Next button at the bottom of the wizard window. Click the Finish button at the bottom of the wizard window. An icon will be created in the Dial-Up Networking folder with the name you speci�ed earlier. This icon will have all the settings you de�ned using the con�guration wizard.
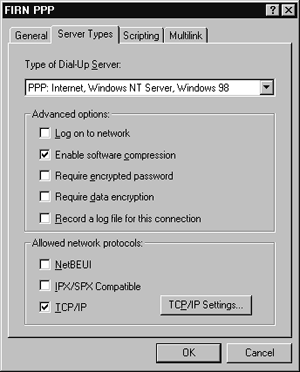
Step 6: Set the dial-up properties (Windows 95 only)
The process for setting the dial-up properties varies slightly according to your operating system. Please select the appropriate section (either Windows 95, Windows 98, or Windows ME) from the three below.
a. In the Dial-Up Networking window, right-click the icon for the new FIRN connection.
b. In the popup menu that appears, choose Properties. A new dialog box with will appear with the settings for your FIRN connection.
c. Click on the Server Type button. The Server Types dialog box should display.
d. Choose the following options:
Type of Dial-Up Server: click the down arrow and choose PPP.
Advanced options: check Enable software compression.
(The other Advanced options should NOT be checked.)
Allowed network protocols: check TCP/IP.
(The other Allowed protocols should NOT be checked.)
Figure 36. Server Types window (Windows 95 only)

e. Click OK to close the Server Types window.
f. Click OK to close the FIRN window.
g. Skip to Step 7 here.
![]()
Step 6: Set the dial-up properties
(Windows 98 only)
The process for setting the dial-up properties varies slightly according to your operating system. Please select the appropriate section (either Windows 95, Windows 98, or Windows ME) from the three below.
a. In the Dial-Up Networking window, right-click the icon for the new FIRN connection.
b. In the popup menu that appears, choose Properties. A new dialog box with the name of the connection will appear.
c. Click on the Server Types tab and choose the following options:
Type of Dial-Up Server: click the down arrow and choose PPP.
Advanced options: check Enable software compression.
(The other Advanced options should NOT be checked.)
Allowed network protocols: check TCP/IP.
(The other Allowed protocols should NOT be checked.)
Figure 37. Server Types tab (Windows 98 ony)
e. Click OK to close the FIRN window.
f. Skip to Step 7 here.
![]()
Step 6: Set the dial-up properties
(Windows ME only)
The process for setting the dial-up properties varies slightly according to your operating system. Please select the appropriate section (either Windows 95, Windows 98, or Windows ME) from the three below.
a. In the Dial-Up Networking window, right-click the icon for the new FIRN connection.
b. In the popup menu that appears, choose Properties. A new dialog box with the name of the connection will appear.
c. Click on the Networking tab and choose the following options:
Type of Dial-Up Server: click the down arrow and choose PPP.
Advanced options: check Enable software compression.
(The other Advanced option(s) should NOT be checked.)
Allowed network protocols: check TCP/IP.
(The other Allowed protocols should NOT be checked.)
Figure 38. Networking tab (Windows ME only)

d. Click OK to close the FIRN window.
e. Continue with Step 7 below.

Step
7: Connecting to FIRN
a. Double-click the FIRN connection icon in the Dial-Up Networking window.
Note: Do not enter a username and password in the empty boxes at the top of
the window; this information will be entered in the terminal window that appears
after dialing and successfully connecting.
b. Click Connect; the modem will begin dialing.
c. A terminal window will appear once a connection has been established.
d. A terminal window will display a welcome message. (Note: If there is no
text in the window, you are probably connecting to an older 28.8 FIRN dial-up
number. Please turn to page 70 for further instructions.)
Welcome to FIRN!
Enter username>02345678
Enter password>
e. At the username prompt, type your FIRN profile account number and press the Enter key.
f. At the password prompt, type your password and press the Enter key. Note: The password will not appear on the screen and the cursor will not move as you type.
g. The terminal window will disappear. A Connecting to... box will appear. At this time, FIRN will verify your FIRN profile account number. After a brief period of time, the title box will change to Connected to ...
h. Minimize the Connected to ... box (or just leave it as is).
i. Launch your browser, email application, or any other PPP applications you would like to use.
j. Enjoy your FIRN connection!
k. When you are finished, quit the PPP applications you launched.
l. To disconnect, restore the Connected to... window (if you minimized it in step h) and click Disconnect. As soon as Connect appears, you have been disconnected.
![]()