![]()

- Step 1: Configure your Modem control panel
- Step 2: Configure your TCP/IP control panel
- Step 3: Configure your Remote Access control panel
- Step 4: Connecting to FIRN
![]()
To prepare your Macintosh computer to connect to FIRN you will have to configure three control panels (steps 1-4 below). This one-time process will take about ten minutes. Once you have your computer properly configured, connecting to FIRN will be fast and easy (step 5 below).
![]()
Step 1: Configure your Modem control
panel
a. Click on the Apple menu to highlight the Control Panels and select Modem.
b. When the Modem control panel opens, go to the drop down File menu at the top of the screen and select Configurations.
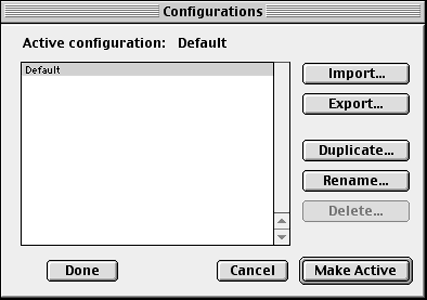
Figure 12. Configurations
c. When the Configurations dialog box (Figure 12) opens, click on the Duplicate button.
d. Name the new configuration FIRN and then click OK.
e. Click the Make Active button on the Configurations dialog box. The dialog box will close and the Modem control panel will be visible again. Choose the following settings:
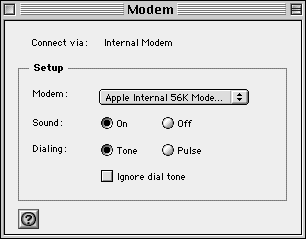
Connect via: select the location of your modem (modem port, printer port, USB, or internal).
Modem: select your modem type from the pull down list
Sound: On
Dialing: Tone (or Pulse if you have a rotary phone)
Ignore dial tone: leave this box blank
Figure 13. Modem control panel
f. Close the Modem control panel by clicking on the box in the upper left corner of the window.
g. When prompted to save the changes, click Save.
Step 2: Configure your TCP/IP control panel
a. Click on the Apple menu to highlight the Control Panels and select TCP/IP.
b. When the TCP/IP control panel opens, go to the drop down File menu at the top of the screen and select Configurations.
c. When the Configurations dialog box (similar to Figure 12 on page 32) opens, click on the Duplicate button.
d. Name the new configuration FIRN and then click OK.
e. Click the Make Active button on the Configurations dialog box. The dialog box will close and the TCP/IP control panel will be visible again.
f. From the Edit menu at the top of the screen, select User Mode.
g. When the User Mode dialog box opens, select Advanced.
h. Click OK. The TCP/IP control panel (Figure 14) will reappear with more options.
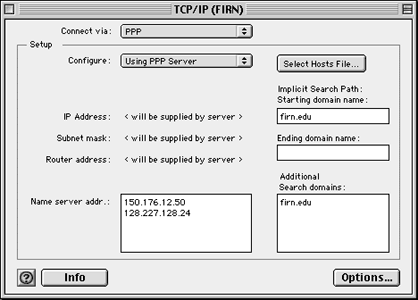
Figure 14. TCP/IP control panel
i. Choose the following settings in the TCP/IP control panel:
Connect via: choose PPP
Configure: choose Using PPP Server
IP address: will be supplied by server
Subnet mask: will be supplied by server
Router address: will be supplied by server
Name server addr.: type 150.176.12.50 on first line, press return, and type 128.227.128.24 on the second line
Starting domain name: enter firn.edu
Ending domain name: leave blank
Additional Search domains: enter firn.edu
j. Click Options. The TCP/IP Options dialog box (Figure 15) will open.
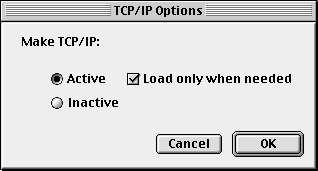
Figure 15. TCP/IP options dialog box
k. Choose the following settings in the Options dialog box:
Select Active
Check Load only when needed
l. Click OK, closing the Options box.
m. Close the TCP/IP control panel by clicking in the top left corner.
n. If prompted to save the configuration, click Save.
a. Click on the Apple menu to highlight the Control Panels
and select Remote Access.
b. When the Remote Access control panel opens, select Configurations
from the File menu at the top of the screen.
c. When the Configurations dialog box (similar to Figure 12 on page 32) opens,
click on the Duplicate button.
d. Name the new configuration FIRN and then click OK.
e. Click the Make Active button on the Configurations dialog box.
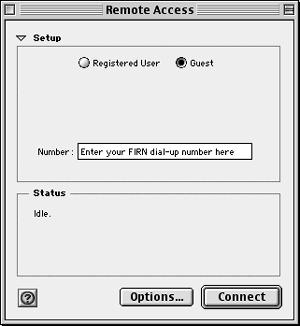
The dialog box will close and the Remote Access control panel (Figure 16)
will be visible again. If your control panel does not show all of the options
shown in Figure 16, click on the arrow next to Setup and the control panel
will expand.
Figure 16. Remote access panel
f. Select Guest.
g. In the Number: field, type your local FIRN dial-up number.
h. Click on Options.
Figure 17. Redialing tab
i. When the Options dialog box opens, select the Redialing tab.
Redial: Redial main number only Figure 18. Connections tab
j. Select the Connections tab.
Check Use Verbose Logging Figure 19. Protocol tab
k. Select the Protocol tab.
Check Allow Error Correction and Compression in modem l. Click OK, closing the Options dialog box.
m. Close the Remote Access dialog box by clicking in the top left
corner.
![]()
Step 3: Configure your Remote Access
control panel
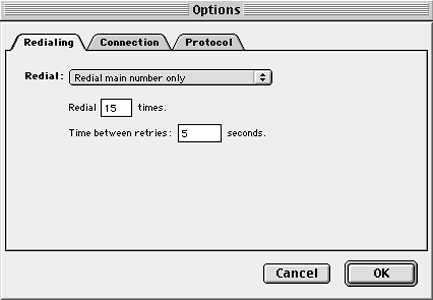
Redial #: 15 times
Time between retries: 5 seconds
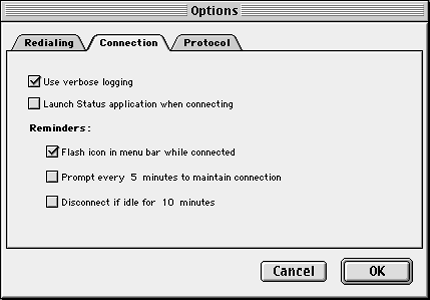
Check Flash icon on Menu Bar While Connected
If necessary, remove check mark from Disconnect if idle for 10 minutes.
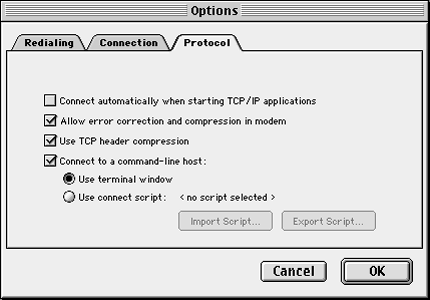
Check Use TCP Header Compression
Check Connect to a Command-line Host
Select Use Terminal Window
n. When prompted to save the changes, click Save.
Once you have done the one-time setup of your computer, the following
steps are all you will have to do whenever you wish to connect to FIRN.
a. Click on the Apple menu to highlight the Control Panels
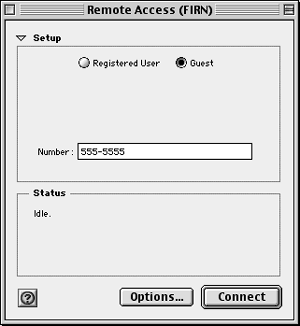
and select Remote Access. A screen, similar to the one in Figure 20,
displays.
Figure 20. Remote Access control panel
b. Click Connect on the Remote Access control panel. The modem will
connect to FIRN.
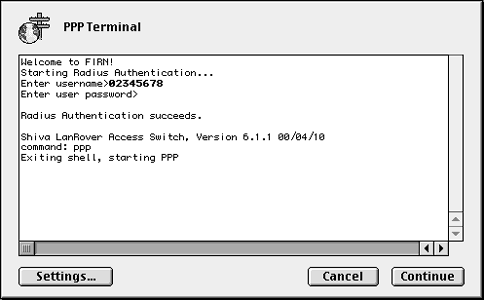
c. A terminal window similar to the one in Figure 21, will display a welcome
message. (Note: If there is no text in the window, you are probably connecting
to an older 28.8 FIRN dial-up number. Please turn to page 70 for further instructions.)
Figure 21. Terminal window
d. At the Enter username prompt, enter your FIRN profile account number
and press Return.
e. At the Enter user password prompt, enter your password and press
Return. (Note: Your password will not display and the cursor will not
move as you type your password.)
f. You will receive a message that your password authentication has succeeded.
You are now connected to the FIRN network.
g. Launch your browser, email application, or any other PPP applications
you would like to use.
h. Enjoy your FIRN connection!
i. When you are finished, quit the PPP applications you launched.
j. Click the Disconnect button in the Remote Access control panel.
When Disconnect changes to Connect, you have hung up the modem and cleared
the PPP connection to FIRN.
k. Quit Remote Access control panel by clicking the box in the upper
left corner.
![]()
Step 4:
Connecting to FIRN
![]()
