![]()

![]()
To prepare your Windows 2000 computer to connect to FIRN you will have to configure your Control Panel (step 1 below). This one-time process will take about 10 minutes. Once you have your computer properly configured, connecting to FIRN will be fast and easy (step 2 below).

Step
1: Configure your Control Panel
a. Double click on My Computer on the desktop.
b. When the My Computer window opens, double click the Control Panel icon.
c. When the Control Panel opens, double click Network and Dial-up Connections. (Note: You may be asked to enter local phone information before proceeding to step d.)
d. When the Network and Dial-up Connections window opens, double-click the Make New Connection icon.

Figure 40. Network Connection Wizzard
e. When the Make New Connection dialog box opens, click the Next button to begin.
f. Check the Dial-up to the Internet option and click Next.
g. Check I want to set up my Internet connection manually and click Next.
h. Check I connect through a phone line and a modem and click Next.
i. Enter the following information:
Area Code: the area code of your FIRN dial-up number
Telephone number: your local FIRN dial-up number
j. Click the Advanced button and the Advanced Connection Properties window will open.

Figure 41. Connection tab
k. Click the Connection tab and choose the following options:
Select the PPP (Point to Point Protocol) radio button in the Connection type area.
Uncheck the box next to Disable LCP Extensions, if necessary
Select the None option in the Logon procedure area.
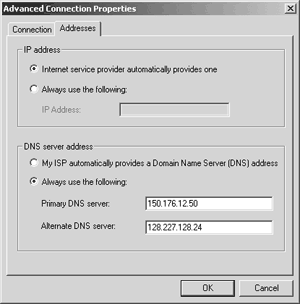
Figure 42. Addresses tab
l. Click on the Addresses tab and enter the following information:
Select the Always use the following: radio button in the DNS server address area
Primary DNS server: enter 150.176.12.50
Alternate DNS server: enter 128.227.128.24
m. Click OK, to close the Advanced Connection Properties dialog box.
n. Returning to the Make New Connection dialog box, click the Next button and enter the following information:
User name: your FIRN profile account number
Password: your FIRN password
o. Click the Next button and in the Connection name field, type FIRN.
p. Click the Next button and select the Yes radio button in the Do you want to set up an Internet mail account now? area if you want to send and receive email through your browser. The following information is for sending and receiving mail through a FIRN email account.
q. Click the Next button and in Display name: type your name.
r. Click the Next button and in E-mail address: type your FIRN email address. (e.g. williams_j@popmail.firn.edu)
s. Click the Next button and and follow the directions:
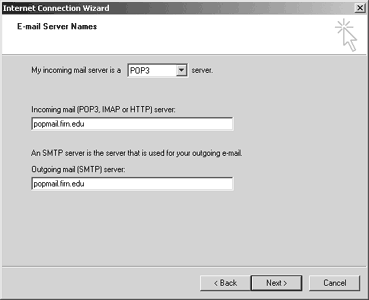
Click the down arrow on the My incoming mail server is a __ server drop-down list and choose POP3.
Incoming mail server: popmail.firn.edu
Outgoing mail server: popmail.firn.edu
Figure 43. E-mail Server Names
t. Click the Next button and enter the following information:
Account name: enter your FIRN POPmail username
(e.g. williams_j)
Password: enter your FIRN POPmail password
u. Click the Next button and then click the Finish button.

Step
2: Dialing in and getting connected to FIRN
a. Double-click My Computer
b. When My Computer window opens, double-click the Control Panel icon.
c. When Control Panel opens, double-click Network and Dial-Up Connection.
d. When Network and Dial-Up Connections opens, double-click on the FIRN icon.
e. When Connect FIRN dialog box opens, click on <Dial>.
f. A terminal window will display a welcome message. (Note: If there is no text in the window, you are probably connecting to an older 28.8 FIRN dial-up number. Please turn to page 70 for further instructions.)
Welcome to FIRN!
Enter username>02345678
Enter password>
g. At the Enter username prompt, enter your FIRN profile account number and press return.
h. At the Enter user password prompt, enter your password and press return. (Note: Your password will not display and the cursor will not move as you type your password.)
i. You will receive a message that your password authentication has succeeded. You are now connected to the FIRN network.
j. You may wish to minimize the Connected to... window.
k. Launch your browser, email application, or any other PPP applications you would like to use.
l. Enjoy your FIRN connection!
m. When you are finished, quit the PPP applications you launched.
n. Restore the Connected to... window and click Disconnect. as soon as Connect appears, you have been disconnected.
![]()


