![]()

- Step 1: Configuring the Network and Internet control panel
- Step 2: Dialing in and getting connected to FIRN
![]()
To prepare your Windows XP computer to connect to FIRN you will have to
configure your Control Panel (step 1 below). This one-time process will take
about 10 minutes. Once you have your computer properly configured, connecting
to FIRN will be fast and easy (step 2 below).
Note: When you access the Control Panel, be sure you are in the Category View,
not the Classic View.

Step
1: Configure the Network and Internet control panel
a. Click on Start and select Control Panel.
b. Click on Network and Internet Connections.
c. When the window opens, click on Set up or Change your Internet connection.
d. When the Internet Properties dialog box opens, select the Connections tab and click Add.
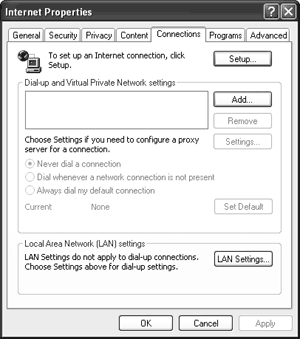
Figure 45. Connections tab
e. When the New Connection Wizard dialog box opens, select Dial-up to a private network.
f. Click Next and enter the local FIRN phone number.
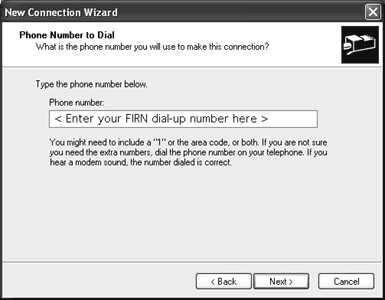
Figure 46. Phone Number to Dial
g. Click Next and name the connection FIRN.
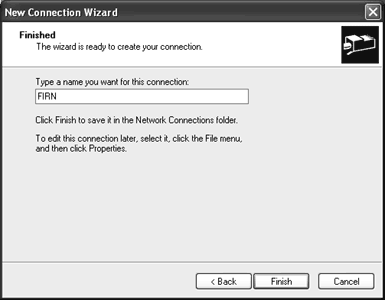
Figure 47. Type a name for this connection
h. Click Finish to close the New Connection Wizard dialog box.
i. The FIRN Settings dialog box will appear. Check Automatically detect settings.
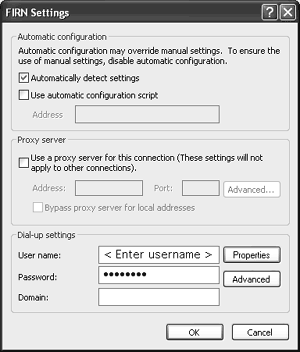
Figure 48. FIRN Settings
j. Under dial-up settings, enter your username (FIRN profile account number) and password.
k. Click on Properties.
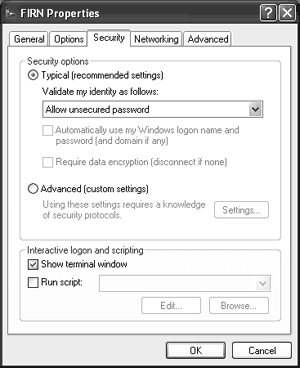
Figure 49. Security tab
l. When the FIRN Properties dialog box opens, click on the Security tab. Check Show terminal window at the bottom.
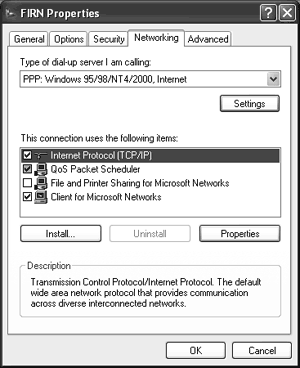
Figure 50. Networking tab
m. Select the Networking tab and click on Settings. The PPP Settings dialog box will appear. Check Enable Software Compression. Enable Software Compression should be the only box checked.
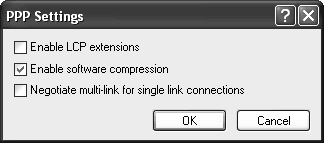
Figure 51. PPP Settings
n. Click OK to close the PPP Settings dialog box, returning to the FIRN Properties dialog box. Under This connection uses the following items: click TCP/IP and then click on Properties.
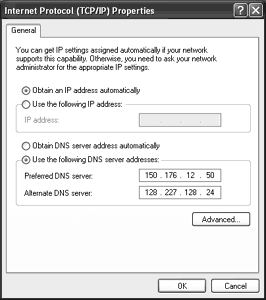
Figure 52. TCP/IP Properties
o. When the Internet Protocal (TCP/IP) Properties dialog box appears, click Use the following DNS server addresses and enter the following information:
Preferred DNS server: type 150.176.12.50
Alternate DNS server: type 128.227.128.24
p. Click OK to close the Internet Protocol (TCP/IP) Properties dialog box.
q. Click OK to close the FIRN Properties dialog box.
r. Click OK to close the FIRN settings dialog box.
s. Click OK to close the Internet Properties dialog box.
t. In the Control Panel (Category view), click on My Network Places.
u. When My Network Places opens, click on View Network Connections.
v. Right-click on the FIRN icon. Select Create Shortcut and
then Yes, to place a shortcut on the desktop.
a. Double-click on the FIRN shortcut icon on the desktop.
b. Your computer will dial into the FIRN network.
c. A terminal window will appear once a connection has been made.
d. A terminal window will display a welcome message. (Note: If there is no
text in the window, you are probably connecting to an older 28.8 FIRN dial-up
number. Please turn to page 70 for further instructions.)
![]()
Step
2: Dialing in and getting connected to FIRN
Welcome to FIRN!
Enter username>02345678
Enter password>
e. At the username prompt, type your FIRN profile account number and press the Enter key.
f. At the password prompt, type your FIRN password and press the Enter key. Note: The password will not appear on the screen and the cursor will not move as you type.
g. The terminal window will disappear. A Connecting to... box will appear. At this time, FIRN will verify your FIRN profile account number. After a brief period of time, the title box will change to Connected to ...
h. Minimize the Connected to ... box (or just leave it as is).
i. Launch your browser, email application, or any other PPP applications you would like to use.
j. Enjoy your FIRN connection!
k. When you are finished, quit the PPP applications you launched.
l. To disconnect, right-click on the dial-up icon near the time indicator on the right hand side of your task bar.
m. Click Disconnect.
![]()

