|
Rounding
to Nearest 10 or 100: Representational Level
More
Teaching Plans on this topic: Concrete, Abstract
|
|
Phase
1
Initial
Acquisition of Skill
|
Phase
2
Practice
Strategies
|
|
|
|
PHASE
1: Initial Acquisition of Skill
Teach Skill with Authentic Context
Description:
“Links” are made to the concrete experiences and the contexts used at the concrete level (See Build Meaningful Student Connections).
A rationale for learning to round by drawing is provided: making decisions about buying items that come in groups of ten without having the items themselves to manipulate (See Build Meaningful Student Connections).
Initial instruction for drawing is imbedded within the context of buying hamburgers for a cookout (See Explicit Teacher Modeling, “Round to the nearest ten by drawing pictures that represent base-ten materials.”
*The following description is an example of how you might implement this instructional strategy for rounding to the nearest ten by drawing pictures (without number line). A similar process can be used for the other learning objectives in this plan.
Build Meaningful Student Connections
Purpose: to assist students to build meaningful connections between what they know about rounding to the nearest ten and/or hundred using concrete materials to rounding by drawing pictures that represent concrete materials.
Learning Objective 1: Round to the nearest ten/hundred by drawing pictures that represent concrete materials.
Materials:
Teacher -
- A set of concrete objects (counting objects or base-ten materials) to review rounding to the nearest ten.
Visually display the learning objective, “round to the nearest ten by drawing pictures.”
Description:
1) L ink to students’ prior knowledge of rounding to the nearest ten or hundred using concrete materials.
For Example:
We’ve learned how to round to the nearest ten/hundred using books, counters, and base-ten materials. (Quickly demonstrate this process while prompting students to “help” you as you demonstrate. You might also consider inviting a student to demonstrate.)
2) I dentify the skill students will learn: “Round to the nearest ten/hundred by drawing pictures.”
For Example:
Today, we’re going to learn how to round to the nearest ten/hundred by drawing pictures instead of using concrete materials. (Display the written objective.) What are we going to learn today? (Point to the written statement and elicit the response, “round to the nearest ten/hundred by drawing pictures.”) That’s correct. We’re going to learn how to round to the nearest ten/hundred by drawing pictures. (Point to the written objective as you say this.)
3) P rovide rationale/meaning for rounding to the nearest ten/hundred by drawing pictures.
For Example:
There will be times when you will need to round to the nearest ten/hundred when you don’t have actual objects to use. For example, you may need to buy something like hamburgers for a party which come in packs of ten. You will need to know how many packs of ten hamburgers to buy so that you have enough hamburgers for everyone but not too many that you waste them. You also will not want to spend more money than you need to since buying too many packs of hamburgers will cost more than buying the right number of packs. Since you have to decide how many packs to buy before you actually have them, you’ll need to round to the nearest ten without using the actual hamburgers. We’ll use this example to learn how to round to the nearest ten by drawing pictures.
[ back to top ]
Provide Explicit Teacher Modeling
Purpose: to provide students a clear teacher model of rounding to the nearest “ten” or “hundred” by drawing pictures that represent concrete materials.
Learning Objective 1: Round to the nearest ten by drawing pictures that represent concrete materials. *Teach this skill directly after students have demonstrated mastery of rounding to the nearest ten using discrete concrete materials (without number lines).
Materials:
Teacher -
- A platform for displaying discrete counting objects and drawings that all students can see.
- Base-ten materials (ten sticks and one cubes).
- Markers/chalk for writing and drawing.
- Language cards that read either “round to nearest ten” or “round to nearest hundred.”
Description:
A. Break down the skill of rounding to the nearest ten by drawing pictures that represent concrete materials.
1) Identify and read the number to be rounded.
2) Draw a two-digit number - e.g. “23” –two long vertical lines (“tall skinny lines”) are drawn for “twenty,” and three horizontal lines (short “fat” or “side-by-side” lines) are drawn for “three ones.”
3) Identify the place value to be rounded to (e.g. “nearest ten”).
4) Review what “rounding” means.
5) Identify and draw representations for the “lower” and “higher” tens.
6) Compare drawings of “lower” and “higher” tens by counting on to “higher” ten by ones and counting back to lower ten by ones.
7) Decide which ten the given number should be rounded to.
Learning Objective 2: Round to the nearest hundred by drawing pictures that represent base-ten materials. *Teach this skill directly after students have demonstrated mastery of rounding to the nearest ten or hundred using base-ten concrete materials (without number lines).
Materials:
Teacher -
- A platform for displaying base-ten materials and drawings that all students can see.
- Base-ten materials (hundred flats, ten sticks, one cubes).
- Markers/chalk for writing and drawing.
- Language card that reads “round to nearest hundred.”
Description:
A. Break down the skill of rounding to the nearest hundred by drawing pictures that represent base-ten materials.
1) Read the number given.
2) Draw the number (e.g. “123” – a square is drawn for “one-hundred,” two vertical lines are drawn for “two tens,” and three horizontal line is drawn for “three ones.”)
3) Identify the place value to be rounded to.
4) Review what “rounding” means.
5) Identify and draw representations for the “lower” and “higher” tens or hundreds.
6) Compare drawings of “lower” and “higher” tens or hundreds by counting on to “higher” ten or hundred and counting back to lower ten or hundred.
7) Decide which ten or hundred number should be rounded to.
Learning Objective 3: Round to the nearest ten and hundred by drawing pictures using a number line. *Teach this skill only after students have demonstrated mastery of rounding using concrete materials and a number line.
Materials:
Teacher -
- Number lines representing hundreds (e.g. “100” to “200;” “400” to “500;” “800 to “900”). Number lines should represent ten multiples. Color-coding the “tens” digit in the ten multiples to the color of the ten sticks can be a helpful cue for students with visual processing problems or attention difficulties. *The number lines should be measured so they are the same length as ten “ten sticks laid side-to-side. Each ten multiple should be written so that it occurs at the beginning/end of the ten sticks.
For Example:

- Base-ten materials (ten sticks and one cubes).
- A visual platform from which to display concrete objects and draw so all students can clearly see them (*there should be enough room to line concrete objects side-by-side in the form of a line in multiples of ten.).
- A language card with the word “rounding” written.
A. Break down the skill of rounding to the nearest ten and hundred by drawing pictures using a number line.
1) Review the number line.
2) Write number to be rounded above number line in the position the number would occur on number line.
3) Count out set of ten sticks and one cubes representing number and then draw pictures to replace the concrete objects.
For Example:
4) Remove concrete materials.
5) Identify whether you are rounding to the nearest ten or to the nearest hundred.
6) “Count on” to the greater “ten” or “hundred” by drawing.
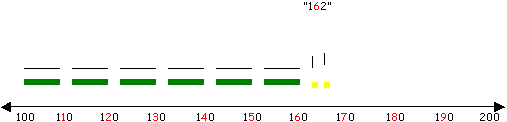
Example for rounding to “tens:”

Example for rounding to “hundreds:”

7) Say how many ones or tens were “counted on;” write number above the set of counted on drawings.
8) “Count back to the lesser “ten” or “hundred” by drawing.
Example for rounding to “tens:”
*Count back using "ones" already drawn or by drawing "ones" already above existing drawings.
Example for rounding to “hundreds:”
*Count back using “tens” already drawn or by drawing “tens” above existing drawings.
9) Say how many ones or tens were “counted back;” write number above the set of “counted back” drawings.
10) Compare the values of the “count on” and “count back” groups of drawings.
11) Determine which group of drawings represents less.
12) Say and then circle which ten or hundred the original group of objects is closer to and why.
13) Review the term “rounding.”
[ back to top ]
Scaffold Instruction
Purpose: to provide students the opportunity to build their initial understanding of how to round to the nearest ten/hundred by drawing with or without the use of a number line, and to provide you the opportunity to evaluate your students’ level of understanding after you have initially modeled this skill.
Materials:
*Dependent on the skill you are Scaffolding Instruction for (See the materials listed for the specific skill you want to scaffold under Explicit Teacher Modeling).
Description:
*Scaffolding at the representational/drawing level of instruction should occur using the same process as scaffolding instruction at the concrete level of instruction (See the description of Scaffolding Instruction for, “rounding to the nearest hundred using base ten materials and a number line,” in the Concrete Level Instructional Plan.). The steps used during Explicit Teacher Modeling should be used as structure for scaffolding your instruction.
A. Scaffold instruction using a high level of teacher direction/support (*Dependent on the needs of your students, you may want to continue to associate concrete materials with drawings at this level as described under Explicit Teacher Modeling.). .). *Move to the next phase of scaffolding only when students demonstrate understanding and ability to respond accurately to your prompts.
B. Scaffold instruction using a medium level of teacher direction/support (*If you associated concrete materials with drawings while scaffolding using a high level of teacher direction/support, then do not include concrete materials during this phase of scaffolding). *Move to the next phase of scaffolding only when students demonstrate understanding and ability to respond accurately to your prompts.
C. Scaffold instruction using a low level of teacher direction/support (*Students should actually draw as you prompt during this phase of Scaffolding Instruction.). *Move students to independent practice of the skill only after they demonstrate the ability to perform the skill with limited prompting from you.
[ back to top ]
Videos
Learning Objective 2: view Clip 1, Clip 2, Clip 3
Round to the nearest ten by drawing pictures that represent concrete materials.
*Teach this skill directly after students have demonstrated mastery of rounding to the nearest ten using discrete concrete materials (without number lines).
[ back to top ]
|