| FCIT Home > A Teacher's Guide to School Web Sites > Chapter 5: Develop |

Once you have the design for your site established, you are ready to develop the content. This takes a team effort. Good communication and clear timelines will facilitate collaboration among those working on the site’s text, graphics and other media, and programming.
- Writing for the Web
- Preparing Your Graphics
- Sources for Your Graphics
- Scanning for the Web
- Editing Your Graphics
- Saving Your Graphics
- Tips
- Preparing Other Media
- Audio
- Video
- Virtual Reality
- Begin the Programming
- HTML Basics
- HTML Tags
- WYSIWYG Editors
- Site Management
- Linking
Writing for the Web
When you are writing for the Web, keep in mind that most users do not read text word-for-word, but scan it quickly to locate the information they are looking for or a link to that information. Organize your information on the page to help visitors efficiently find whatever information they are seeking.
- Organization. Once you have the information for each of your
web pages, you must plan how to present it. Since most people begin scanning
or reading at the top of a page, put your summary at the top. Then allow
the reader to access the details through hyperlinks or buttons to other
sections on the page or to a different page. This type of writing is called
inverted pyramid, because it presents the summary followed by more specific
details rather than building toward a conclusion by laying a foundation
of many facts and details.
For instance, you may be writing about the transportation system offered by the school. Decide what critical information needs to go in an up-front summary. Under the summary you might place a submenu with hyperlinks to more detailed information that parents might need, such as finding their drop off point, changing routes, or bus rules for students. The more detailed information might be located further down the same page or on a different page. You can program a link (anchor) in HTML that will take the viewer to a specific section within the same page or to any other page within your site.
Example of summary &
linked menu technique:Bus transportation is provided for all students enrolled in the district, whether the student goes to a local or magnet school. - Bus rules
- Bus routes/schedules
- Behavior policy
-
Conciseness. Being concise in writing for the screen is a virtue!
Be considerate of your viewers. Present the information in a way that doesn’t
require them to read long sentences. Divide large blocks of information
into smaller ones where natural. If you have a number of items to discuss,
consider using a list instead of a sentence. Using lists allows people to
scan the information quickly and sort through it for what they are looking
for, without reading extraneous words. Within the list, use the interactivity
feature of HTML to augment the conciseness. Link items so that when viewers
decide they want more information, they can click on the hypertext or button
and go directly to more details.
Wordy Example: Our electives include dance, drama, musical theater, costume design, and 3-D art. Students can pick two electives each semester. Scroll down this page for more information about each elective. Concise Example: Electives (Choose 2 each semester): - dance
- drama
- musical theater
- costume design
- 3-D art
- Reading level. Use the clearest and simplest language appropriate for the content. Site accessibility will be broadened for users who may have limited English proficiency.
Preparing Your Graphics
Well-designed graphics will help create a distinctive look and feel for your site, make your pages more inviting to read, convey information efficiently, and assist in navigation. On a well-designed site, the graphics do not just "decorate" the text content. Rather, the visuals become an integral part of the content of your site. Include someone with visual design experience on your team as you design the site. An effective site will have an inviting visual unity. No one wants to try to use a site that is a clutter of superfluous doodads dancing around the content they are trying to find.
Sources for your graphics. There are many possible sources for graphics to include on your site. They may be copied or adapted from a clip art collection. Student artwork, photos, and other flat sources may be scanned. Inexpensive digital cameras create digital files ready to edit and post on the Web. And, of course, you or your students may use computer graphics programs to create entirely original images for your site.- Clip Art. The most convenient source of clip art is the Web itself. Many sites offer graphics suitable for a school site. A search for "clip art" will yield numerous sites or you may use a directory such as Yahoo for a list of sites chosen by the directory’s editor. When you find an item you wish to use, just click and drag it onto your desktop to create a copy on your computer. Alternatively, you can right click (Windows) or click and hold (Macintosh) and then choose "save file" from the pop-up menu.
- Digital cameras. A digital camera can be a valuable tool for obtaining photos to place on your web site. Most cameras can output web-ready JPEG format photos, so you could actually post them to your site without any additional preparation. In reality, however, most photos from a digital camera will need a little doctoring. For instance, you might want to use a graphics program to lighten a dark photo or remove the greenish cast that often results from shooting under fluorescent lighting. Carefully compose your photos. Zoom in on just the details you want. (Caution: be sure to use the "optical zoom" feature, not the "digital zoom," since digital zoom will produce lower quality photos.) Your photos will usually have more impact (and actually compress to a smaller file size!) if you try to avoid cluttered backgrounds as you shoot. Perhaps your school’s art teacher would be willing to have a short discussion about composition with your students before they start using the camera.
- Scanners. A scanner can be used to produce digital images of existing photos, student artwork, or other 2-D items. You can even make scans of many 3-D objects such as pencils, erasers, or candy. Just be careful not to use wet objects or anything that might scratch the scanner bed. Your scanner probably came with detailed directions or you may wish to refer to the basic scanning steps on the following page.
- Place the item to be scanned squarely on the clean scanner bed.
- Launch your scanning software and select preview.
- Use the crop or selection tool to indicate the area that you want in your final scan.
- The resolution for images to be put on the Web should be 72 dpi.
- Options:
- Brightness: You may wish to lighten or darken the scan based on the preview image.
- Contrast: Some images might need a slight contrast adjustment.
- Descreen: If you original is from a printed source such as a newspaper, select descreen to avoid unwanted patterns in your final scan.
- Click the scan button and save the file when prompted.
- Graphics from scratch. In many cases you will want to create your own unique graphics for your site. There are many free and inexpensive graphic-editing programs you can use. For beginning graphics work you will not need a high-end, professional program such as Adobe Photoshop. However, a mid-range program such as Adobe Photoshop Elements or Microfrontier Color It will be worth the modest investment if you are going to be making or editing a number of graphics. While making your own graphics will take more time than borrowing them from clip art collections, you will be able to create a distinctive site with a more consistent look and feel than is generally possible using borrowed art.
Many CD-ROM collections of clip art are also available. Some collections contain hundreds of thousands of items. If a clip art collection is specifically designed for the Web, the images will be in a web-ready format such as GIF or JPEG. GIF and JPEG formats are ready to put directly on your site. Other clip art collections might have the images saved in a "vector" format that is not web-ready. If you use this type of clip art, you will need to convert the graphics to either a GIF or JPEG format before putting them on your site. This process is called "rasterization" and can be easily done in a graphics program such as Adobe Illustrator or Macromedia Freehand.
Even though using clip art from a vector collection involves the additional step of rasterization, vector art has many advantages over graphics already in the GIF or JPEG format. You can easily scale vector art to any size with no loss of quality. (Resizing GIF or JPEG art may leave jaggy edges on your graphic.) You can also edit a vector graphic easily. For example, you might want a graphic of a red crayon for your site, but can only find a piece of vector clip art that includes a blue crayon and a pencil overlapping it. You can use your graphics program to delete the pencil and then change the color of the crayon to red. A good vector clip art collection can give you lots of parts and pieces of images that you can combine, resize, and recolor however you would like.
Regardless of the source of your clip art, be sure to read the license carefully. A "free" clip art web site might require you to add a link on your site back to their site or a CD-ROM collection of clip art might limit the number of items you can use in a single project. You should always be certain that you have clear, written permission to use any graphic that you do not make yourself.
Scanning for the Web
- Crop. As mentioned above, cropping to the most important part of the photo will increase impact and make them easier to understand. Generally you will either use the cropping tool and then hit return once you have it placed as you would like, or use the rectangular selection toll and choose "crop to selection" from a drop-down menu. Cropping unnecessary background is always a good first step when editing.
- Resize. Usually the image will not be exactly the size you want
for the page. Just dropping a handful of images onto a page without considering
the relationship of size among them will usually result in visual clutter.
You might, for instance want to make the most important photo the largest
to create a dominant element to help hold the page together. Or perhaps
you will want to make a number of smaller photos all the same height so
they visually hold together as a group instead of just looking random.
(Note that it is possible to resize a graphic in the code by setting the height and width tags to another value, but that generally is not recommended. A large image resized down in the HTML code will still be the same file size and take much longer to download than if you had resized it in a graphics editor. A small image resized larger in the code will look very blocky and unattractive.)
- Brightness and contrast. Often a photo can be improved with a small adjustment in either the brightness and/or contrast control. As you adjust the brightness of images, keep in mind that most Windows machines display images significantly darker than they will appear on a Macintosh computer. Therefore it is a good idea to check what your graphics look like on both platforms. In general, if you are creating graphics on a Macintosh computer you should make them a little lighter so they will not be too dark for Windows users. Conversely, if you are creating graphics on a Windows computer, your graphics should be just a bit darker so that they will not look washed out to Macintosh users.
- Sharpening. Many photos will look better with just a slight amount of sharpening, especially if you have resized them. Just be careful not to overdo it. Over-sharpened photos are unattractive and do not compress well if you are using the JPEG format.
- GIF. The GIF (Graphic Interchange Format) is best for line art, graphics with limited colors, or text. It is limited to a maximum of 256 colors, but has the advantage of being "lossless," which means that no image quality is lost when this format is used. The GIF format also allows for animation or transparency in the graphic. The simplicity and flexibility of the GIF format makes it the most commonly used graphic format on the Web. The ability of GIF to include transparency gives you additional flexibility as you design pages. All graphic files are actually rectangular, but sometimes you might want a graphic to be a shape other than rectangular. In these cases simply design the shaped graphic the way you want it and then surround it with a solid background color that is different from the colors used in the graphic itself. When you save the file as a GIF, you will then be given the opportunity to identify the one color you selected for the background to be the transparent color. Although GIF animations are often annoying distractions on a web page, they may be used effectively in some situations. Perhaps you will want to call attention to important information or demonstrate a process with your animation. GIF animation works on the same principle as a flipbook animation—there are a number of separate pictures that change rapidly, thus creating the illusion of motion. To make one, you will need to make a number of individual pictures and then assemble them into one animation with a piece of software such as Yves Piguet's free GIFBuilder. You may wish to create an animation that only plays once or twice instead of running continuously. To get the maximum compression with the GIF format, try to design your graphics with a limited number of colors. Often very effective graphics can be made with only 8 or 16 colors. Graphics made with areas of flat color will also compress much better than graphics with textures or fine detail.
- JPEG. The JPEG (Joint Photographers Expert Group) file format is best for photographs and other graphics with continuous tones or gradients. Graphics in this format can utilize millions of colors and can be compressed as much as you would like. The drawback is that JPEG is a "lossy" format, which means that as you compress the graphic the image quality deteriorates in proportion to the amount of compression. Since JPEG is a "lossy" format, you should always save an original of your image in a different format before creating your JPEG file just in case you ever want to go back to the original image. It is never advisable to save an image in the JPEG format more than once since you will be multiplying the loss of quality. Always go back to the original file saved in a non-JPEG format to make changes. When saving files in the JPEG format you may use either the .jpeg or the .jpg extension.
- Recycle images. If you are going to use the same image on more than one page, be sure to always refer to the same file rather than putting multiple copies of the file at various locations on your site. This will make the pages load faster since the image will already be in a visitor’s browser cache after it is loaded for the first time.
- Turn off “thumbnails” and “preview images” in the preferences of your graphic editor program. Thumbnails and preview images can easily add 20k of unnecessary file size to each graphic.
- A graphic may be used as a repeated background image on a web page. The HTML to include a background is: <body background="myfile.gif">
- Keep a good contrast between text and background, avoiding strong textures in the background.
- If you have many images to display (such as a classroom set of paintings), you may want to create a gallery of small thumbnail images that link to the larger images. This way, visitors can preview the smaller images and then select the ones they wish to view in the larger format.
- Be sure to include the <alt> tag to provide a description of your graphic for visitors with visual impairments. Example: <img src="school.jpg" height="40" width="60" alt="Photograph of Sunny Skies Elementary School">
- When choosing colors for text, backgrounds, and any areas of flat color try to pick one of the 216 Web-safe colors. This special set of colors will display well on older computers that do not have the ability to display the millions of colors available on current computers. The Web-safe palette can be accessed in most graphic editing programs.
Preparing Other Media
- Audio. Adding sound to your web site is an
easy way to enhance your viewers experience at your site. In order to be
accessible on the Web, a sound file must be changed from analog to digital.
Two popular sound digital file formats are .wav and .au. Be sure to give
your visitors the option of turning off any sound or music file. Better
yet, do not have the sound file play until the visitor clicks on a play
button.
If you want to prepare a narration, record it in the highest available quality for the master. Then using a sound editor, try different compression rates in order to determine which rate you will be happy with. Try the sound files over the Web using a modem. It is important to optimize your sound files for delivery over the Web, by decreasing the file size as much as possible without compromising on quality. - Video. Short videos can enhance a school web site. With the availability of video cameras and user-friendly video editing software such as iMovie, video production is now within the reach of most schools. While we usually think of a movie as motion video, movies can also incorporate still images, artwork, text, and audio. To conserve bandwidth and increase download times, you will probably want to limit the size of your videos to 320 x 240 pixels. Try to tape in locations with uncluttered backgrounds and experiment with different compression settings to make the file sizes as small as possible. As mentioned with audio files above, it is better to give visitors the option of requesting the video file, rather than forcing it on them when they come to your homepage. Visitors to your site will feel frustrated if they get a message to download a missing plug-in before they even see the first page of your site. Use the <embed> tag to add a movie to your school web site: <embed src="school.mov" width="320" height="256" controller="true">. By the way, the height of the movie in this example is 256 instead of 240 to allow 16 pixels for the height of the control bar that will be included at the bottom of the movie.
- Virtual Reality. VR tours of schools are becoming more common and, thanks to digital cameras, have become fairly easy to make. Your school may already have a copy of VR production software such as QuickTime Virtual Reality Authoring Studio or VR Worx, which often are included with education software bundles. You will need to mount your digital camera on a tripod to take a series of pictures showing a panorama view of your school. These images are then assembled using your VR production software and then turned into a QuickTime VR movie. Several VRs can ever be linked together to create a whole virtual tour of your school! VRs are added to your site using the same code as for movies.
- PDF. PDF (Portable Document Format) is useful
whenever you have a document that you need to deliver over the Web with
very specific formatting. For example, you may wish to convert a permission
or scheduling form into a PDF, which can then be printed out, signed, and
returned to the school. PDF forms can even be completed and returned electronically.
Maintaining a library of commonly requested forms on your school site will
save your school the cost of printing, handling, and mailing countless forms
each year.
Visitors must have the free Adobe Acrobat Reader installed on their computer to view a PDF. You may want to include a link from your site to the Adobe site so that visitors can download this plug-in:
<a href="http://www.adobe.com/products/acrobat/readstep2.html">Get the free Adobe Acrobat Reader here.</a>
Begin The Programming
The basic language of the Internet is HyperText Markup Language (HTML). Unlike a true programming language, HTML doesn’t work like an operating system and run your computer. Instead, it allows the author to "mark up" the contents of a document in order to change its visual appearance in a web browser. A browser takes the content as written in the HTML file and represents it on the screen of your computer.HTML Basics. Although there are programs that automate the writing of HTML code, mastering even a few basics will be of great value. Troubleshooting a page that won’t load correctly is much easier when you know how each part of the code is supposed to work. One trick to help you with this endeavor is the fact that web pages do not hide the source code that goes into creating them. All you have to do is choose “view source” from the browser’s menu, and you can see the code that makes up the page you are viewing. Of course, you should not steal code from other sites. The “view source” method should be used to learn how to write your own HTML code.
To get started then, we already know that when we view a web page, we see
content “marked up” to be displayed in a browser. HTML uses
tags and attributes to bring about this process. To think of this in a different
way, a tag commands the browser to modify the content in a particular way.
For example, to make text bold, the HTML would look like this: <b>This
text is bold.</b>. The best way to think about how a tag works is
to think of a light switch. Once you turn the light on with the switch,
the only way to get it off is to turn the switch off. That is how the tag
is working. All of the text after <b> will be bold until it is turned
off through the use of </b>. There are some tags that also allow for
additional modifications of how content displays on the screen. Those additional
modifications are known as attributes. For example, if you want to use a
different font than the browser default, you would use the font tag with
an attribute specifying the particular font you wish to use: <font face="arial">Text
formatted as Arial.</font>. The attribute is the additional content,
face="arial". You don’t need to turn the attribute off because
this will occur as part of turning the tag off.
Make sure you properly nest your tags. This means keeping the proper sequencing
of tags as you open and close them within your file. For example, if you
want to make some content bold and italic on a page, your code would look
as follows: This sentence contains a <b><i>bold italicized</i></b>
example.
One thing to always keep in mind when using HTML is that unless you specify
something, the browser will use its default setting. That is why most web
pages appear using a Times font. Browsers will also use the default font
if you specify a font that is not available on that computer. What does
this mean? One thing you should always do is check your pages on a few other
computers to see how they look. Another thing to do is realize that you
cannot control everything about the page you are attempting to create. Your
energies are better spent focusing on creating good, usable content instead
of attempting to integrate every bell and whistle that you can think of.
To create the simple web page shown below, you will need to type the
HTML code as indicated. A basic text editor is all that is needed to
create this page. Avoid smarter programs like Microsoft
Word since they will continually try to correct the text as you type
it. Two appropriate programs are, Text Edit on
the Macintosh or Notepad on the PC.
You may notice that HTML code uses many quotation marks. It is very important
that you use straight quotes "" in your code rather than the curly
typographer’s or so-called smart quotes “”. Make sure
you turn off “smart quotes” in your word processor’s preference
settings or your code will not work properly.
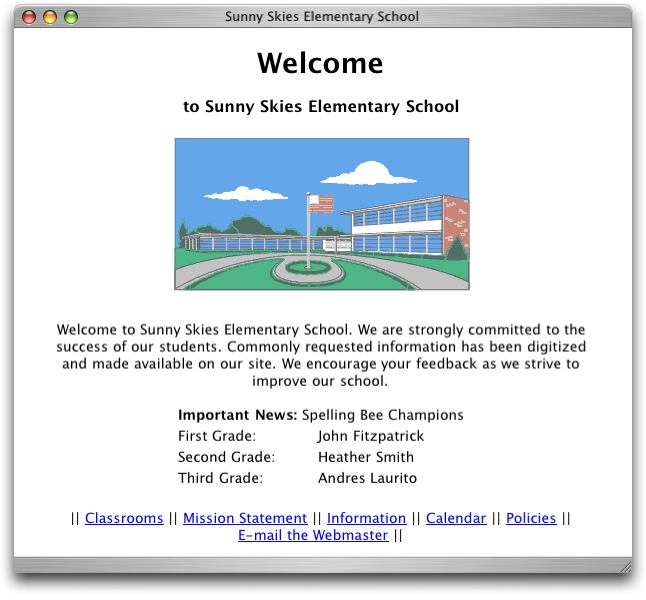
The HTML below was used to create the web page above.
<html>
<head>
<title>Sunny Skies Elementary School</title>
</head>
<body bgcolor="#ffffff">
<center>
<h1>Welcome</h1>
<h3>to Sunny Skies Elementary School</h3>
<img src="school.gif" width="300" height="158"
border="0" alt="Picture of Sunny Skies Elementary">
<p>Welcome to Sunny Skies Elementary School. We are strongly committed to the success of our students. Commonly requested information has been digitized and made available on our site. We encourage your feedback as we strive to improve our school.</p>
<table border="0">
<tr><td colspan="2"><b>Important News:</b> Spelling Bee Champions</td></tr>
<tr><td>First Grade:</td><td>John Fitzpatrick</td></tr>
<tr><td>Second Grade:</td><td>Heather Smith</td></tr>
<tr><td>Third Grade:</td><td>Andres Laurito</td></tr>
</table>
<p> </p>
|| <a href="class.htm">Classrooms</a>
|| <a href="mission.htm">Mission Statement</a>
|| <a href="info.htm">Information</a>
|| <a href="calendar.htm">Calendar</a>
|| <a href="policy.htm">Policies</a>
|| <a href="mailto:webmaster@sunnyskies.org">E-mail the Webmaster</a> ||
</center>
</body>
</html>
After typing this page, it needs to be saved. Name all of your web pages using the 8.3 standard. This means you can use anywhere from 1 to 8 characters for the name of the file before the period. Do not use spaces or most other characters. Limit yourself to a-z and 0-9. If you want to separate the letters, use a dash or an underscore. While not absolutely necessary in many cases, keeping your file names lowercase may help avoid unnecessary difficulty later. The three characters after the period indicate to the computer what type of file this is. Since we are creating web pages, you will use .htm as the extension.
HTML Tags. Now that we have created this basic web page, let’s take a look at some of the HTML tags that can be used to format a web page.
- HTML Tag <html> </html> This tells the browser that the document is in HTML format.
- Head Tag <head> </head> This section contains information about your site but is not visible in a browser window. This information is helpful when you want to use search engines to promote your site. The one tag you should always include is the <title> tag.
- Title Tag <title> </title> This will display the title of your site in the top bar of the browser. You want to include this or your page will appear as an untitled document in the browser and in lists of bookmarks.
- Body tag <body> </body> The visible content of the page must be placed between the <body> and </body> tags. In our example in above, an attribute of <bgcolor="#ffffff"> was added to this tag to ensure that the page would have a white background.
- Paragraph tag <p> </p> This tag tells the browser to skip a line and begin a new paragraph. This tag often appears without a corresponding closing tag. Although browsers will still represent your paragraphs correctly, including that closing tag will make possible transitions to future technologies easier.
- Line break tag <br> Content following the <br> tag will appear on the next line.
- Heading tag <head> </head> This tag indicates to the browser that you are using a headline. The range of values from <h1> to <h6> (largest to smallest) sets the size of the headline. Good practice indicates that you should use an <h1> tag only once on a web page, just as a newspaper uses the largest headline size only once on the front page. Text formatted with this tag will also be bold. However, do not use this tag if you simply want bold text. Use the <b> tag instead.
- Bold tag <b> </b> This will make the content between the tags appear bold.
- Italic tag <i> </i> This italicizes the content between the tags.
- Image tag <img> This tag allows you to place graphics onto a web page. As seen in Figure 10, you will have to indicate the location of the graphic you want to use. This is done though the attribute <src="filename">. You will also want to indicate the height and width of the graphic. This will allow the browser to continue loading other content on your page as the graphic is downloaded. Finally, use the <alt> attribute to describe the graphic. This will be helpful for those surfing with graphics turned off or for persons with visual disabilities using a text reader.
- Anchor tag <a> </a> The anchor tag creates links to additional content elsewhere on the Web or elsewhere in your site.
- Font tag <font> </font> This tag will allow you to change the size, color, and font of the text on your page. You can modify any of these properties by altering these attributes. If you wish to modify the size of the font to be one size larger than normal, you would use <font size="+1">. While it is possible to set an absolute size, it is better to set a relative size instead such as "-1" or "+2". This way you can make your page increasable for someone with a visual problem to read your content.
- Tables. Tables allows for better organization of larger amounts of information into a more cohesive structure. Tables require three different tags in order to display properly.
- Table tag <table> </table> The <table> and </table> tags go at the beginning and very end of the table.
- Table row tag <tr> </tr> The table row contains all of the cells that make up a particular row. Each row needs to contain an equal number of cells unless the <colspan> attribute is used. The <tr> and </tr> tags go at the beginning and end of the each row.
- Table data tag <td> </td> These tags make up the cells of the table in which individual content is placed. As seen in the example above, the attribute <colspan> can be used to stretch one cell out over the space of two cells. The <td> and </td> tags go at the beginning and end of each cell.
WYSIWYG Editors. As mentioned earlier, there are other ways to create a web site besides hand coding the pages. Many people prefer to create web pages using a WYSIWYG, or graphical based, program. Examples include Macromedia Dreamweaver and Adobe GoLive. WYSIWYG stands for What You See Is What You Get, but this is not always the case. Each of these programs allows the user to create HTML pages without knowing the underlying HTML code. Pages are created using an interface that closely resembles many popular word processing programs. Content is entered and the program does the behind-the-scenes work. Such programs allow users to create web pages without a knowledge of HTML. Other convenient aspects of advanced WYSIWYG programs are the built-in tools for site management and template creation.
In terms of a consistent look and feel for the site, using templates can greatly
reduce development time and allow for additional outsourcing of work. Templates
allow you to create the look and feel of a page and then define the areas that
can be modified by another person. For example, you could create a template
for a faculty information page. The template is sent to every teacher who then
opens the page using the same program you used to create it. Instead of having
the ability to modify the entire page, they are limited to the areas you defined
as editable. They enter their information and send the page back to you. This
type of workflow can be a significant boon when creating your site.
Site Management
Careful planning and management are extremely important. An important first step is to decide how you might best group common elements into folders. Your site map will be a useful tool. You might consider first grouping like elements together, such as graphics, movies, and sounds. Each of these groups would then be placed in a folder. Once you have created a folder for each type of media, you might then want to create a folder for each content area, such as "clubs," You would then group all of your HTML pages that relate to clubs into this folder. The clubs folder might be located within another folder called "students." Once you have decided on your folder structure, you then need to come up with a naming convention for individual folders and files.The names of the files and folders should follow a logical plan. Make the file names short but descriptive, without any spaces. For example "bussched.htm" would be better than "b2 list.htm." Your homepage will need a special file name, which only your web server administrator can tell you. Usually the homepage must be named either "default.htm" or "index.htm." Some web servers also require that you be consistent with upper and lowercase letters in your file names. For example if you name your file "Bussched.htm" and then add a link to your homepage and refer to the file as "bussched.htm" your server might give you an error. Always be consistent!
 Linking. You must make sure that all links within your HTML pages
reflect the appropriate folder structure. If you have decided to place all
of you image files into a folder called “graphics” any time
you place a graphic into your HTML page you must include that folder (e.g.
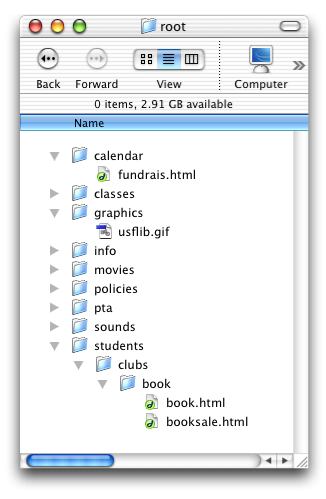
“graphics\myphoto.jpg”). The figure on the right illustrates
the folder structure for Sunny Skies Elementary’s web site. Let’s
look at the example of the web page for the Book Club. Their materials will
be placed in a folder called “book” within the “clubs”
folder. This “clubs” folder is within the “students”
folder. The Book Club might name their welcome page “book.htm.”
From this welcome page they might have links to various other pages such
as an information page about their upcoming book sale. If this page is named
“booksale.htm,” the proper format for linking to this page from
the Book Club's welcome page would be: <a href="booksale.htm">.
Because both the “book.htm” and “booksale.htm” files
are in the same folder, it is not necessary to include any other information.
Linking. You must make sure that all links within your HTML pages
reflect the appropriate folder structure. If you have decided to place all
of you image files into a folder called “graphics” any time
you place a graphic into your HTML page you must include that folder (e.g.
“graphics\myphoto.jpg”). The figure on the right illustrates
the folder structure for Sunny Skies Elementary’s web site. Let’s
look at the example of the web page for the Book Club. Their materials will
be placed in a folder called “book” within the “clubs”
folder. This “clubs” folder is within the “students”
folder. The Book Club might name their welcome page “book.htm.”
From this welcome page they might have links to various other pages such
as an information page about their upcoming book sale. If this page is named
“booksale.htm,” the proper format for linking to this page from
the Book Club's welcome page would be: <a href="booksale.htm">.
Because both the “book.htm” and “booksale.htm” files
are in the same folder, it is not necessary to include any other information.
The Book Club welcome page might include a photo called “usflib.jpg” from a recent field trip. When this photo is placed on the page, the programmer must make sure that the link includes the proper folder structure. Remember that Sunny Skies has decided to place all of their images into a folder called “graphics.” The Book Club's photo link should look like this: <img src="../../graphics/usflib.jpg">. This tells the browser to go up two folder levels, look in the folder called “graphics,” and find the file called “usflib.jpg” for display on the page. If you had to move up only one folder level there would have only been one set of “../” in the code. Moving up three levels would require “../../../” in the code.
If the person editing the fundraisers page (“fundrais.htm” located in the “calendar” folder on the main school site) wants to include a link to information on the Book Club’s book sale, the link would be: <a href="../students/clubs/book/booksale.htm">.

Next
©2004 Florida Center for Instructional Technology
College of Education, University of South Florida
4202 E. Fowler Ave., EDU162
Tampa, Florida 33620