Project Ovenbird – Home
Article by Jim McGinty, Learning Gate Community School

The Project
My pilot project (“Project Ovenbird”) was conceived as a way to use the ovenbird as a catalyst for my students’ environmental learning. The original idea was to involve all our 3rd, 4th and 5th grade students. The first adjustment that needed to be made was that there was no way I was going to be able to involve all 12 classes of 3rd, 4th and 5th grades (4 classes per grade). Since I am one of the Specials teachers, I also teach all the kindergarten through 5th grade classes. I was not going to be able to suspend all the lessons for the other classes in order to implement this special project. I decided to treat it as a pilot project and target one class in each of the three grade levels.
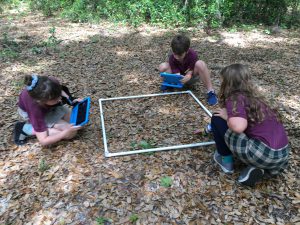
* Students documenting forest floor measurements using a quadrat
Since each grade level focused on a different aspect of the ovenbird’s life (3rd grade — how to catch them & habitat; 4th grade — forest habitat; 5th grade — diet), I planned different lessons for each grade. (See Lesson Plan Map.) Of the eight class sessions dedicated to this project, one was dedicated to training the students on using iMovie and the last two were dedicated to editing and completing their videos.
One exciting development was how creative the students were when it came to producing their videos. Also, students who have rarely spoken during the traditional classroom lessons really opened up in a way that I had not expected. Using the technology gave them a safe channel to express themselves creatively.
Project Impacts
Through the student survey I received some valuable, anonymous feedback on the project. Overall, most of the students really enjoyed the project. They mostly suggested that they needed more time to work on their videos. A few students had trouble working with their partners, which were assigned by their classroom teacher. The pre-/post-tests demonstrated an average of 25% or more gains in learning about ovenbirds and the challenges facing them at their breeding and wintering grounds, as well as during migration.
By the end of the project, most of the students were much more proficient in using the iPads for still photography and for shooting and editing movies. I was pleasantly surprised with how the use of the technology increased the engagement of students who are not typically very excited about going outside to study nature. At the beginning of the project, I was concerned that the technology would be more of a distraction or a barrier to the students’ ability to focus on the various nature topics being studied. Instead, for several students the technology was a tool that helped them to better focus on the learning objectives.
Technological Challenges
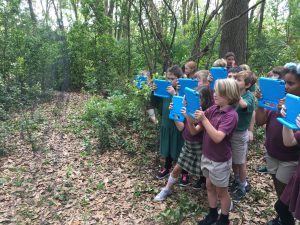
* Students filming use of a mist net to capture ovenbirds
As I expected, the students were very excited to be able to use the iPads. The training with the staff from the University of South Florida (USF) went very well. It was focused on teaching the students (organized in two-person teams) how to use iMovie software to organize photos and videos into a final short movie. Some students already had experience with iMovie, which helped with the transference of the skills to other students.
One challenge we faced was having one group from each grade level sharing iPads. That meant that all the photos and video footage that were shot by each group were accessible to the other two groups. I had to ask the students to NOT delete any photos or videos that were not their own.
With Air Play active, all 14 iPads also had access to all the photos and videos shot by ALL the groups. It made it very confusing when it came time for the groups to work on their final videos. I worked closely with our IT staff person, but he said that it would be impossible for us to create a unique Apple ID for each group (3 per iPad). In the end, he gave me 2 Apple ID’s so that I could download apps to the iPads. (Apparently an Apple ID can only manage 10 iPads.) At this point I did feel a bit overwhelmed by the learning curve, but I pressed on. On a few occasions, I had the more experienced students help other students solve whatever problems they were having with the iMovie software. It was really cool to see them helping each other out.
Video Projects
The students enjoyed doing the activities in our 30-acre, natural classroom. I had them measuring trees and the density of the understory, taking soil and air temperatures, and surveying the shrubs and leaf litter layer for insects. The students did a pretty good job taking photos and video clips of the various activities. It gave them a lot of material to work with at the end of the project when they were creating their videos. The videos posted are a few examples of work from groups that put in maximum effort and worked collaboratively with their peers
Lessons Learned:
- Simplify lessons. It was a lot to ask of the younger students to do the activity outside and film/photograph it at the same time. A few of the lessons required both team members to do the activity which made it difficult for them to use the iPad.
- Establish tighter rules/guidelines on the use of the iPads. Some students monopolized the use of the technology despite my efforts to get them to switch every so often. Also, each day’s lesson should have had a much clearer objective so that the students knew what they were expected to capture when we went outside.
- Create video rubic. More specifically list what should be included in each team’s final video. (I gave them too much free rein.) Some of the students lost track of what the focus of their videos was supposed to be.
- The coolest piece of technology was the digital microscope! Combined with a WiFi adapter, up to 10 devices can view and take pictures/video of whatever is being viewed. The students were very excited about this capability!
- Be careful that the students don’t get too focused on the technology and forget they are supposed to be learning about nature/environment. After the first lesson with the iPads, one student said, “This was the best nature class EVER!” (We never stepped foot outside.)
- Don’t try to do too much or make the project too complicated. It quickly became clear that I had a very limited amount of time and I was not going to be able to accomplish everything I initially thought I would do. I had to prioritize and focus the project.
- Need more time. I under-estimated the amount of time it took to explain and implement several of the lessons. I had a lot of material that I wanted to include that wasn’t very practical.
- Celebrate and share. At the end of the project, I brought the classes together to view each other’s final videos. They really enjoyed it and especially liked seeing what the other grades produced.
Future Impacts/Expansion:
Even while implementing the project, I was beginning to think of new ways to utilize the technology. I was able to download Kahoot to each of the devices and use it to create interactive quizzes to provide a review of the material covered during the course of the school year. I am eager to find content/apps to connect even the younger students to nature using technology.
For the older students, I would like to find some probes or other technology that they can use in conjunction with the iPads to gather environmental data about the campus. Things like temperature, humidity, light levels, etc., that we can track/record over time would be very interesting. It would be a good demonstration that technology can be a valuable tool to help us to better understand the world around us.
A future project that I plan to implement in the fall is having the students’ use the iPads, Garage band, and Sound Cloud to research a specific tree species found on our campus and record an audio report about their tree. I will then upload them to Sound Cloud, create a QR code, and print/laminate a card to post on the different trees. This will allow parents visiting the campus during our fall Biome Celebration to scan the codes and listen to their child’s audio report about that particular tree.