I recently gave a presentation in which I demonstrated how our various presentation elements with transparent backgrounds could be used in the foreground of a remote video lesson. I suddenly had lots of questions about how I had superimposed images in front of my video. Just about everyone who has been teaching online this past year has mastered changing the background, but I found that many were interested in changing the foreground as well. Some just wanted to add a simple lower third graphic as one might see on a news program. Others were intrigued by the various images I had popping up all over the screen, so I decided to share this short post.
But first, a paragraph about why I think this is actually useful. We all learned in Classroom Management 101 that students—especially younger students—need and actually desire regular, predictable routines and procedures in the classroom. I absolutely agree. However, I think that there’s a necessary refinement to that notion. As much as we desire structure, we also desire variety. Too much sameness in the classroom and the students will start to add their own variety of the disruptive sort. I always liked to keep a steady flow of surprises in a lesson. Keep the surprises related to the lesson, and you’ve beaten the class clowns at their own game. If I were remote teaching younger grades at the moment, I’d be having a ball with OBS Studio.
So what’s OBS Studio?
Open Broadcaster Software (OBS) is a free streaming and recording program available for both Windows and Mac OS. You can download it from the obsproject.com website. It does a gazillion things and looks overwhelming at first, so just ignore all the other features. Today we are just going to look at one thing: How to add images in the front layer of your video.
Maybe you want to:
- Just add a lower third graphic like your name or class at the bottom of the screen
- Add a decorative frame around your video
- Have large words or numbers appear on the screen in front of you
- Have a “guest” of some sort appear next to you
- Have changing graphics to indicate what portion of the lesson you are in or what step of a process you are doing
- Have a word of the day appear
- Make something (maybe a cartoon character) appear at random intervals and reward the first student who notices and responds
For any of these things, you are just adding a graphic layer to your video. Let’s get started.
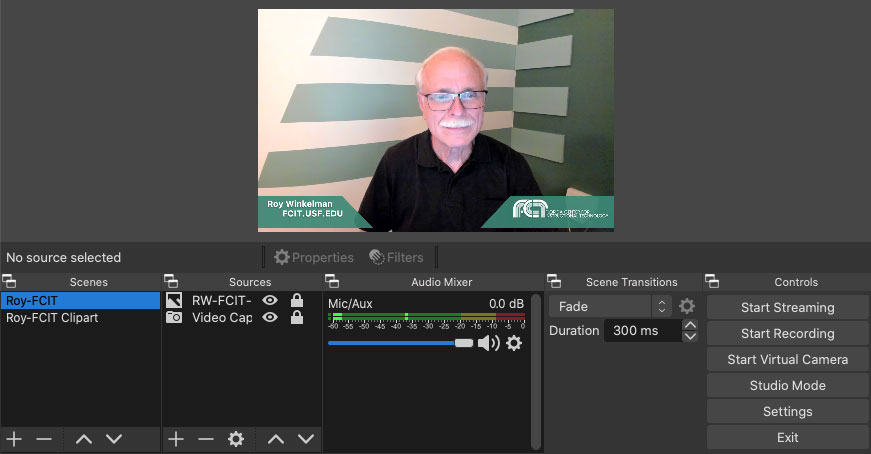
When you open the software, you’ll see two boxes is the lower left called “Scenes” and “Sources.” Each scene is a grouping of elements that you want to use together. The sources are the elements that make up a scene. The first scene, “RW-FCIT,” just has two sources. The first source is my video capture device. (Mine is a camera clipped to the top of my monitor.) The second source is a lower third graphic that I made in Photoshop with my name and the FCIT logo. The graphic by itself looks like this:
Notice that I made the graphic with a hole in the middle of the bar and saved it as a PNG to preserve the transparent area. Be sure to use the up and down arrows at the bottom of the sources panel to get your sources in the right order. You want the graphic on TOP of the video, not under it.
In the next scene, “Roy-FCIT Clipart,” I have five sources. The video is still on the bottom, of course. Notice that the men are behind the lower third graphic, but the woman is in front of the lower third graphic. And the exclamation point is in the very top layer. This exactly matches the way I have the images layered in the sources panel.
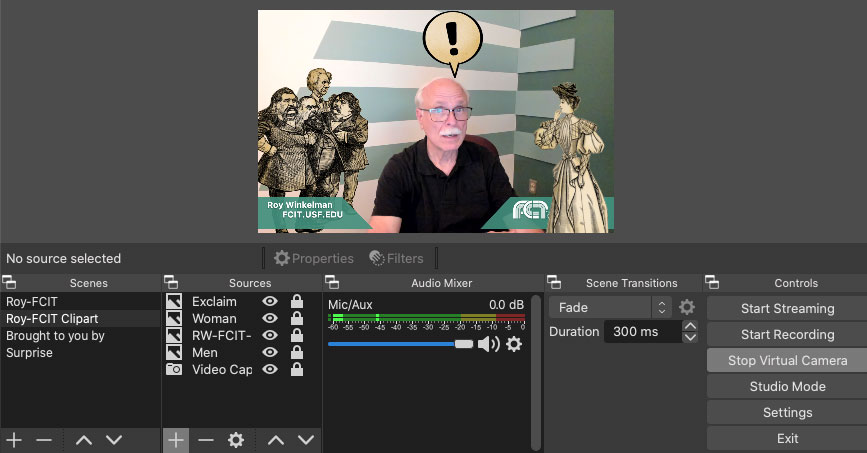
Notice that each source has an icon of an eye and one of a padlock next to it. Clicking the eye icon toggles the visibility of the source. Perhaps you want to bring elements into the scene one at a time. The padlock locks or unlocks the location of the element. If the source is unlocked, you can use your mouse to move the element around. It may take a bit of practice to move the item around smoothly while the video is going and you are pretending to react to its location on the screen.
When you have all your scenes created and are ready to start your Zoom session, click the “Start Virtual Camera” button on the lower right. You’ve got everything set up in OBS Studio at this point.
Now when you start your Zoom session, click the little up arrow by the video camera and you’ll notice that you have a new camera choice called “OBS Virtual Camera.” Select this instead of your regular camera and your Zoom video will now run through whichever OBS scene you have selected.
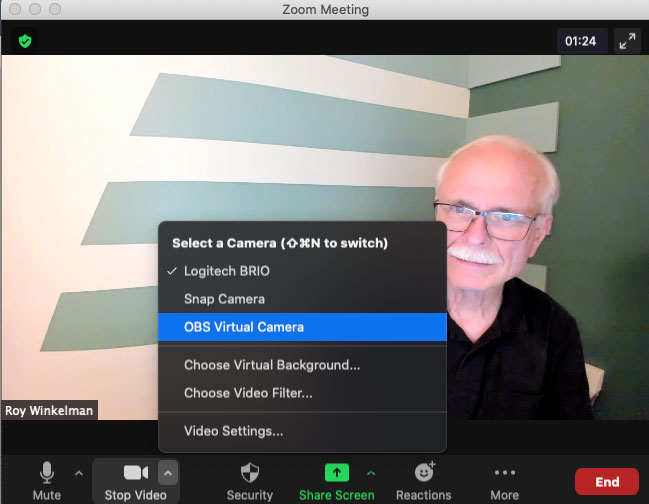
Now you can switch scenes in OBS and have everything show up in Zoom. Enjoy! Let the magic begin.
Today’s post was brought to you by the letter “W” and the number “3.”
Resources:
You’ll find my cutout characters and a large selection of cutout letters and numerals on our Presentations ETC website.
A previous post, Cutout People for Digital Narratives, includes additional sources of cutouts and instructions for making your own cutouts in Photoshop.
Roy Winkelman is a 40+ year veteran teacher of students from every level kindergarten through graduate school. As the former Director of FCIT, he began the Center's focus on providing students with rich content collections from which to build their understanding. When not glued to his keyboard, Dr. Winkelman can usually be found puttering around his tomato garden in Pittsburgh. Questions about this post or suggestions for a future topic? Email me at winkelma@usf.edu. To ensure that your email is not blocked, please do not change the subject line. Thank you!
FCIT Newsletter
Each month FCIT publishes a newsletter with short articles on teaching and learning with technology, using digital content in the classroom, and technology integration. Subscribe today! The subscription form will open in a new window. When you have subscribed, you can close the new window to return to this page.