The addition of customizable roles in TIM Tools v6.0 has made it convenient to create and track different groups when evaluating technology initiatives, PD programs, or other interventions. The new roles feature defines eight different sets of permissions, or roles, within the TIM Tools environment. For example, the role of “Teacher” may have permission to take the TUPS, while the role of “School Observer” may have permission to conduct observations using the TIM-O. Any of the default roles can be duplicated and then renamed as needed for your purposes. The roles feature was created primarily for administrative purposes, but we can extend the functionality to become a valuable tool in research and evaluation.
While the procedures outlined here would apply for other roles, this post will assume that you are going to look at teacher data. If, for example, you want to compare teachers who participated in a special summer institute with a matched group of teachers who did not participate, you could simply create two duplicates of the current “Teacher” role, and then name one of the new roles “Teacher: Summer Institute” and the other new role “Teacher: No Summer Institute.” Then, change the role of the individual teachers in each of your groups from “Teacher” to either “Teacher: Summer Institute” or “Teacher: No Summer Institute” as appropriate, and you are ready to generate reports for both the treatment and control groups.
If, instead of participation in a particular training or event, you want to evaluate the effect of access to a TIM Tools application component, you may want to adjust the access given to different teachers for a particular tool. For example you may want your control group not to have access to the Reflection Tool and the experimental group to have access. Or you might use access to ARTI (the action research tool) as your differentiating element. We will discuss these options for further extending the roles feature for research and evaluation in an upcoming post.
How To Create a New Role
In the TIM Tools Admin Center, go to Members > Define Member Roles. At the top of the page you will see a section entitled Add Role. Use the dropdown menu to select the role you would like to duplicate and then enter a name for the new role. When you click the GO button, the new role will be created and added to the grid of roles and permissions below.
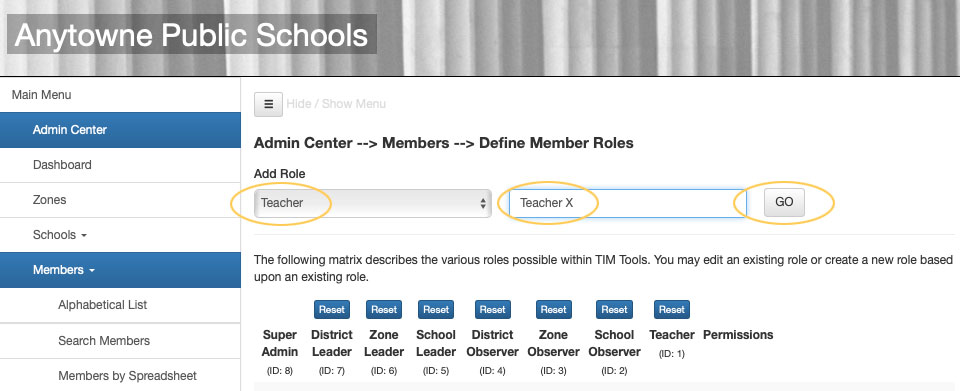
Figure 1. Creating the “Teacher X” role.
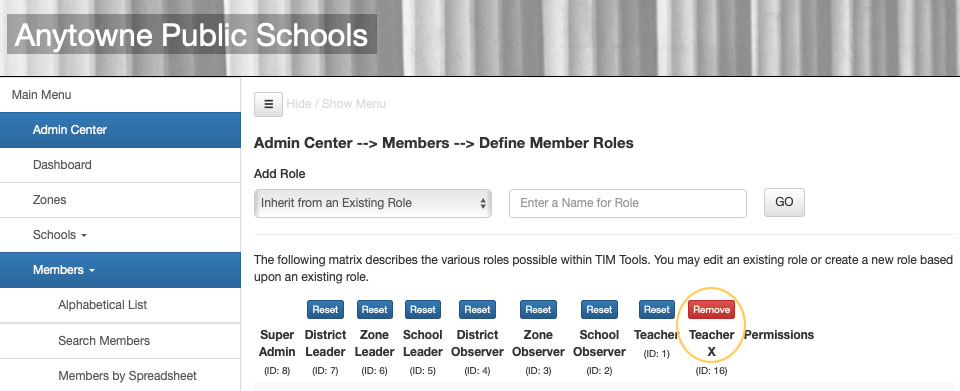
Figure 2. The “Teacher X” role appears in the Roles/Permissions grid.
You can name the new role anything you like. However, we suggest that you retain “Teacher” as part of the name, for example: Teacher 1:1, Teacher Tech Initiative, Teacher Tablet Cohort, etc. This naming convention may avoid confusion later. If you wish to create a report that includes all teacher data, it’s easier to select Teacher and Teacher 1:1 rather than trying to remember to select names like Tech Gurus or Cart Classrooms.
There is no technical limit to the number of roles you can create in a TIM Tools instance, although if you make a great many roles, your Role/Permission grid will become a bit unwieldily to manage.
How To Tag the Teachers with the New Role
If you have just a small number of teachers that you would like to assign the new role, you may find it practical just to use either the Alphabetical List or the Search Members tab to bring up each teacher’s profile and use the dropdown menu to reassign them to the new role. If you have more than a handful of teachers to reassign roles for, it’ll be much quicker to use the spreadsheet method. From the Members by Spreadsheet tab, download the current list of members. If your district has many thousands of teachers this may take a minute or two. When you open the Excel file, you’ll see that column E is labeled “Role.” Simply change the role number from 1 (that’s the default Teacher role) to the ID number for the new role. You’ll find the new role ID on the Roles/Permissions grid. In Figure 2 above, the ID number for the “Teacher X” role is 16. Once you’ve made the desired changes to the spreadsheet, upload it back into the system using the Members by Spreadsheet tab.
Accessing the Data
Now that you have your teachers grouped into two or more roles, you can start to pull data from your TIM Tools instance by any one role or combination of roles. Whether you are using the Report Tool to build a report for TUPS, TIM-O, TIM-LP, or TIM-R, or downloading the data from the Admin Center for use in the corresponding templates, you’ll be able to select just the role or roles you want to include. In both the Report Tool and in the spreadsheet download interfaces, you’ll see a dropdown menu for Roles. Simply select the role or roles you’d like included. Control-click (command-click on a Mac) to select more than one role.
BTW, don’t be surprised to see that the dropdown menu has appended an “s” to your newly-created role’s name. The system does that automatically because in most cases that makes it appear more natural.
And, as always, you can download the raw data for use in your preferred statistics package. The role for each member will be indicated by the role ID you see on the Roles/Permissions grid.
Related post: See Rockin’ Roles in TIM Tools 6.0 for more on creating and modifying roles.
Christine Harmes is a consultant on research, measurement, and evaluation, and an ICF-certified coach. Her research interests focus on improving teacher use of technology, computer-based testing and usability. At the Florida Center for Instructional Technology at the University of South Florida, Dr. Harmes focuses on research and tool development related to technology integration.