While most TIM Tools clients use one of the 100 or so built-in page header images for their site, some clients prefer to make a custom banner to match their other websites or sometimes just their school colors. With just a few minutes effort you can create a custom header image that personalizes your TIM Tools site and assures your teachers and other users that they are at the right website.
Any PNG, JPEG, or GIF image can be used as your header. Simply resize your image to 100 pixels high and place it on any publicly-accessible web server. If your image is greater than 100 pixels tall, then only the top 100 pixels will display. The image can be any width. We suggest a minimum of 1600 pixels wide since the image will “tile” (repeat itself) if the visitor’s browser is wider than the image.
Setting Your TIM Tools Header Image
Once you’ve created your image and placed in on a web server someplace, log into the Admin Center of your TIM Tools account. On the left, you will see an expanding menu for “Customization.” Click this and then click the “Site Banner” sub-menu item.
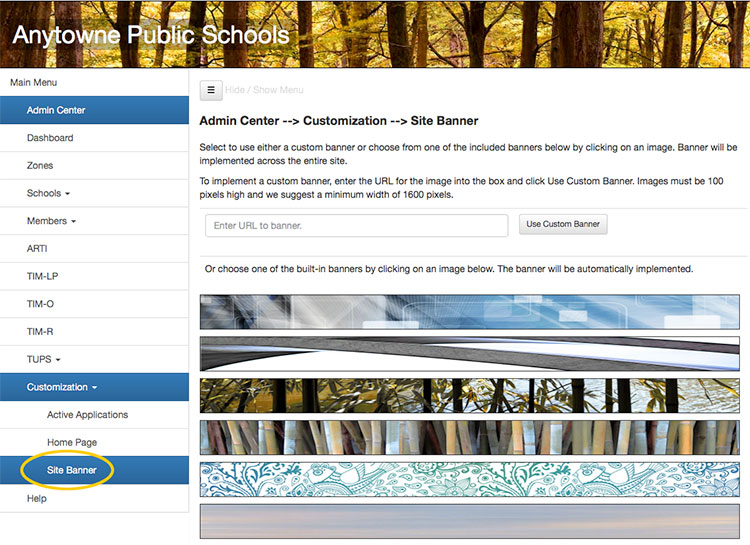
Above: The Site Banner customization window.
Simply enter the URL of your custom image in the text box, click the “Use Custom Banner” button, and your banner is instantly applied across your TIM Tools instance.
But what if the image you want to use isn’t very wide or doesn’t tile well? Keep reading!
Making Images that Tile Properly in Four Easy Steps:
Photoshop Offset Filter to the Rescue
1. Open your image in Photoshop. If it isn’t already 100 pixel high, resize it so that it is.
2. Offset it. Many experienced Photoshop users really aren’t aware of this filter, but it’s going to make the process very simple for us. You’ll find in the “Other” sub-menu under Filters:
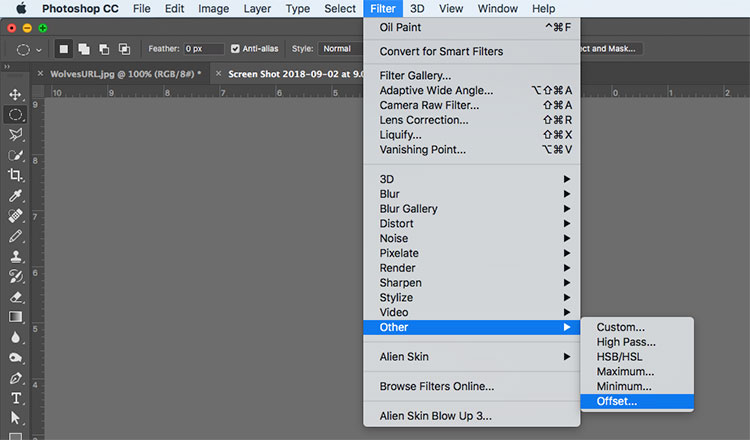
Above: Finding the Offset filter in Photoshop.
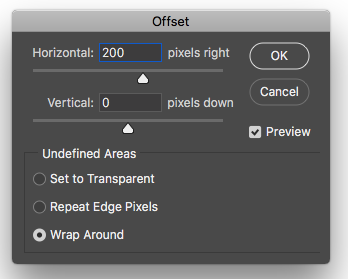
When the Offset filter opens, enter a number equal to half the width of the image for the Horizontal setting and select the “Wrap Around” option at the bottom. (You could use any convenient number for the horizontal offset, but if you use exactly half, repeating the filter will get you exactly back to your original, and I like to make things easy.)
For an image 400 pixels wide, the settings should look like these:
3. Disguise the seam. The offset filter has now put the seam right in the middle of your image making it easy to see what needs to be done to make the image tile well. Sometimes, just using the blur tool will be enough to disguise the seam. Usually, you’ll need to use the clone tool to copy areas from one side of the seam to the other. Occasionally, either the smudge tool or the healing tool will be the fastest fix. See examples in the next section.
4. Repeat the offset filter. Running the filter again will return your image to its original orientation, but now the left and right sides will match when the image repeats. And you’re done!
Examples
I’ve intentionally selected images that aren’t very wide so the seams will be a problem. You’ll want to start with an image that is much wider if possible.

1. Original image.

2. Offset. Notice the slight seam in the center.

3. Five seconds using the blur tool hid the seam completely.

4. Offset a second time to return image to original view.

Live on TIM Tools instance with no obvious seams.

1. Original image.

2. Offset. Obvious seam in the center.

3. Using the clone tool to copy content from the right side of the seam over to the left side took about 15 seconds.

4. Offset a second time to return image to original view.

Live on TIM Tools instance with no obvious seams.

1. Original image.

2. Offset. Very obvious seam to hide here.

3. This one was more difficult to fix. It took about a minute of cloning areas from one side of the seam to the other. It helps to zoom in when doing this.

4. Offset a second time to return image to original view.

Live on TIM Tools instance with no obvious seams.
Additional Graphics Posts
- Colorizing ClipArt: Intro to Blending Modes
- Colorizing ClipArt: Using Gradient Maps
- Photo or Illustration?
- Using ClipArt ETC for Flyers and Newsletters
- Paper People for Your Preso
- Converting Raster Clipart to Vector
- Signs for the Times: Repurposing ClipArt ETC traffic signs
- 4,000 Drop Caps: When and how to use FCIT's drop cap collection in your documents
- Custom Banners: How to manipulate an image so that it tiles (repeats) seamlessly
Roy Winkelman is a 40+ year veteran teacher of students from every level kindergarten through graduate school. As the former Director of FCIT, he began the Center's focus on providing students with rich content collections from which to build their understanding. When not glued to his keyboard, Dr. Winkelman can usually be found puttering around his tomato garden in Pittsburgh.