Menu
1. TIM Tools Admin Center
The Admin Center provides for management of the TIM Tools suite of applications.
Overview
Getting Started
- Admin Center Access
- Admin Center Dashboard
- Managing Zones (for Districts)
- Managing Zones (for Regional Service Agencies)
- Managing Zones (for Education Ministries, Consultants, Grantors, and Others)
- Managing Schools
Customization
Managing Members
- Uploading and Updating Members
- Profile Screen
- Changing Passwords
- Defining Roles (for Districts)
- Defining Roles (for School Licensees)
- Defining Roles (for Education Ministries, RSAs, Consultants, Grantors, and Others)
Working with Data
- Participation Overview
- Downloading ARTI Data
- Downloading TIM-LP Data
- Downloading TIM-C Data
- Downloading TIM-O Data
- Downloading TIM-R Data
- Downloading TUPS Data
- Using TUPS, TIM-O, TIM-R, and TIM-LP Templates
2. TUPS
The Technology Uses and Perceptions Survey provides essential information for planning technology infrastructure and support and identifying the perceptions and PD needs of teachers.
- TUPS Intro
- Collection Frameworks
- TUPS Intro and Closing Text
- Customizing TUPS Sections and Items
- Accessing School or District TUPS Data
- TUPS Report Template
3. TIM-O / TIM-LP / TIM-R
These three tools are for classroom observation, lesson plan review, and teacher reflection.
Overview
Preparation
TIM-O
- TIM-O: Beginning an Observation
- TIM-O: Question-Based Method
- TIM-O: Matrix-Based Method
- TIM-O: Finishing an Observation
- TIM-O: Print or Share an Observation with a Teacher
- TIM-O: Editing Previous Observations
- TIM-O Report Templates
- Accessing School or District TIM-O Data
TIM-R
TIM-LP
4. TIM-C
The TIM-C allows a coach and client to document the goals, activities, progress, and outcomes of a coaching cycle.
5. ARTI
The ARTI tool provides a framework for teachers to design and conduct their own action research projects.
6. Report Tool
The Report Tool allows a school or district to create TIM-LP, TIM-O, TIM-R, or TUPS reports.
- Report Tool Intro
- Building a New Report
- View, Edit, or Delete Reports
- Interpreting TIM-O Report Data
7. Survey Tool
The Survey Tool allows a school or district to create internal or external surveys on new topics as needed.
- Survey Tool Intro
- Creating a New Internal Survey
- Creating a New Public Survey
- Adding Questions to Your Survey
- Customizing a Library Survey
- Viewing Survey Results
Need help?
Have a question?
Email us at TIM@fcit.us anytime. We want to help you get the most out of your TIM Tools account!
TIM Tools 7.5 Administration Guide
Adding Questions to Your Survey
Adding Sections
Surveys are organized by sections. Every survey will have at least one section. Use sections to organize your items.
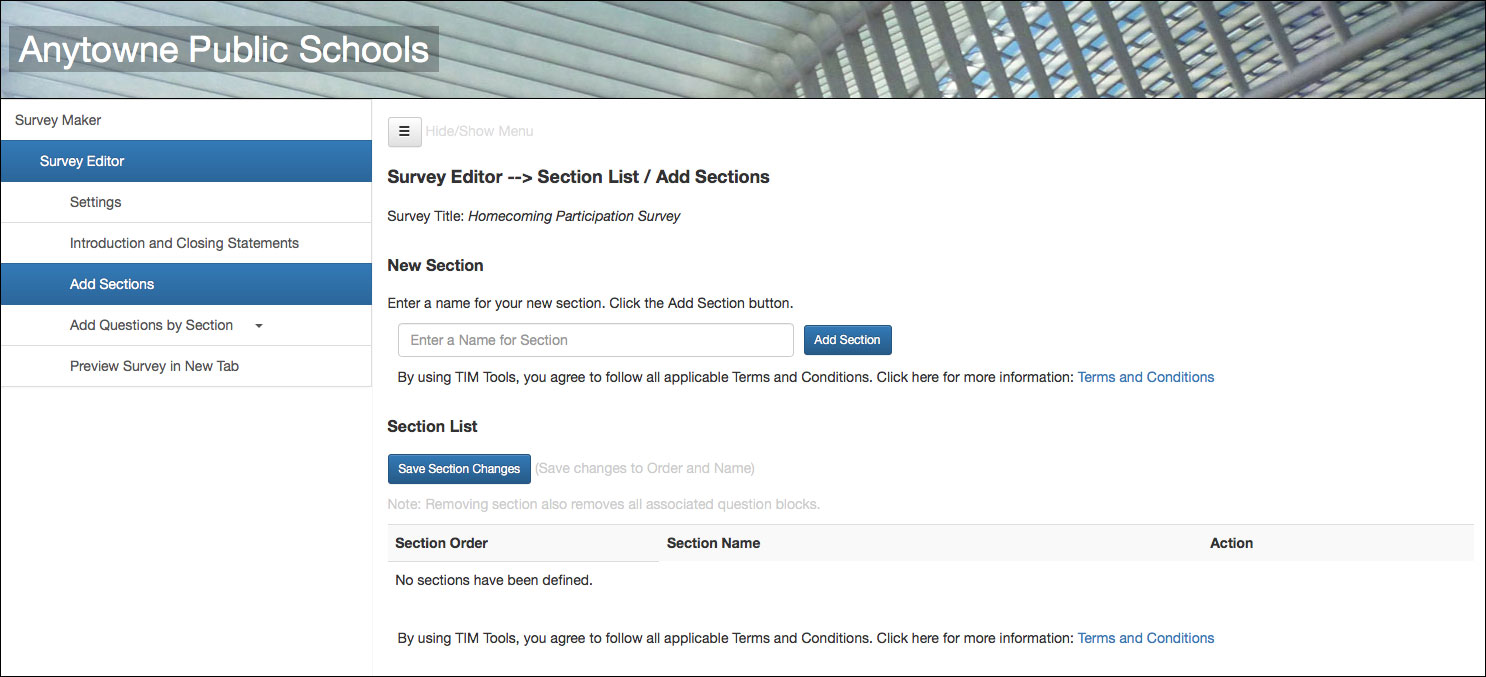 Figure 1. Panel for adding sections to a survey.
If you plan to have just one section, then you will probably want to label that section something like “Questions.” For longer surveys, it’s best to group questions by topic. You may even wish to number the sections, for example:
1. About My Teacher
2. About My Classmates
3. About My Classwork
4. About My School Activities
Once you have created your section names, you can use the Section Order dropdowns to re-order the sections if you wish. Be sure to select the “Save Section Changes” button after editing either the name or order of your sections.
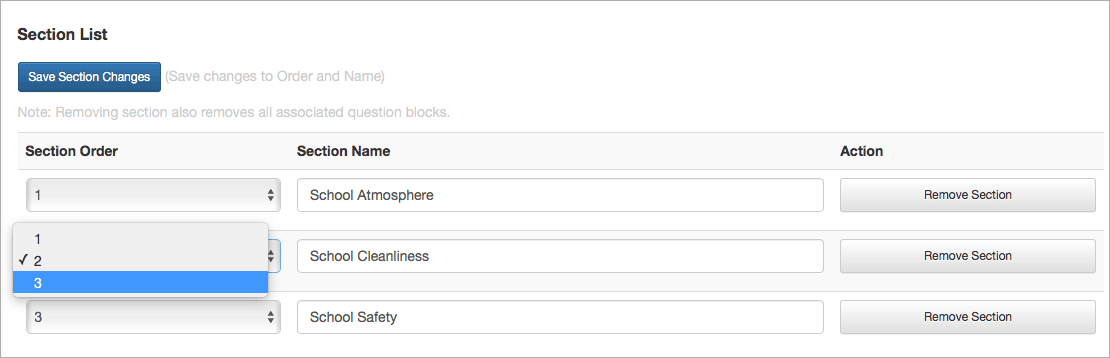 Figure 2. Changing the order of sections.
Once you’ve created the sections you want, you’re ready to start adding questions.
Adding Questions
To begin adding questions, select the “Add Questions by Section” tab. The sections you’ve created will appear below. Select the section you want to begin with.
The Survey Builder allows for five question types: free text response, multiple choice, multiple response, agreement scale, and frequency scale. Each question type is very flexible. Additional information can be added to any question. Each question can be designated as required or not required, multiple choice and multiple response questions support any number of response options, and the number and labels for both scale questions are completely customizable. A sixth item type, descriptive text, isn’t an actual question. It’s a means to inject titles, headings, additional directions, charts, or images into the flow of questions at any point.
Free Text Questions
Free Text is simply an open text field that allows for any sort of response, for example:
 Figure2. Free Text example from live survey.
To create a Free Text question, first enter the question in the New Question box:
 Figure 3. Creating a new Free Text question.
When you select the “Add Question” button, the Question Editor will open. Here you can make edits to the question if you like. You can also select whether to make it a required question. There is also a place to add additional directions about answering the question if you like.
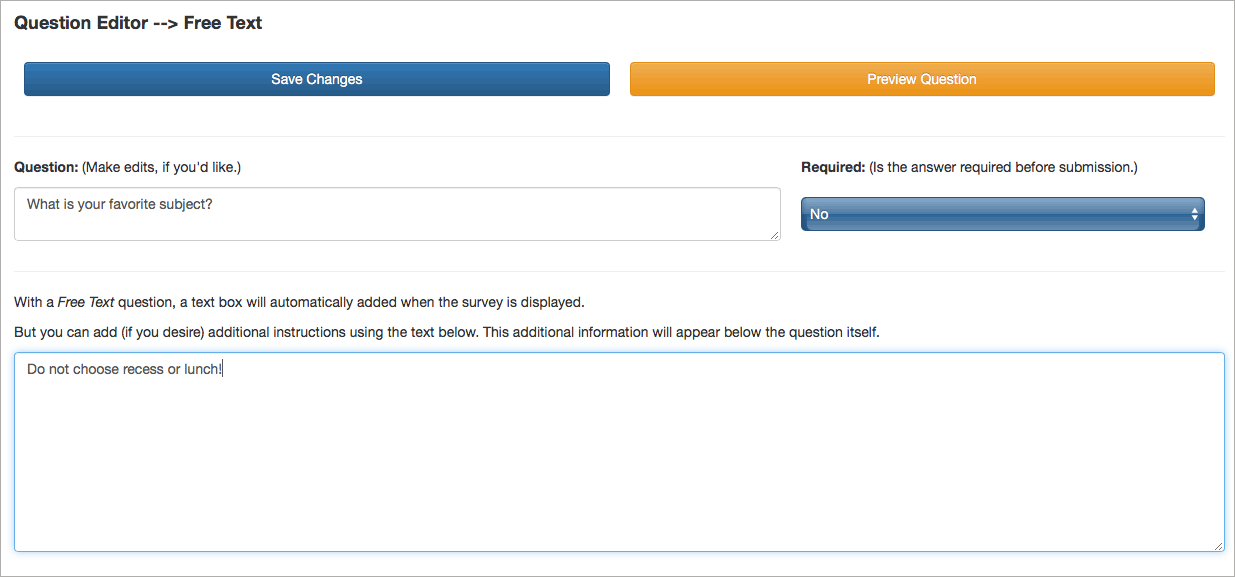 Figure 4. The Free Text Editor.
Multiple Choice Questions
Multiple Choice items allow for only one response per question. This is indicated by the use of radio buttons for the various options.
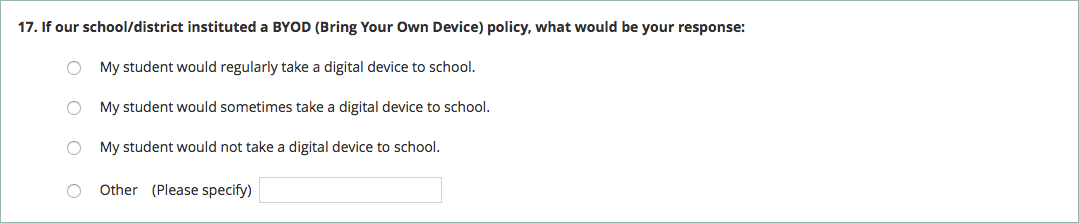 Figure 5. Multiple Choice example from a live survey.
In the Multiple Choice question editor below, you can see that the item is not required, that the creator has added an explanation about à la carte items, and that only the first two options are used. Unused options can be removed or new options added if more than the five default options are required. Also notice that a final option of “Other” can be added to any Multiple Choice item. This option will include a text box for the answer.
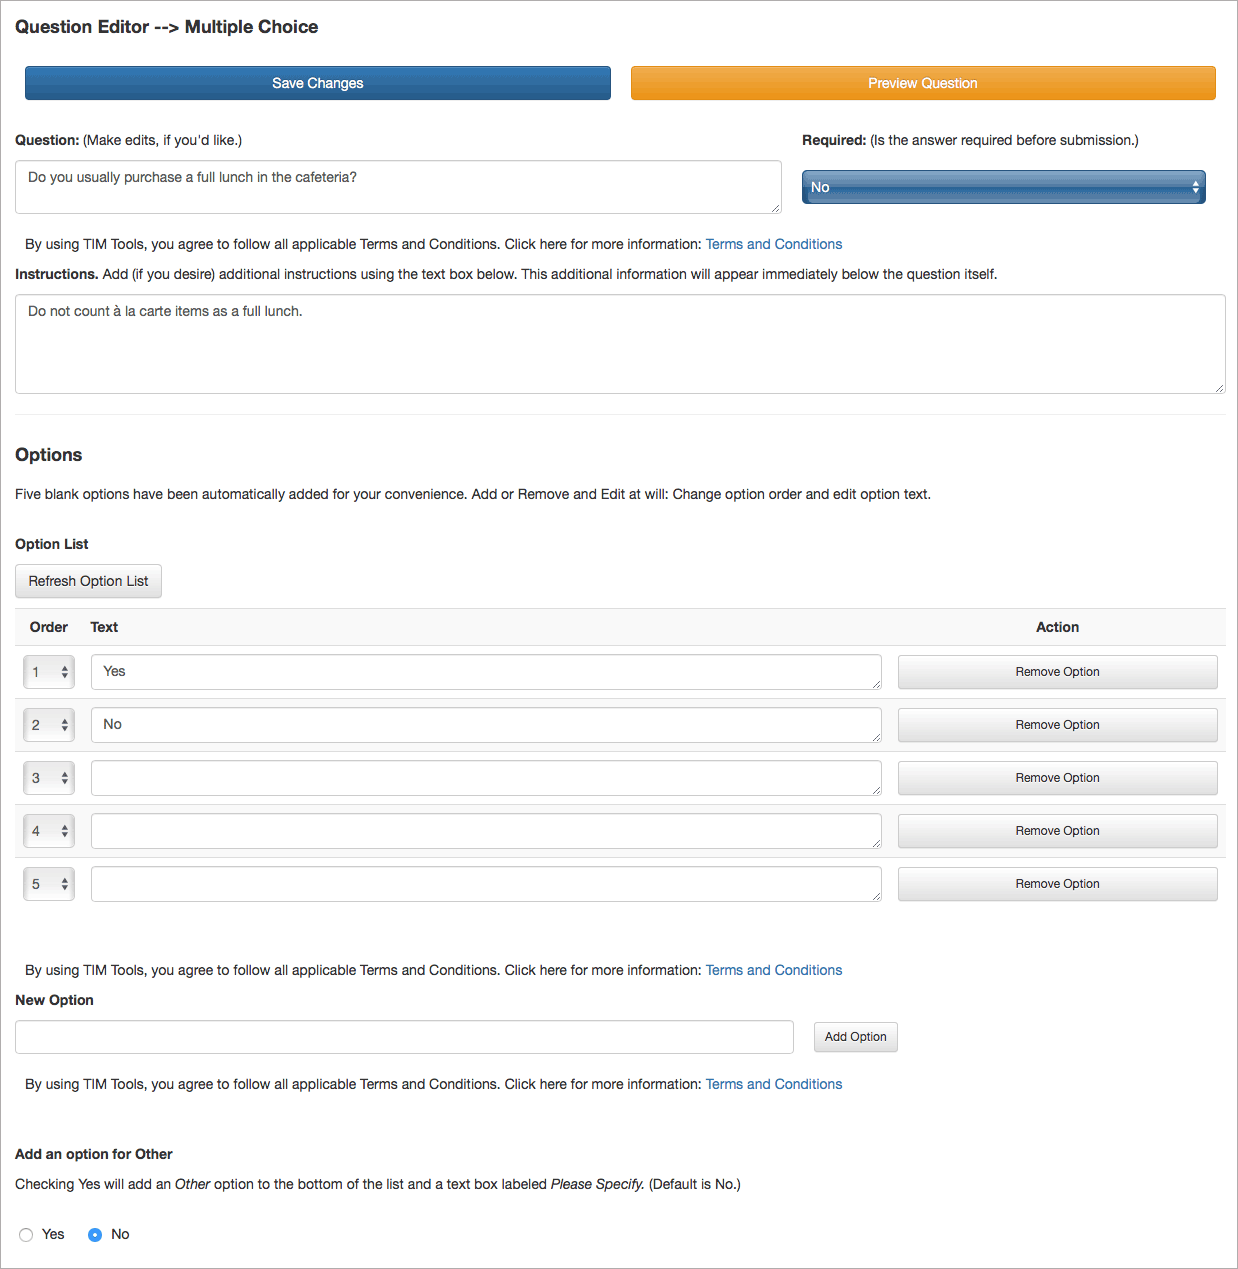 Figure 6. The Multiple Choice Editor.
Multiple Response Questions
A Multiple Response question allows for more than one answer. This is indicated by the use of checkboxes for the various options.
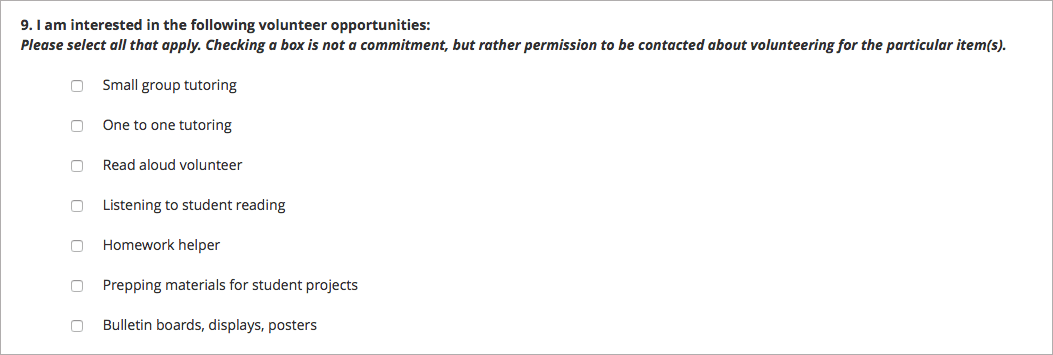 Figure 7. Multiple Response example from a live survey.
In the Multiple Response question editor below, you can see that the item is required, additional instructions were added, a sixth item (Student Council) was included along with the “Other” option.
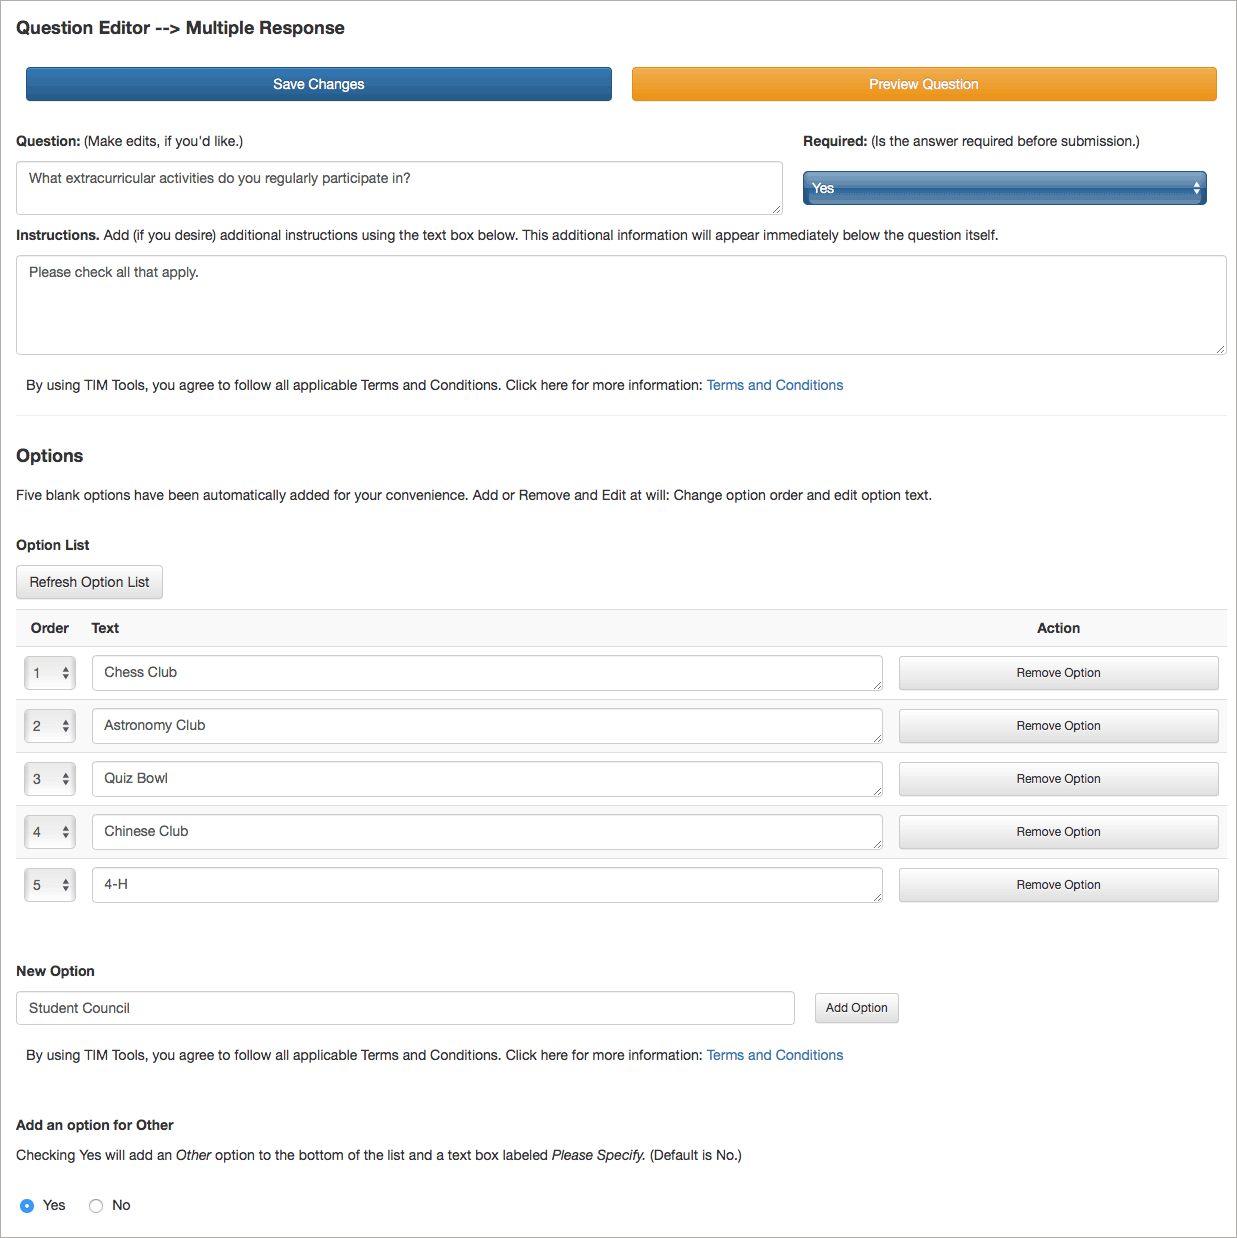 Figure 8. The Multiple Response Editor.
Agreement Scale Questions
An Agreement Scale question asks how much the respondent agrees with a statement.
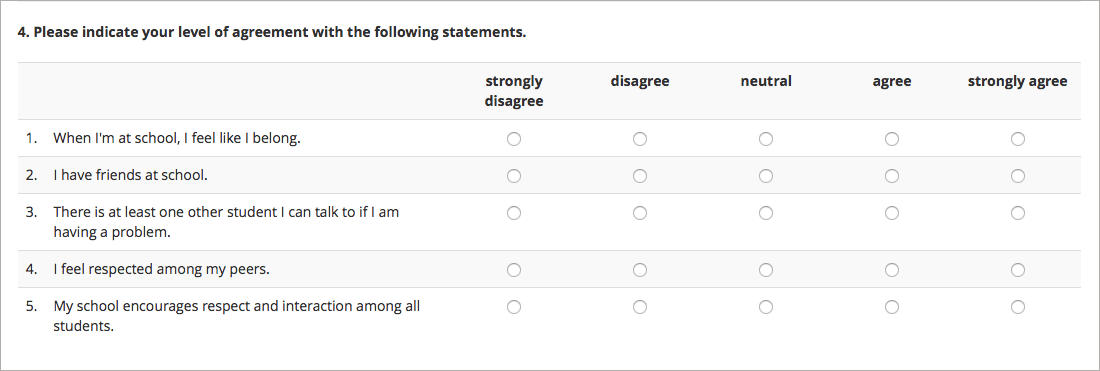 Figure 9. Agreement Scale item from a live survey.
In the Agreement Scale Editor below, we see that the question is not required, no additional instructions were added, and the creator used the default scale of strongly disagree, disagree, neutral, agree, and strongly agree. The editor will allow for any number of agreement steps. Unneeded ones can be deleted or additional steps added. The names of each column can also be changed.
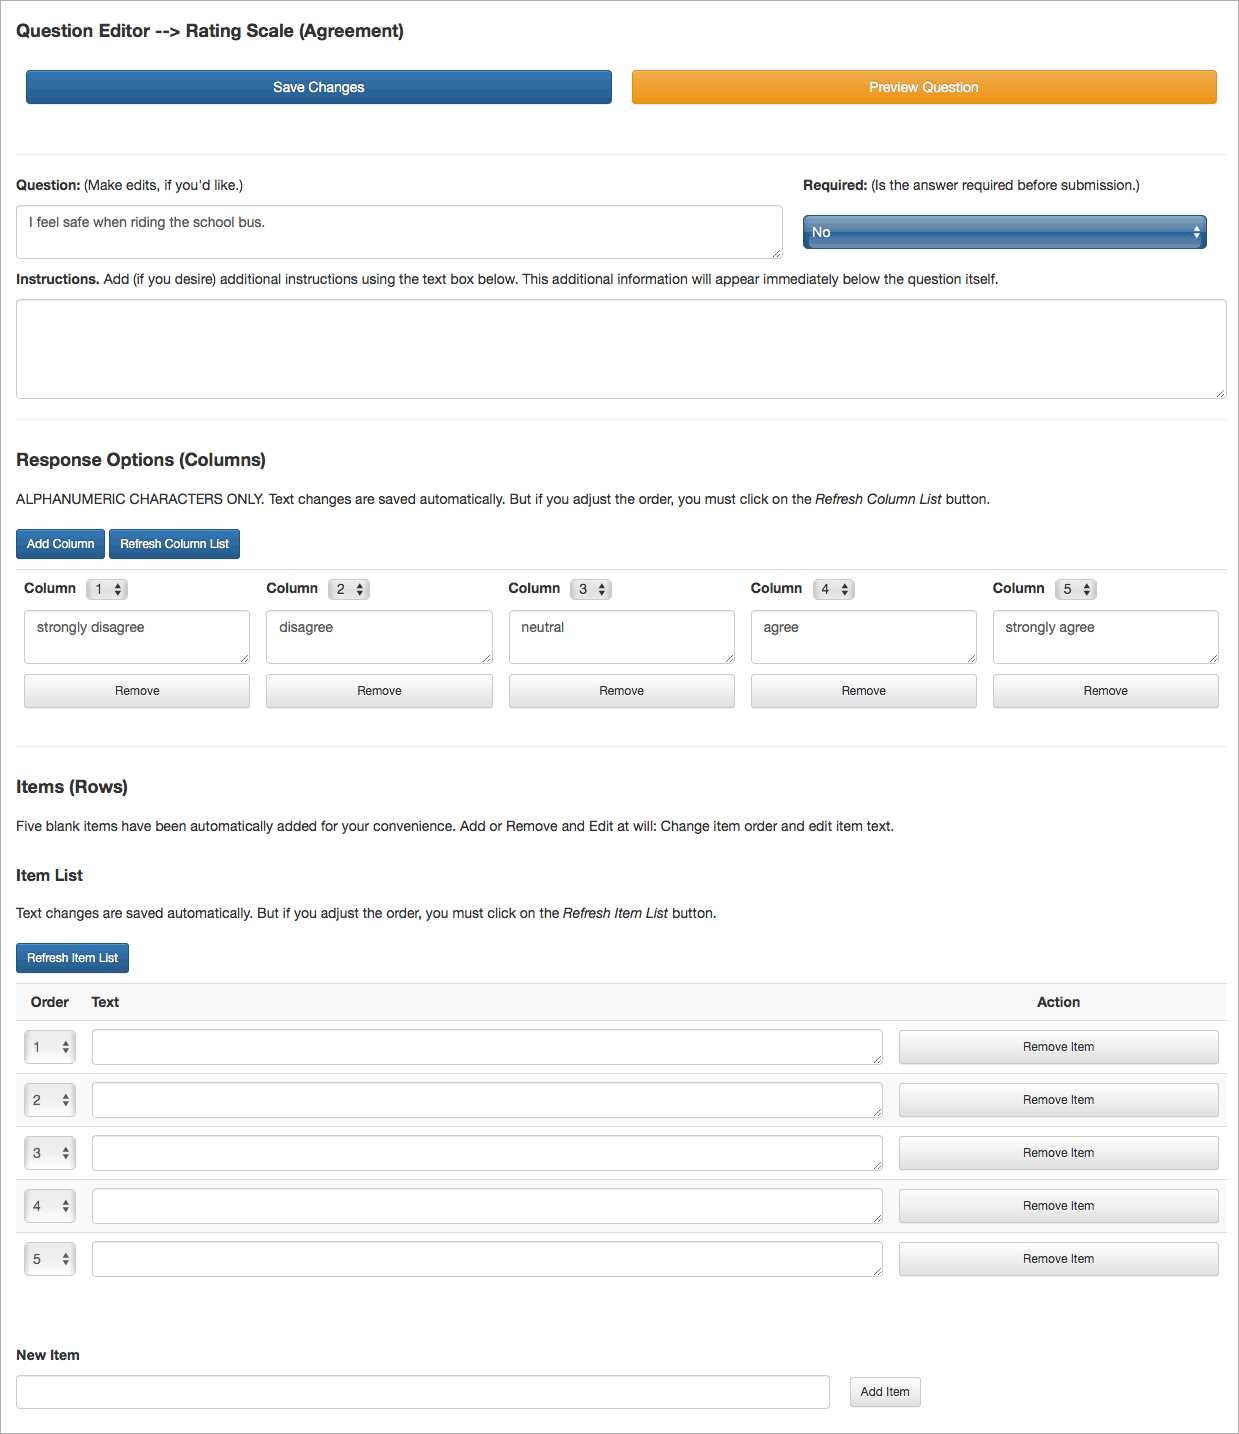 Figure 10. Agreement Scale Editor.
Frequency Scale Questions
Frequency Scale questions ask how often something happens.
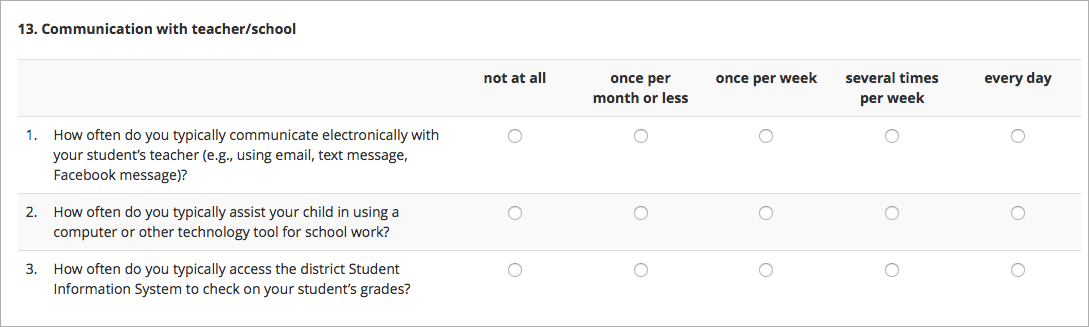 Figure 11. Frequency Scale item from a live survey.
In the Frequency Scale Editor below, no additional edits have been made to the original question. You can see that the number, name, and order of columns can be changed at will, however. You can also create a set of items using multiple rows. For example, the question could be, “How often do you use each of the following applications on your laptop?” The the five rows could be named with applications such as, word processors, drawing programs, presentations applications, email, and web browsers.
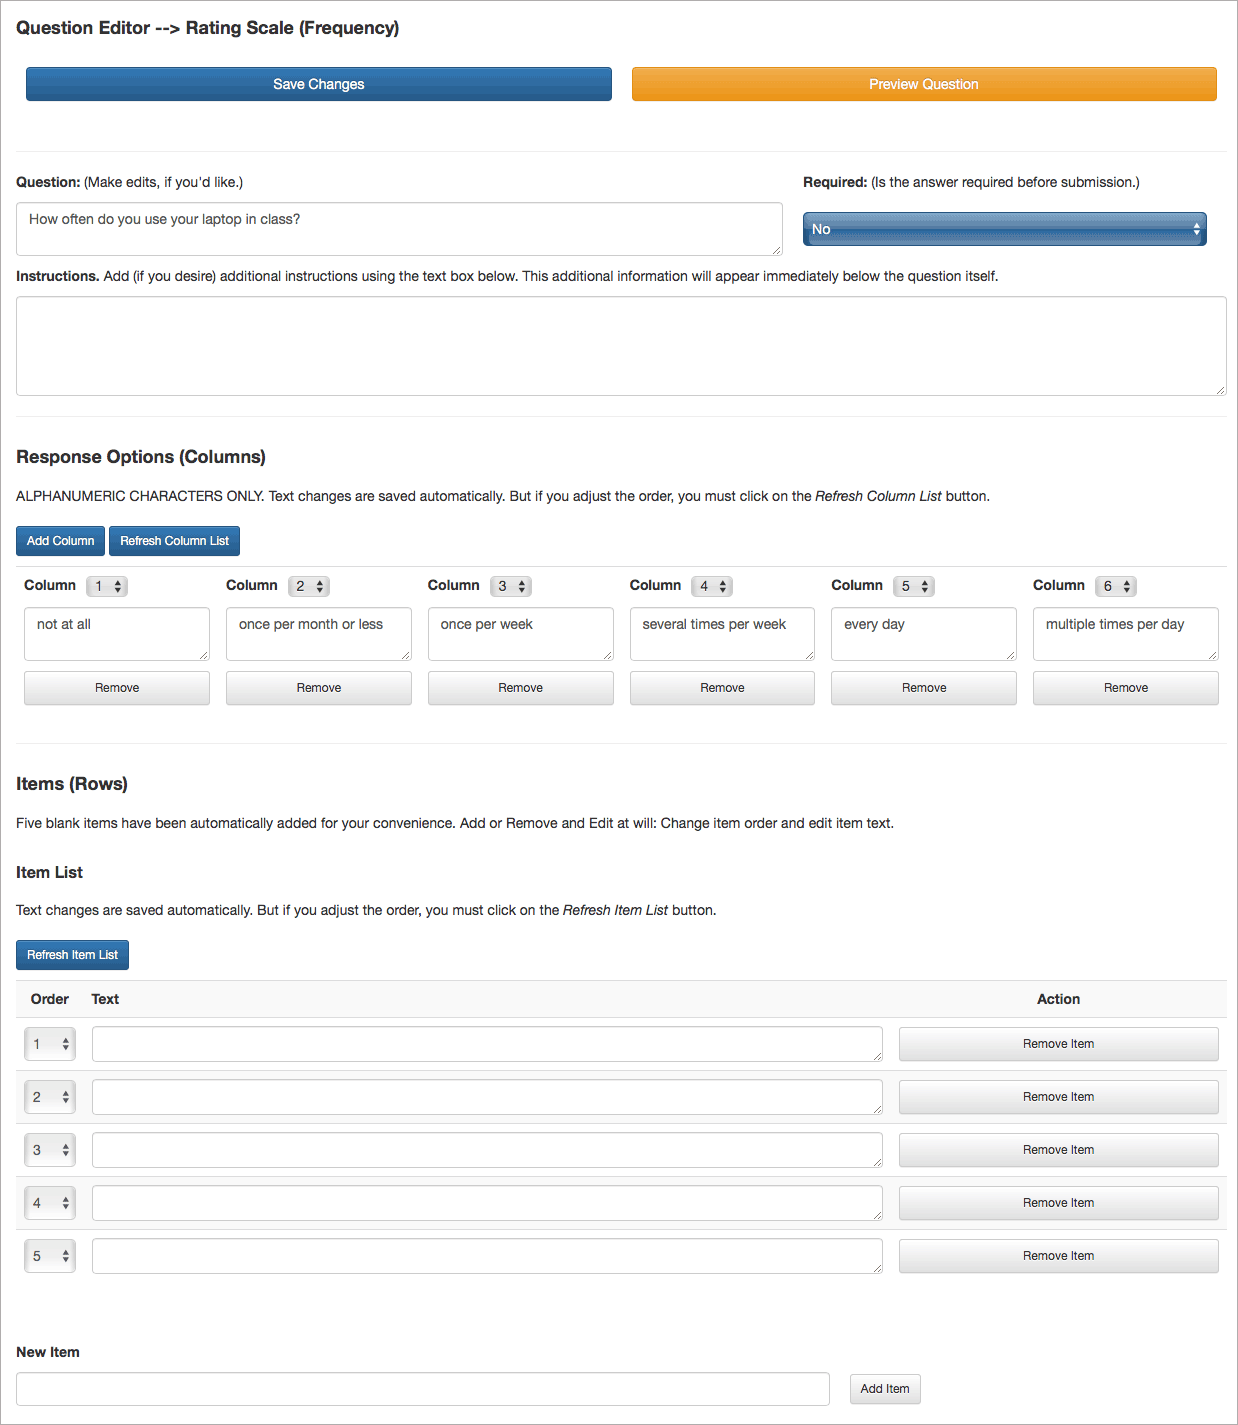 Figure 12. Frequency Scale Question Editor.
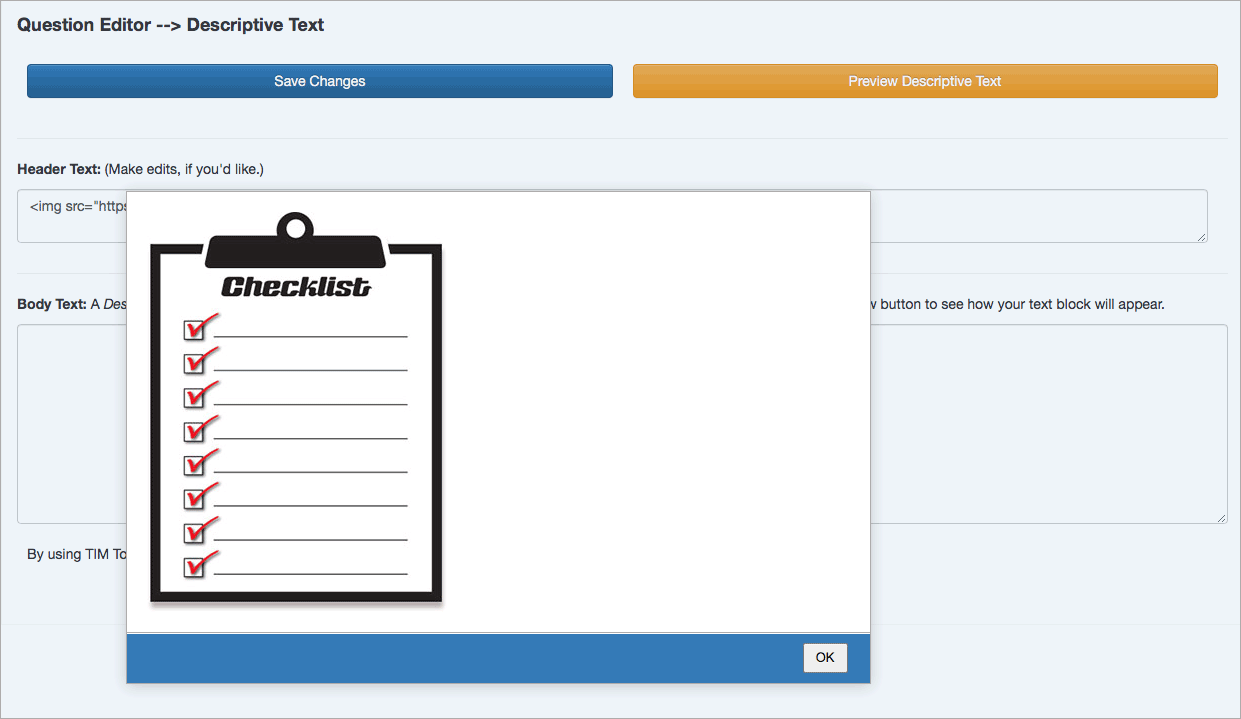
Descriptive Text “Questions”
This question type isn’t a question at all. It’s a means to inject titles, headings, additional directions, charts, or images into the flow of questions at any point. You can use any standard HTML markup to control the appearance of your survey. In the Descriptive Text Editor below, a simple image tag has been added.
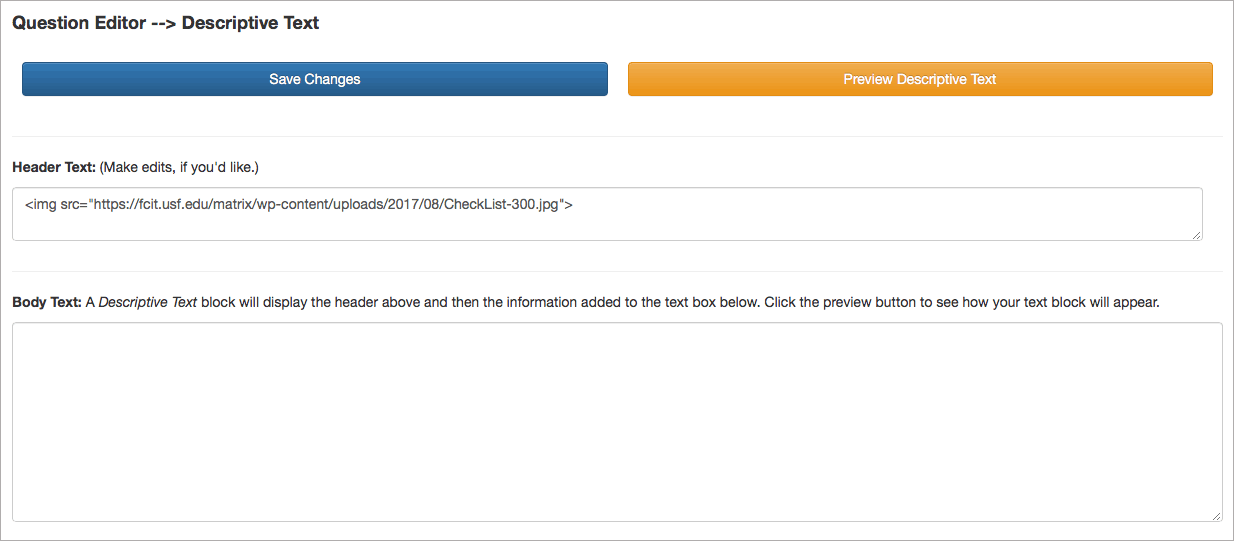 Figure 13 Descriptive Text Editor.
When you’ve entered your text or tags, select the “Preview Descriptive Text” button to see what it will look like.
Preview and Make Live!
When you are finished adding your questions to each section, select Preview Survey in New Tab from the sidebar menu. If you are happy with it and ready to publish, go back to the Settings panel and change Live Survey from No to Yes. Your survey will now be available to the participant audience you have selected. Of coures, if you chose the Public: Entry Codes option, you’ll need to distribute the codes you created to the population you wish to participate.