Menu
1. TIM Tools Admin Center
The Admin Center provides for management of the TIM Tools suite of applications.
Overview
Getting Started
- Admin Center Access
- Admin Center Dashboard
- Managing Zones (for Districts)
- Managing Zones (for Regional Service Agencies)
- Managing Zones (for Education Ministries, Consultants, Grantors, and Others)
- Managing Schools
Customization
Managing Members
- Uploading and Updating Members
- Profile Screen
- Changing Passwords
- Defining Roles (for Districts)
- Defining Roles (for School Licensees)
- Defining Roles (for Education Ministries, RSAs, Consultants, Grantors, and Others)
Working with Data
- Participation Overview
- Downloading ARTI Data
- Downloading TIM-LP Data
- Downloading TIM-C Data
- Downloading TIM-O Data
- Downloading TIM-R Data
- Downloading TUPS Data
- Using TUPS, TIM-O, TIM-R, and TIM-LP Templates
2. TUPS
The Technology Uses and Perceptions Survey provides essential information for planning technology infrastructure and support and identifying the perceptions and PD needs of teachers.
- TUPS Intro
- Collection Frameworks
- TUPS Intro and Closing Text
- Customizing TUPS Sections and Items
- Accessing School or District TUPS Data
- TUPS Report Template
3. TIM-O / TIM-LP / TIM-R
These three tools are for classroom observation, lesson plan review, and teacher reflection.
Overview
Preparation
TIM-O
- TIM-O: Beginning an Observation
- TIM-O: Question-Based Method
- TIM-O: Matrix-Based Method
- TIM-O: Finishing an Observation
- TIM-O: Print or Share an Observation with a Teacher
- TIM-O: Editing Previous Observations
- TIM-O Report Templates
- Accessing School or District TIM-O Data
TIM-R
TIM-LP
4. TIM-C
The TIM-C allows a coach and client to document the goals, activities, progress, and outcomes of a coaching cycle.
5. ARTI
The ARTI tool provides a framework for teachers to design and conduct their own action research projects.
6. Report Tool
The Report Tool allows a school or district to create TIM-LP, TIM-O, TIM-R, or TUPS reports.
- Report Tool Intro
- Building a New Report
- View, Edit, or Delete Reports
- Interpreting TIM-O Report Data
7. Survey Tool
The Survey Tool allows a school or district to create internal or external surveys on new topics as needed.
- Survey Tool Intro
- Creating a New Internal Survey
- Creating a New Public Survey
- Adding Questions to Your Survey
- Customizing a Library Survey
- Viewing Survey Results
Need help?
Have a question?
Email us at TIM@fcit.us anytime. We want to help you get the most out of your TIM Tools account!
TIM Tools 7.5 Administration Guide
Managing TIM-O Observers and TIM-LP Reviewers
Observers are members who have permission to observe classroom lessons using the TIM-O and to review lesson plans using the TIM-LP. Observers can be assigned to work district-wide, zone-wide, or at their home school only.
Configuring Observer Roles
Beginning in version 6.0 of TIM Tools, all roles are completely customizable. The default installation includes three roles with primary responsibility for conducting lesson observations and lesson plan reviews. These three roles are the School Observer, the Zone Observer, and the District Observer. District Observers can conduct observations and reviews across the entire district, Zone Observers can conduct observations and reviews across their assigned zones, and School Observers can conduct observations and reviews in their home school only. This default configuration will satisfy the needs of most clients.
Clients can use the Set Member Roles panel to redefine existing roles or create new roles as needed. For example, a district may wish to split the roles of Observer and Reviewer. Just about any combination is possible.
Assigning Members as Observers or Reviewers
There are several methods available for assigning members tho role of Observer. Pick the method that works best for your district size and the number of observers you need to manage at a time. In each example below, we assume that the district is using the default roles of School Observer, Zone Observer, and District Observer.
1. Assigning the Observer role to a few members.
If you have a small number of of members you want to assign the Observer role to, use the Search Members tab to search for the member by name. When the list of results appears, locate the member you want and click the Edit button in the properties column. The edit window will open. Locate the dropdown menu for Role and select either School, Zone, or District Observer. Repeat for each member you want to reassign.
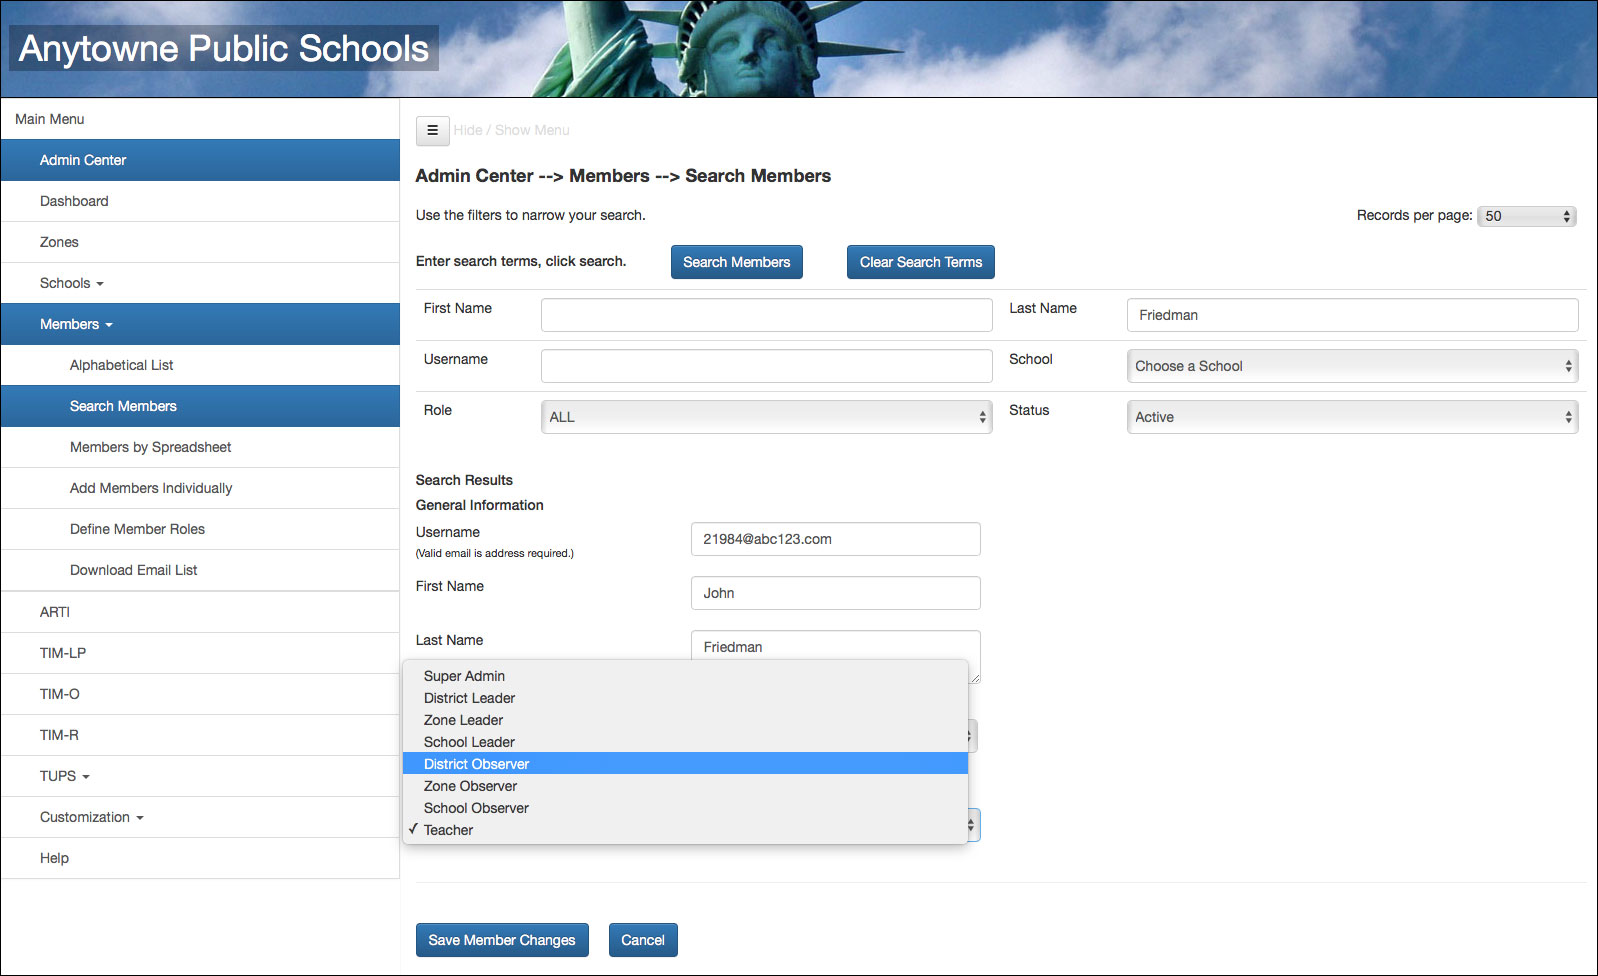 Figure 1. Selecting the role of District Observer in the Edit Properties window for member John Friedman.
2. Assigning Observer role to a large group of members.
If you need to assign the Observer role to many members at once, it’s often more convenient to use a spreadsheet. Select the Members by Spreadsheet tab. Download the current set of Active Members as a spreadsheet. Change the Role column to “2” for each member you wish to assign the School Observer role to, a “3” to each member you wish to assign the Zone Observer role to, and a “4” to each member you wish to assign the District Observer role to. Save and upload the file. Click the Preview Import button to review the changes. If all is as you intended, click the Apply Changes button and the database will be updated.
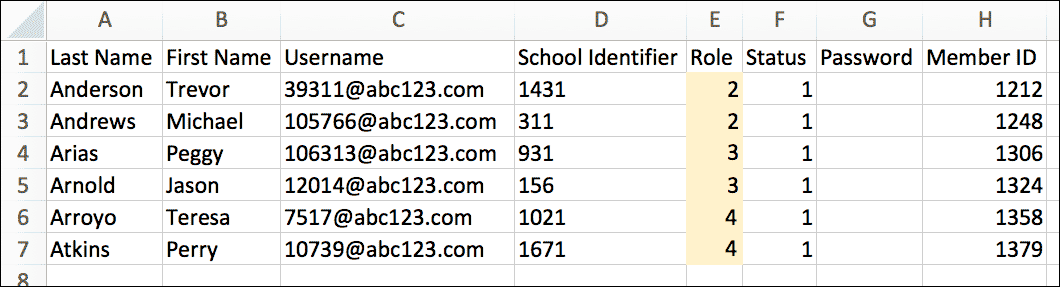 Figure 2. Spreadsheet assigning the first two members as School Observers, the second two members as Zone Observers, and the last two members as District Observers.
3. Using the Alphabetical List of Members to grant Observer status.
If your membership list is small enough it may be practical to locate a member on the scrolling Alphabetical List on the Members tab. Click the Edit button next to the member’s name and select the desired role in the Edit window that opens. Then click the Save Member Changes button.
4. Add members and grant Observer status at the same time.
If you know that new members you are adding to the system will need Observer status, you can use the Members by Spreadsheet window. Add the people you want to become new members to the bottom of the sheet and put a “2” in the Role column for School Observer, a “3” for Zone Observer, or a “4” for District Observer. When the spreadsheet is uploaded the new members will be added with the roles your designated.