Menu
1. TIM Tools Admin Center
The Admin Center provides for management of the TIM Tools suite of applications.
Overview
Getting Started
- Admin Center Access
- Admin Center Dashboard
- Managing Zones (for Districts)
- Managing Zones (for Regional Service Agencies)
- Managing Zones (for Education Ministries, Consultants, Grantors, and Others)
- Managing Schools
Customization
Managing Members
- Uploading and Updating Members
- Profile Screen
- Changing Passwords
- Defining Roles (for Districts)
- Defining Roles (for School Licensees)
- Defining Roles (for Education Ministries, RSAs, Consultants, Grantors, and Others)
Working with Data
- Participation Overview
- Downloading ARTI Data
- Downloading TIM-LP Data
- Downloading TIM-C Data
- Downloading TIM-O Data
- Downloading TIM-R Data
- Downloading TUPS Data
- Using TUPS, TIM-O, TIM-R, and TIM-LP Templates
2. TUPS
The Technology Uses and Perceptions Survey provides essential information for planning technology infrastructure and support and identifying the perceptions and PD needs of teachers.
- TUPS Intro
- Collection Frameworks
- TUPS Intro and Closing Text
- Customizing TUPS Sections and Items
- Accessing School or District TUPS Data
- TUPS Report Template
3. TIM-O / TIM-LP / TIM-R
These three tools are for classroom observation, lesson plan review, and teacher reflection.
Overview
Preparation
TIM-O
- TIM-O: Beginning an Observation
- TIM-O: Question-Based Method
- TIM-O: Matrix-Based Method
- TIM-O: Finishing an Observation
- TIM-O: Print or Share an Observation with a Teacher
- TIM-O: Editing Previous Observations
- TIM-O Report Templates
- Accessing School or District TIM-O Data
TIM-R
TIM-LP
4. TIM-C
The TIM-C allows a coach and client to document the goals, activities, progress, and outcomes of a coaching cycle.
5. ARTI
The ARTI tool provides a framework for teachers to design and conduct their own action research projects.
6. Report Tool
The Report Tool allows a school or district to create TIM-LP, TIM-O, TIM-R, or TUPS reports.
- Report Tool Intro
- Building a New Report
- View, Edit, or Delete Reports
- Interpreting TIM-O Report Data
7. Survey Tool
The Survey Tool allows a school or district to create internal or external surveys on new topics as needed.
- Survey Tool Intro
- Creating a New Internal Survey
- Creating a New Public Survey
- Adding Questions to Your Survey
- Customizing a Library Survey
- Viewing Survey Results
Need help?
Have a question?
Email us at TIM@fcit.us anytime. We want to help you get the most out of your TIM Tools account!
TIM Tools 7.5 Administration Guide
Customizing TUPS Sections and Items
You can customize the content of the TUPS to meet the needs of your school or district. The TUPS is customizable in three ways:
1. You can hide or show any of the eight sections of the TUPS.
While we find that most teachers can complete the entire TUPS in about 20 minutes, some districts prefer to administer the TUPS in sections. For example they might administer sections 1 through 5 in October and sections 6 through 8 in November as a part of an in-service activity. The Demographic and Background Information section is sometimes hidden by schools in countries where there are restrictions on handling teacher data.
2. You can hide or show any item within a section.
Occasionally a school or district wishes to remove an item from the survey for a variety of reasons. It is easy to hide one or more items without impacting the survey or survey reporting.
3. You can edit the text of any item.
Frequently, districts need to make small tweaks to the text of an item to clarify it for their teachers. For example, several items ask about access to a technology specialist. If your district uses a different title for the person in the role of tech specialist, it is easy to change the text of the relevant questions to reflect your district’s title. You might also want to edit references to specific software to match your district’s use. For example, one question asks about the use of word processors and gives examples of Word and Pages in parenthesis. If your district uses a different word processor such as Open Office Writer, you can quickly replace Word and Pages with Open Office Writer so you teachers will be certain to understand the question.
1. Hiding or Showing an Entire TUPS Section
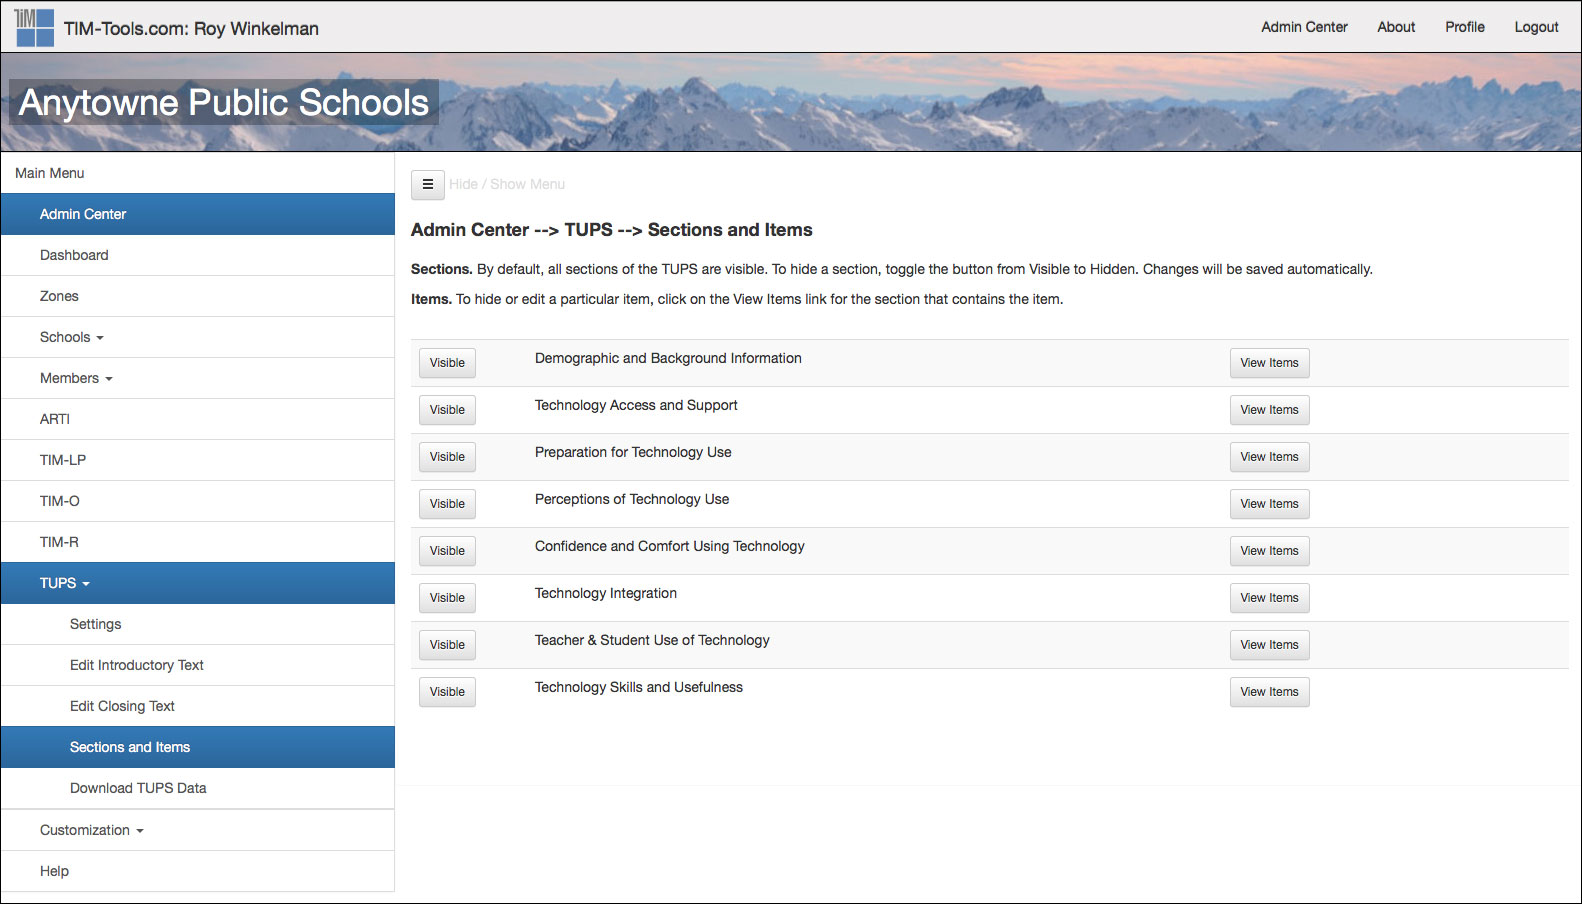
To change the visibility of a section of the TUPS, in the Admin Center select TUPS and then Sections and Items. Your window will look like the following screen capture.
 Figure 1. Section and View Items screen with visibility buttons to left of each section title.
On the Sections and View Items screen, you will see the names of all eight sections of the TUPS. To the left of each section title is a button that says either “Visible” or “Hidden.” Clicking a button will toggle the visibility of the entire section. Hiding a section does not delete it from your TIM Tools instance. You can toggle it back to “Visible” at any time. The change to the TUPS takes place immediately. There is no need to look for an “Apply” or “Save Changes” button.
2. Hiding or Showing a TUPS Item
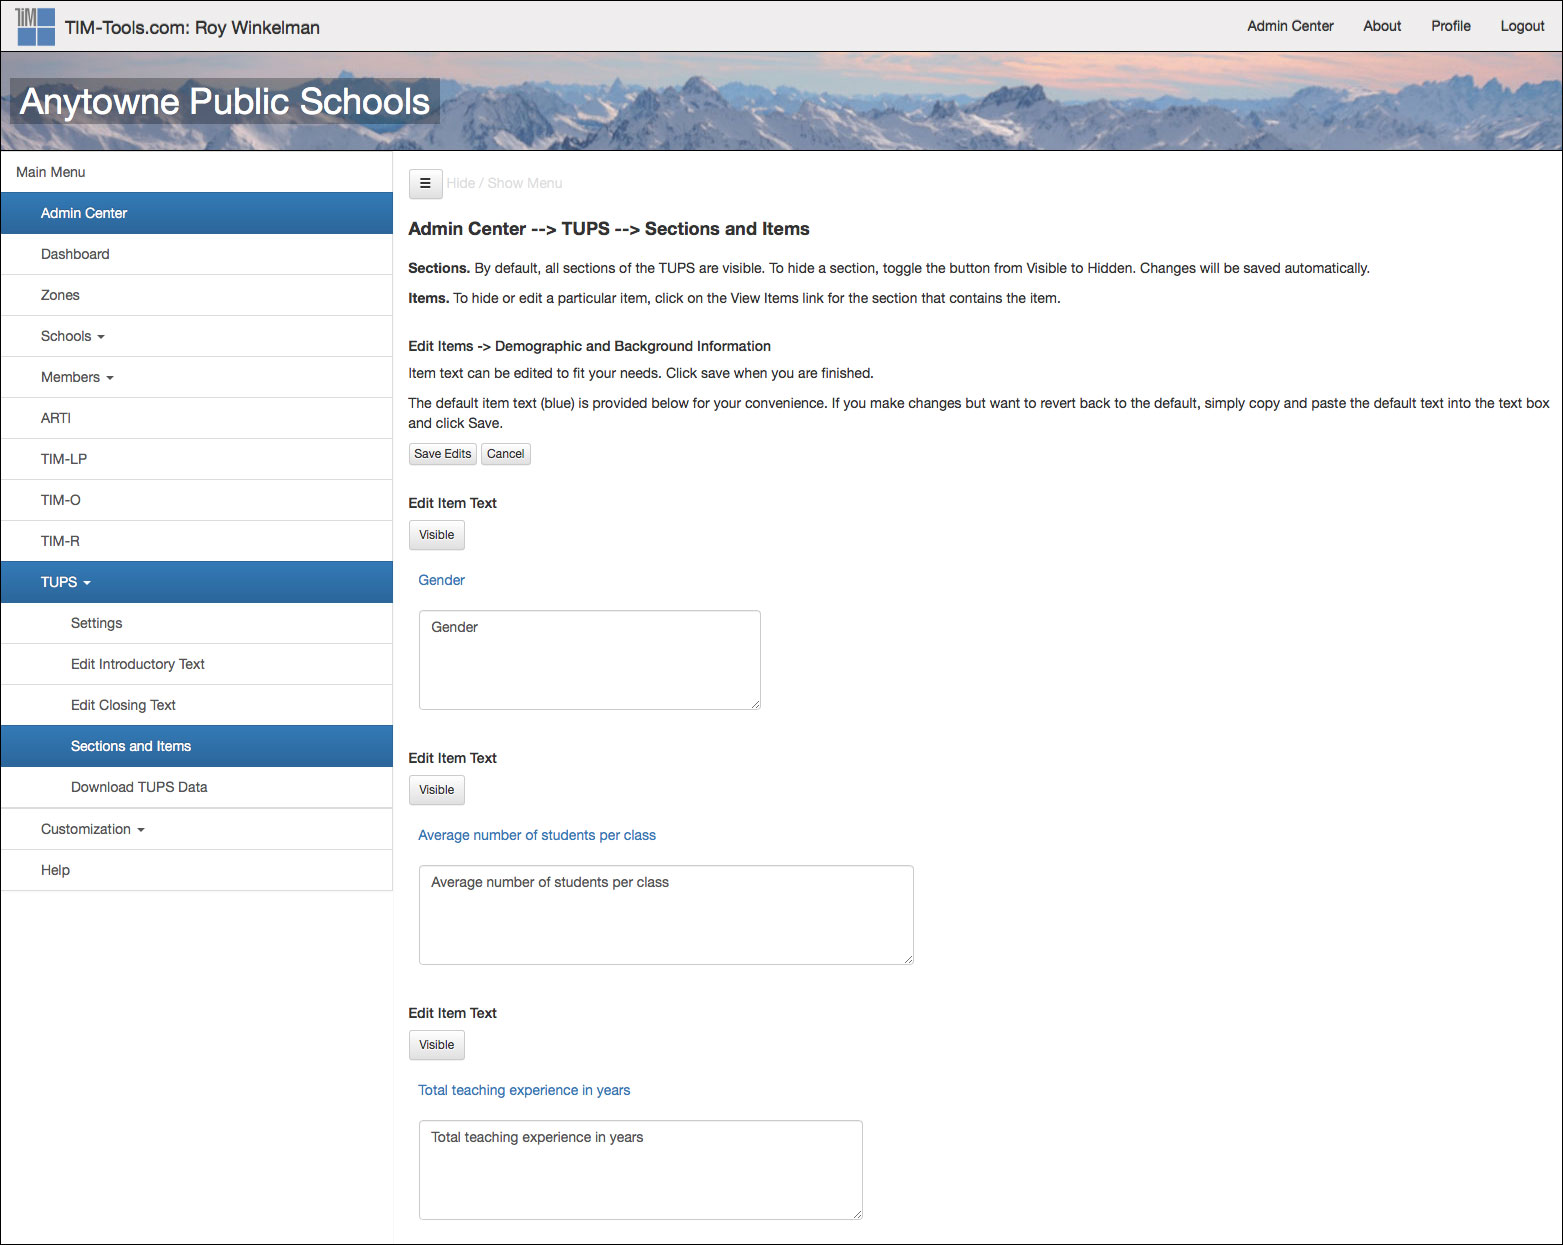
To the right of each section title on the Sections and Items screen you will see a button called View Items. Click this button to display all of the items in a given section. For example, clicking the View Items button for the Demographic and Background Information section will open the following screen.
 Figure 2. Top portion of the edit screen for the Demographic and Background Information section.
Notice that each item has a button next to it that says Item is Visible. To toggle the visibility of an item simply click the button and it will change to Item is Hidden. Hiding an item does not delete it from your TIM Tools instance and you can click the button again at any time to make the item visible again.
Once you have made the changes to visibility for items in one section, click the Save Edits button to save your choices and return to the Sections and Items menu. If you do not want to save your changes, click the Cancel button instead.
3. Editing the Text of a TUPS item
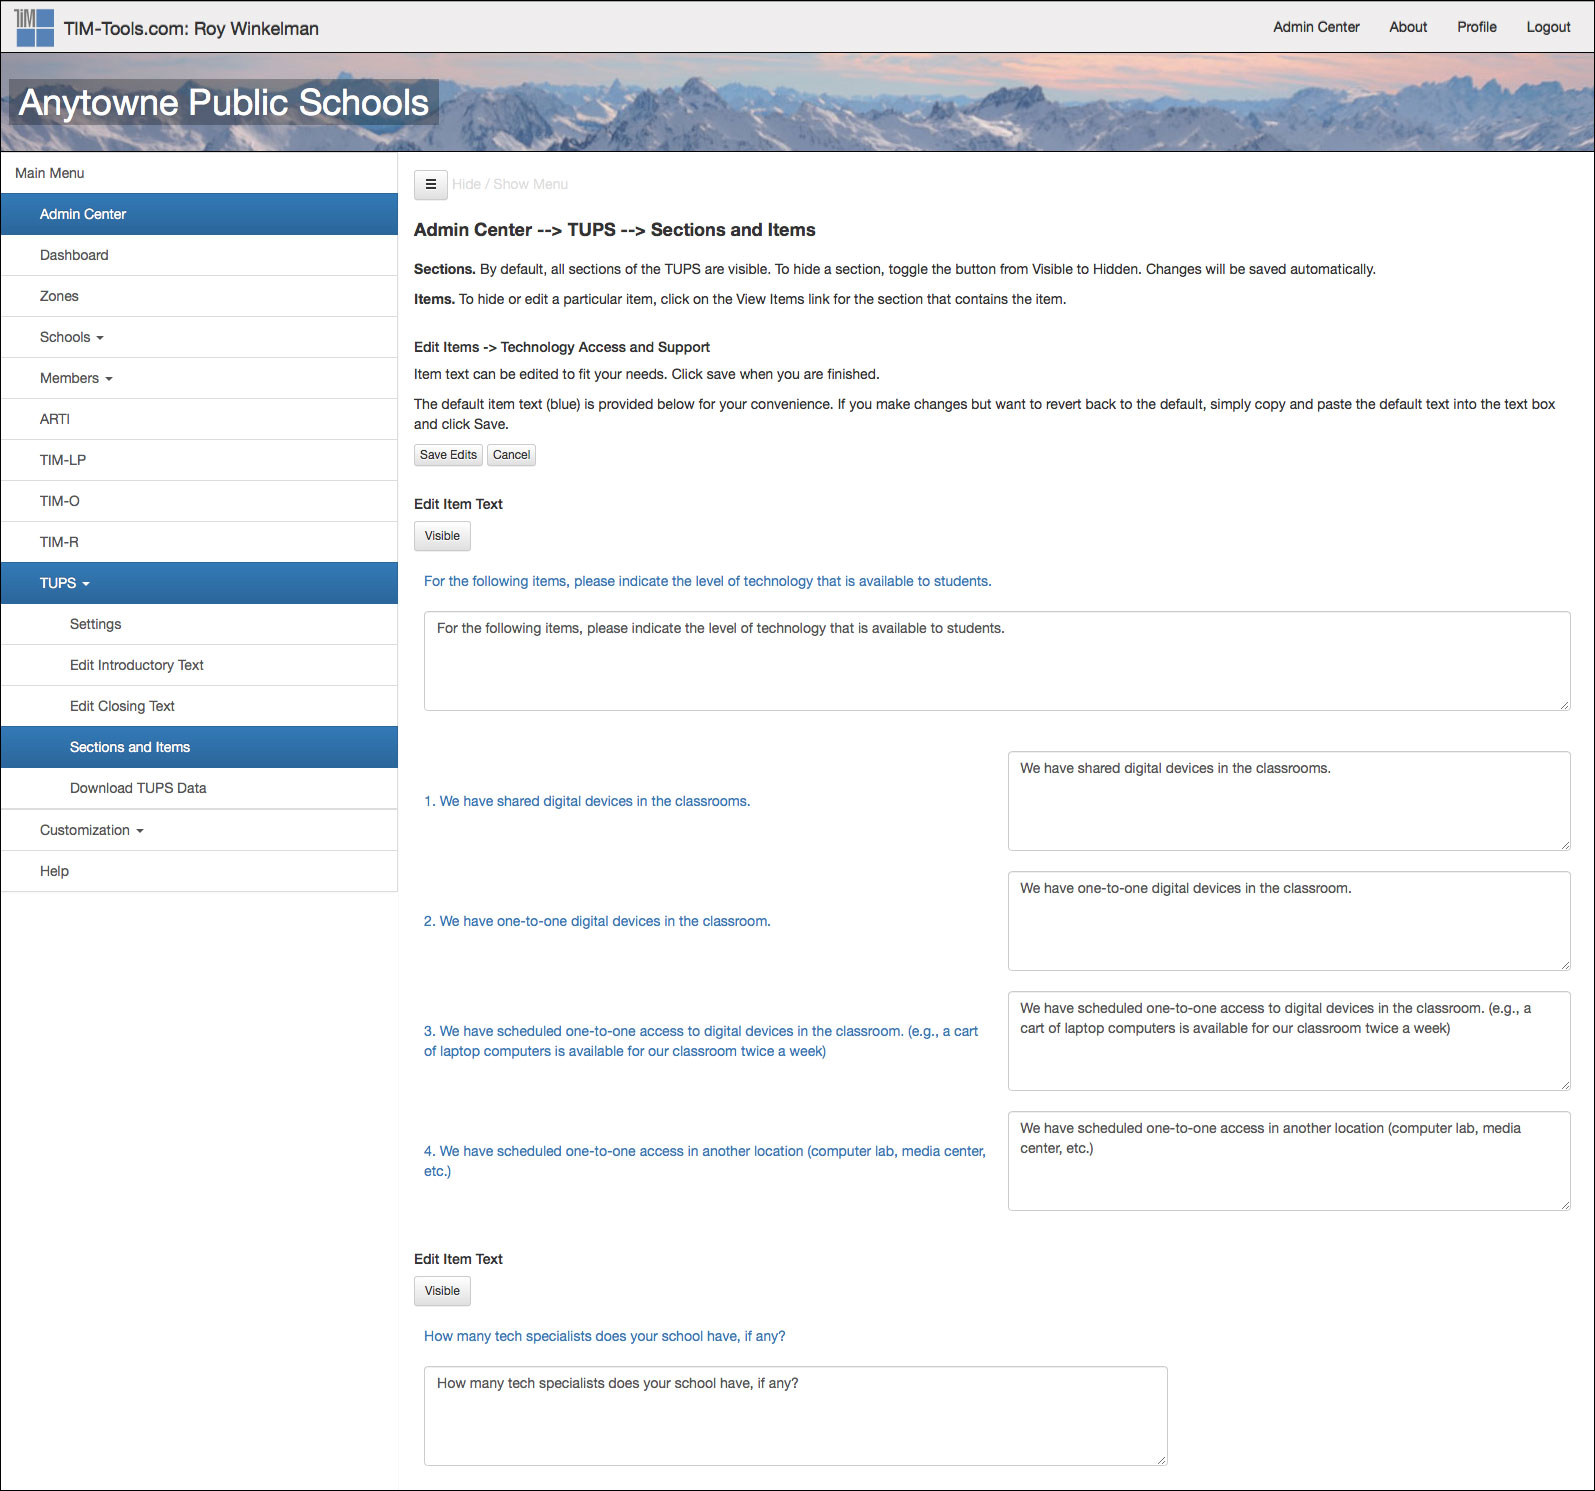
The text of any item can be edited. Beginning again at the Sections and Items screen, click the View Items button for the section that contains the item or items you would like to edit. For example, clicking the View Items button for the Technology Access and Support section will open the following screen.
 Figure 3. Top portion of the edit screen for the Technology Access and Support section.
Notice that the text for each item appears twice. You see it first in blue followed by a box with the same text in black. The black text is the one you can edit. Just click into the text field and make any changes you’d like. In the event you decide that you want to go back to the original text, you can copy and paste the blue default text back into the edit box to return the item to its original state. In the following example, the question has been edited to change “tech specialists” to “Technology Support Heroes”.
 Figure 4. Example of an edited question. The original text is blue. The revised text is black.
Once you have made the text changes for items in one section, click the Save Edits button to save your choices and return to the Sections and Items menu. If you do not want to save your changes, click the Cancel button instead.
