Menu
1. TIM Tools Admin Center
The Admin Center provides for management of the TIM Tools suite of applications.
Overview
Getting Started
- Admin Center Access
- Admin Center Dashboard
- Managing Zones (for Districts)
- Managing Zones (for Regional Service Agencies)
- Managing Zones (for Education Ministries, Consultants, Grantors, and Others)
- Managing Schools
Customization
Managing Members
- Uploading and Updating Members
- Profile Screen
- Changing Passwords
- Defining Roles (for Districts)
- Defining Roles (for School Licensees)
- Defining Roles (for Education Ministries, RSAs, Consultants, Grantors, and Others)
Working with Data
- Participation Overview
- Downloading ARTI Data
- Downloading TIM-LP Data
- Downloading TIM-C Data
- Downloading TIM-O Data
- Downloading TIM-R Data
- Downloading TUPS Data
- Using TUPS, TIM-O, TIM-R, and TIM-LP Templates
2. TUPS
The Technology Uses and Perceptions Survey provides essential information for planning technology infrastructure and support and identifying the perceptions and PD needs of teachers.
- TUPS Intro
- Collection Frameworks
- TUPS Intro and Closing Text
- Customizing TUPS Sections and Items
- Accessing School or District TUPS Data
- TUPS Report Template
3. TIM-O / TIM-LP / TIM-R
These three tools are for classroom observation, lesson plan review, and teacher reflection.
Overview
Preparation
TIM-O
- TIM-O: Beginning an Observation
- TIM-O: Question-Based Method
- TIM-O: Matrix-Based Method
- TIM-O: Finishing an Observation
- TIM-O: Print or Share an Observation with a Teacher
- TIM-O: Editing Previous Observations
- TIM-O Report Templates
- Accessing School or District TIM-O Data
TIM-R
TIM-LP
4. TIM-C
The TIM-C allows a coach and client to document the goals, activities, progress, and outcomes of a coaching cycle.
5. ARTI
The ARTI tool provides a framework for teachers to design and conduct their own action research projects.
6. Report Tool
The Report Tool allows a school or district to create TIM-LP, TIM-O, TIM-R, or TUPS reports.
- Report Tool Intro
- Building a New Report
- View, Edit, or Delete Reports
- Interpreting TIM-O Report Data
7. Survey Tool
The Survey Tool allows a school or district to create internal or external surveys on new topics as needed.
- Survey Tool Intro
- Creating a New Internal Survey
- Creating a New Public Survey
- Adding Questions to Your Survey
- Customizing a Library Survey
- Viewing Survey Results
Need help?
Have a question?
Email us at TIM@fcit.us anytime. We want to help you get the most out of your TIM Tools account!
TIM Tools 7.5 Administration Guide
Managing Zones (for Districts)
NOTE: This page describes how the Zones feature can be used by a typical district client. We have separate pages describing the use of the Zones feature by Regional Service Agencies and for use by Ministries of Education, Consultants, Foundations, Associations, Vendors, Grantors, Teacher Preparation Programs, and Others. If you have already set up your zones, then skip to the next topic, Managing Schools.
The Zones window gives district administrators the ability to group schools into zones for administrative convenience. You can group schools by geographic area, by level (e.g elementary, middle, high school), by participation in a special program, or any other factor of your choosing. Observer privileges can be assigned by school or by zone if you have created multiple zones.
Every school is in one zone, even if it is simply the default zone. You may choose to set up zones prior to adding schools, or leave all of your schools in the default zone. Later, you can create additional zones as needed.
The default zone and every zone you create is automatically assigned an ID number. You will use these ID numbers if you choose to add your schools via a spreadsheet.
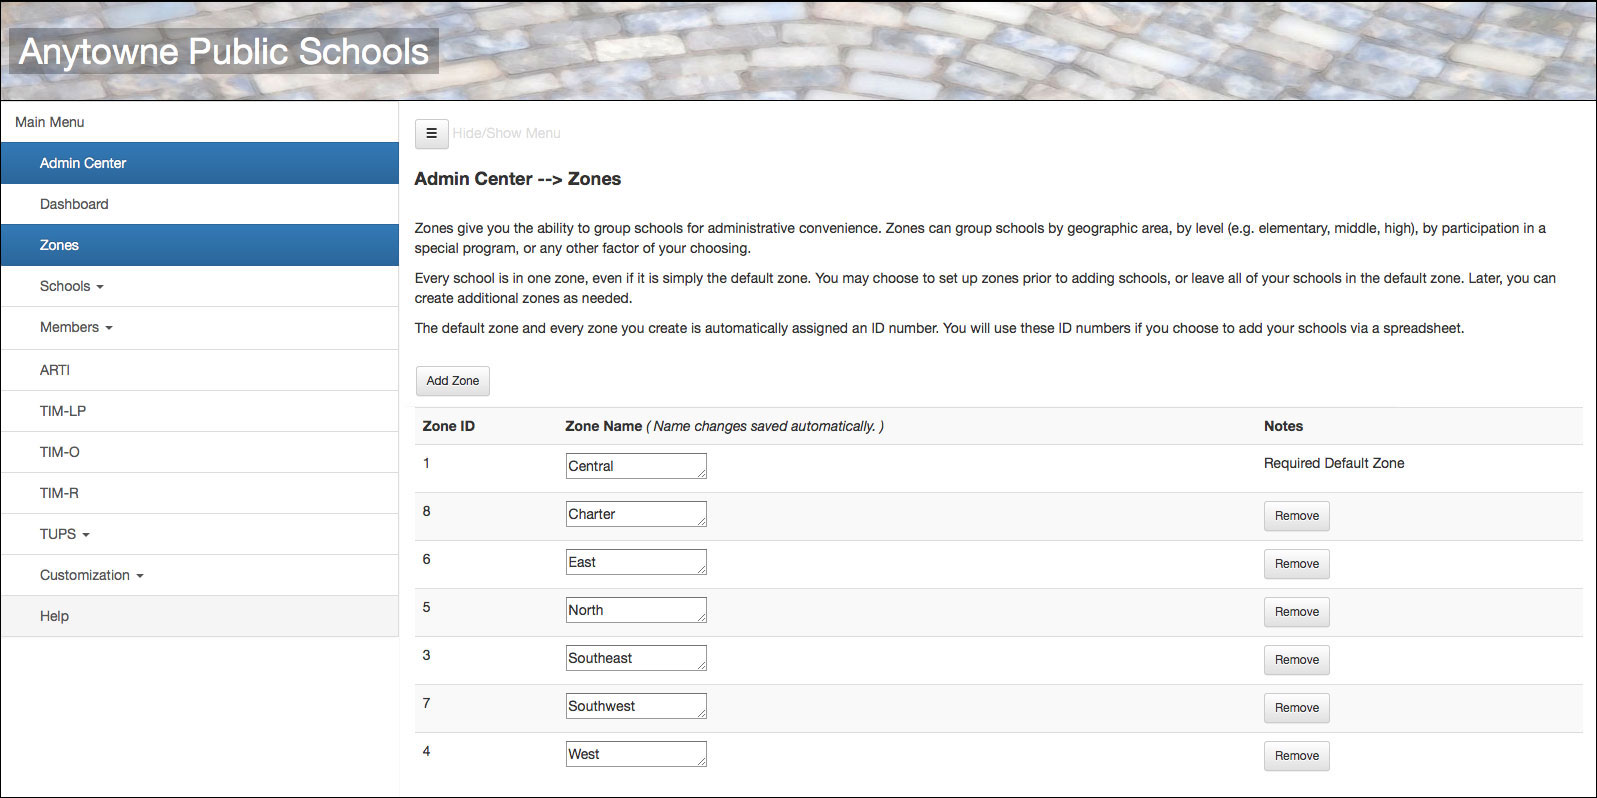
Access the Zones window by selecting Zones in the Admin Center. The following screen capture shows a district that has grouped its schools into seven zones by geographic region.

Figure 1. A district with seven school zones.
Every school is in one zone, even if it is simply the default zone. Some districts choose to leave all of their schools in the default zone when they first start using TIM Tools, but the fact that zones exist by default makes it possible at any time in the future to create additional zones and assign their schools among them as their needs change.
TIP: Although the Admin Center will allow you to enter member, school, and zone information in any order, it will save much time to:
- first enter the zones you want,
- next enter your schools via spreadsheet with their zones identified
- then enter your membership via spreadsheet with their schools identified.
Otherwise, you will waste time going back and forth to assign existing members to schools and/or assign existing schools to zones.
Use the Zones window to perform the following actions:
Add a zone by clicking the Add Zone button and giving the new zone a name.
Change the name of a zone by clicking in the text box and typing the new name.
Delete a zone by clicking the Remove button.
All changes to this page are saved automatically.
TIP: If, for example, you want a total of four zones, rename the default zone to the name you want for your first zone, and then create and name just three additional zones for a total of four.
The default zone and every zone you create is automatically assigned an ID number. You will use these ID numbers if you choose to enter your schools via a spreadsheet.
