Menu
1. TIM Tools Admin Center
The Admin Center provides for management of the TIM Tools suite of applications.
Overview
Getting Started
- Admin Center Access
- Admin Center Dashboard
- Managing Zones (for Districts)
- Managing Zones (for Regional Service Agencies)
- Managing Zones (for Education Ministries, Consultants, Grantors, and Others)
- Managing Schools
Customization
Managing Members
- Uploading and Updating Members
- Profile Screen
- Changing Passwords
- Defining Roles (for Districts)
- Defining Roles (for School Licensees)
- Defining Roles (for Education Ministries, RSAs, Consultants, Grantors, and Others)
Working with Data
- Participation Overview
- Downloading ARTI Data
- Downloading TIM-LP Data
- Downloading TIM-C Data
- Downloading TIM-O Data
- Downloading TIM-R Data
- Downloading TUPS Data
- Using TUPS, TIM-O, TIM-R, and TIM-LP Templates
2. TUPS
The Technology Uses and Perceptions Survey provides essential information for planning technology infrastructure and support and identifying the perceptions and PD needs of teachers.
- TUPS Intro
- Collection Frameworks
- TUPS Intro and Closing Text
- Customizing TUPS Sections and Items
- Accessing School or District TUPS Data
- TUPS Report Template
3. TIM-O / TIM-LP / TIM-R
These three tools are for classroom observation, lesson plan review, and teacher reflection.
Overview
Preparation
TIM-O
- TIM-O: Beginning an Observation
- TIM-O: Question-Based Method
- TIM-O: Matrix-Based Method
- TIM-O: Finishing an Observation
- TIM-O: Print or Share an Observation with a Teacher
- TIM-O: Editing Previous Observations
- TIM-O Report Templates
- Accessing School or District TIM-O Data
TIM-R
TIM-LP
4. TIM-C
The TIM-C allows a coach and client to document the goals, activities, progress, and outcomes of a coaching cycle.
5. ARTI
The ARTI tool provides a framework for teachers to design and conduct their own action research projects.
6. Report Tool
The Report Tool allows a school or district to create TIM-LP, TIM-O, TIM-R, or TUPS reports.
- Report Tool Intro
- Building a New Report
- View, Edit, or Delete Reports
- Interpreting TIM-O Report Data
7. Survey Tool
The Survey Tool allows a school or district to create internal or external surveys on new topics as needed.
- Survey Tool Intro
- Creating a New Internal Survey
- Creating a New Public Survey
- Adding Questions to Your Survey
- Customizing a Library Survey
- Viewing Survey Results
Need help?
Have a question?
Email us at TIM@fcit.us anytime. We want to help you get the most out of your TIM Tools account!
TIM Tools 7.5 Administration Guide
Site Banner
The site banner appears across the top of every page in your TIM Tools instance. Some clients like to pick a banner from our library and use it consistently. Others prefer to change the banner frequently, sometimes with the season. Clients can also link to their own custom banner to keep a consistent branding across both their existing website and their TIM Tools instance.
There are two ways of customizing the banner that appears across your TIM Tools instance. You can select one of the many built-in banners we have prepared or you can link to a custom banner of your own making.
1. Using a Built-In Banner
To use one of the built-in banners, just click on it and it will instantly become the banner used across your TIM Tools instance. You can change the banner image as often as you wish just by clicking on a different built-in banner. We’ve given you over 150 banners to choose from.
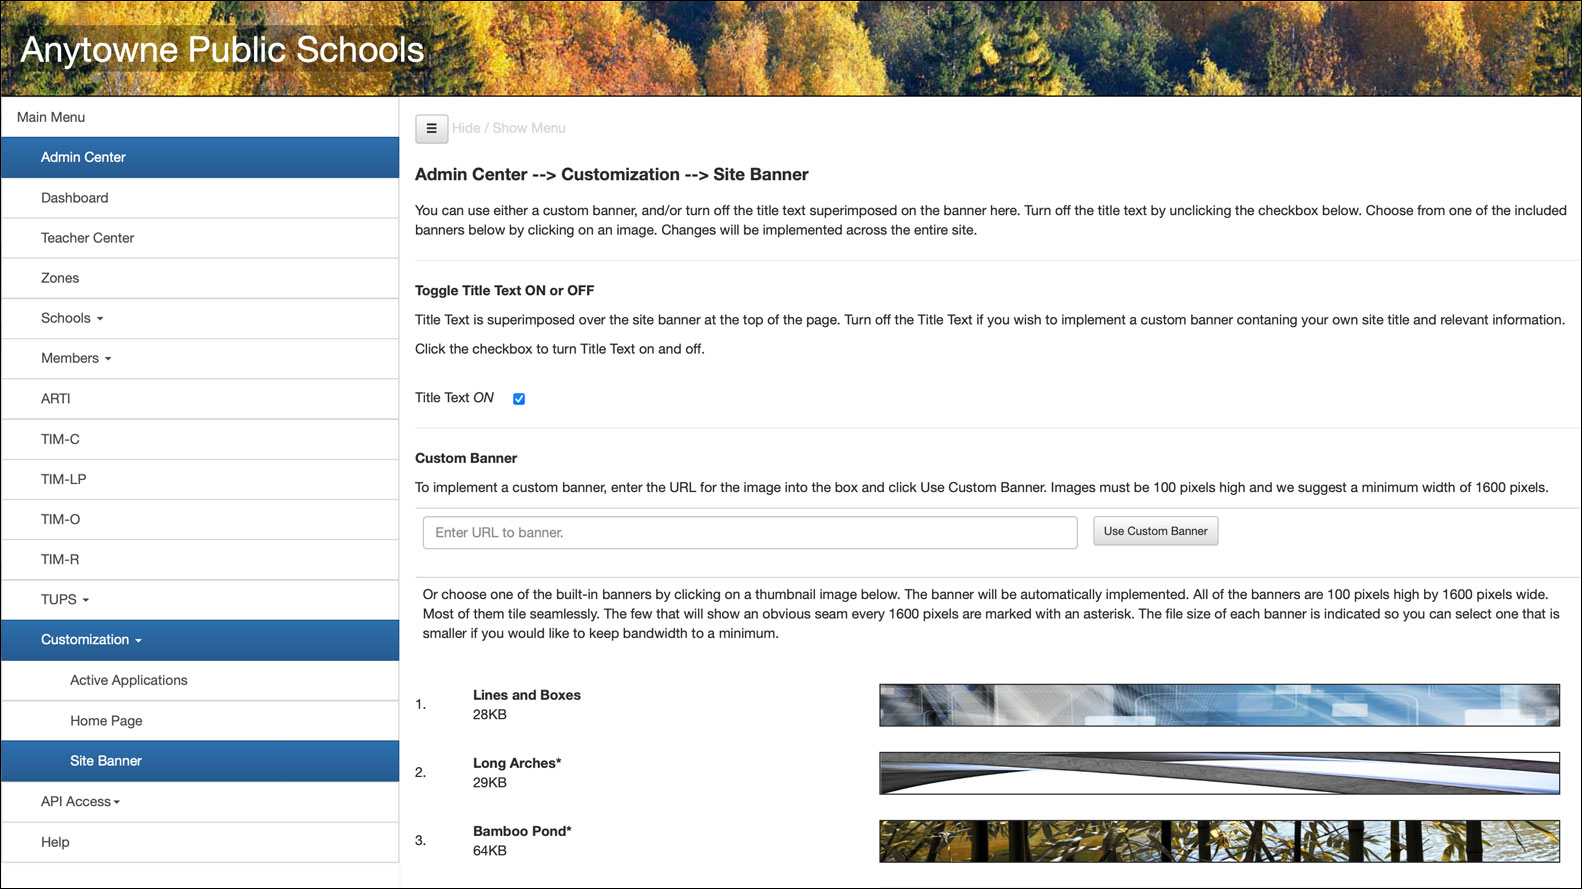 Figure 1. Clicking on a built-in banner to select it.
Notice that we’ve indicated the file size of each of the banner choices. If your school or district is in an area where bandwidth is a concern, you may want to select a banner option with a smaller file size. Even though all the choices are 1600 pixels wide, dozens of the options are under 10KB.
If you scroll all the way down to the bottom of the banner customization page, you’ll find a link to a central library of banners that we’ll update from time to time with fresh choices. You can copy the URL of any of these banners and paste it into the custom field to use them on your site.
2. Using Your Own Banner
You may prefer to use your own banner to keep a consistent branding across your existing website and your TIM Tools instance. The banner should be 100 pixels high and we suggest a minimum of 1600 pixels wide. The banner will tile (repeat itself) if your image is not as wide as visitors have their browser window set. If you select an image taller than 100 pixels, only the top 100 pixels if the image will display. Keep in mind that your school or district name will automatically be superimposed on your banner at the left where you see “Anytowne Public Schools” in the illustration below. Place your banner anywhere on your own server and paste the URL into the custom banner text field. When you click the Use Custom Banner button, your banner will immediately appear across your TIM Tools instance. You can change the custom banner or revert to one of the built-in banners at any time.
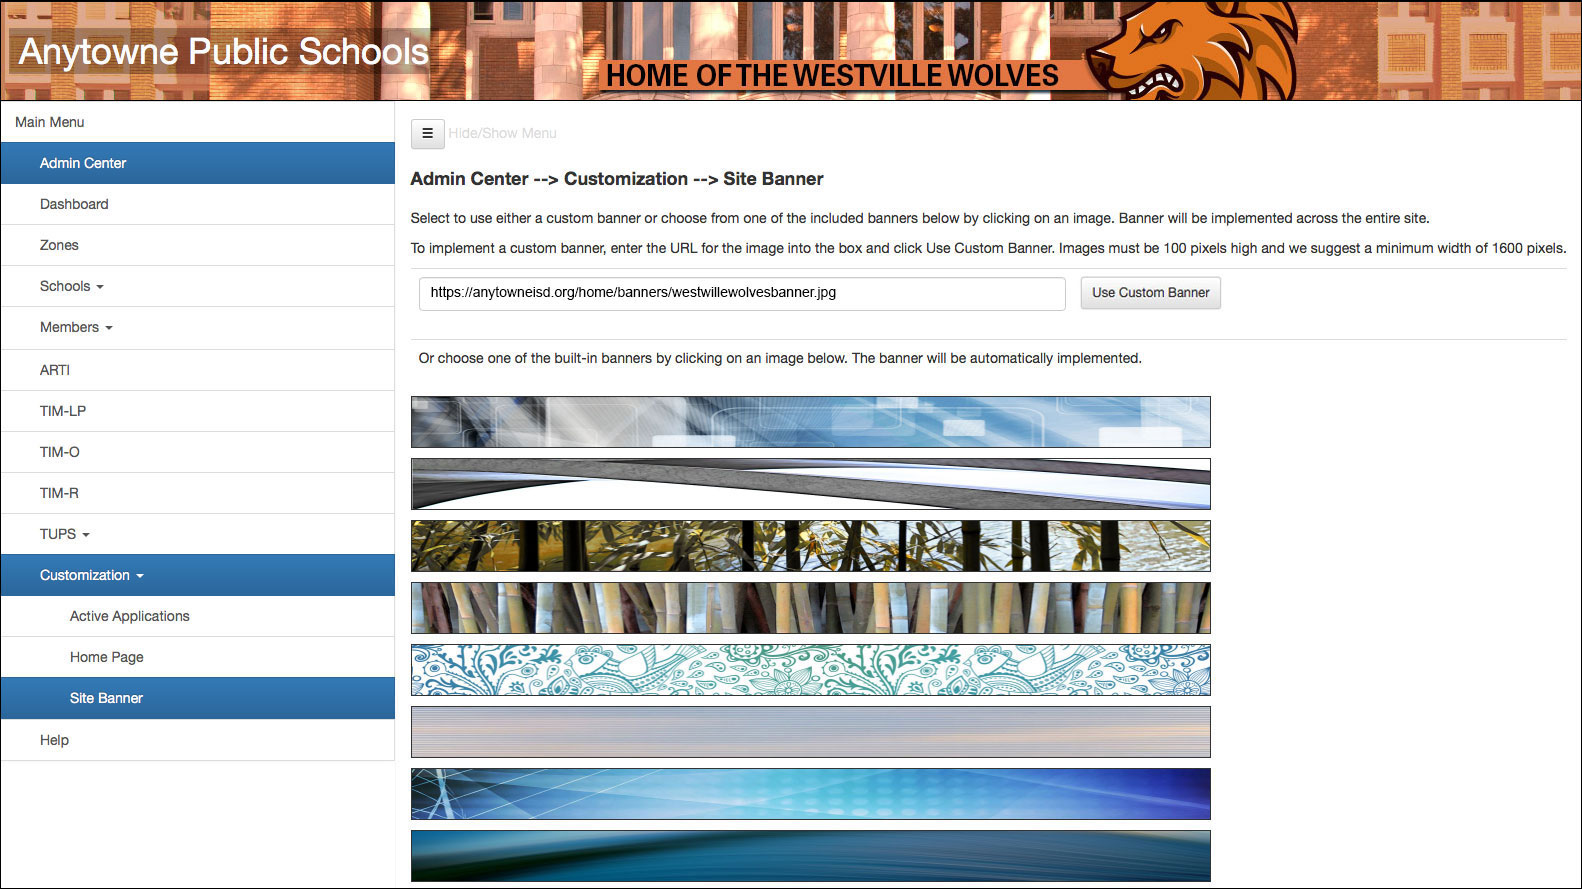 Figure 2. A custom banner image linked from district web server.
If you are making your own banner, you may want to check out our blog post, “Custom Banners for Your TIM Tools Instance.” We show you how to use Photoshop to eliminate visible seams in your images so that they tile like these examples:


Figure 3. Custom banners that repeat without visible seams.
3. Turning Off the Default Title
By default, each TIM Tools instance superimposes the school or district name over the banner image. If you are using your own custom banner and it includes your school or district name, you’ll want to uncheck the Title Text box to hide the overlay title text overlay.
 Figure 4. Custom banner with the default title overlay still checked.
 Figure 5. Custom banner with the default title overlay unchecked.