Menu
1. TIM Tools Admin Center
The Admin Center provides for management of the TIM Tools suite of applications.
Overview
Getting Started
- Admin Center Access
- Admin Center Dashboard
- Managing Zones (for Districts)
- Managing Zones (for Regional Service Agencies)
- Managing Zones (for Education Ministries, Consultants, Grantors, and Others)
- Managing Schools
Customization
Managing Members
- Uploading and Updating Members
- Profile Screen
- Changing Passwords
- Defining Roles (for Districts)
- Defining Roles (for School Licensees)
- Defining Roles (for Education Ministries, RSAs, Consultants, Grantors, and Others)
Working with Data
- Participation Overview
- Downloading ARTI Data
- Downloading TIM-LP Data
- Downloading TIM-C Data
- Downloading TIM-O Data
- Downloading TIM-R Data
- Downloading TUPS Data
- Using TUPS, TIM-O, TIM-R, and TIM-LP Templates
2. TUPS
The Technology Uses and Perceptions Survey provides essential information for planning technology infrastructure and support and identifying the perceptions and PD needs of teachers.
- TUPS Intro
- Collection Frameworks
- TUPS Intro and Closing Text
- Customizing TUPS Sections and Items
- Accessing School or District TUPS Data
- TUPS Report Template
3. TIM-O / TIM-LP / TIM-R
These three tools are for classroom observation, lesson plan review, and teacher reflection.
Overview
Preparation
TIM-O
- TIM-O: Beginning an Observation
- TIM-O: Question-Based Method
- TIM-O: Matrix-Based Method
- TIM-O: Finishing an Observation
- TIM-O: Print or Share an Observation with a Teacher
- TIM-O: Editing Previous Observations
- TIM-O Report Templates
- Accessing School or District TIM-O Data
TIM-R
TIM-LP
4. TIM-C
The TIM-C allows a coach and client to document the goals, activities, progress, and outcomes of a coaching cycle.
5. ARTI
The ARTI tool provides a framework for teachers to design and conduct their own action research projects.
6. Report Tool
The Report Tool allows a school or district to create TIM-LP, TIM-O, TIM-R, or TUPS reports.
- Report Tool Intro
- Building a New Report
- View, Edit, or Delete Reports
- Interpreting TIM-O Report Data
7. Survey Tool
The Survey Tool allows a school or district to create internal or external surveys on new topics as needed.
- Survey Tool Intro
- Creating a New Internal Survey
- Creating a New Public Survey
- Adding Questions to Your Survey
- Customizing a Library Survey
- Viewing Survey Results
Need help?
Have a question?
Email us at TIM@fcit.us anytime. We want to help you get the most out of your TIM Tools account!
TIM Tools 7.5 Administration Guide
Uploading and Updating Members
To access member options, go to the Admin Center and click on the Members tab.
The Members tab has a dropdown menu with as many as six options depending upon the permissions setting for the user:
1. Alphabetical List
2. Search Members
3. Members by Spreadsheet
4. Add Members Individually
5. Define Member Roles
6. Download Email List
These options provide flexibility in adding and updating members:
If you want to add just a few members, select Add Members Individually
If you want to add many members, select Members by Spreadsheet
If you want to update just a few members (edit names, change school assignment, change role assisgnments, or reset passwords), select Search Members.
If you want to update many members all at once, select Members by Spreadsheet.
If you want to browse the member list and make edits as you scroll through, select Alphabetical List.
Section 1: Alphabetical List
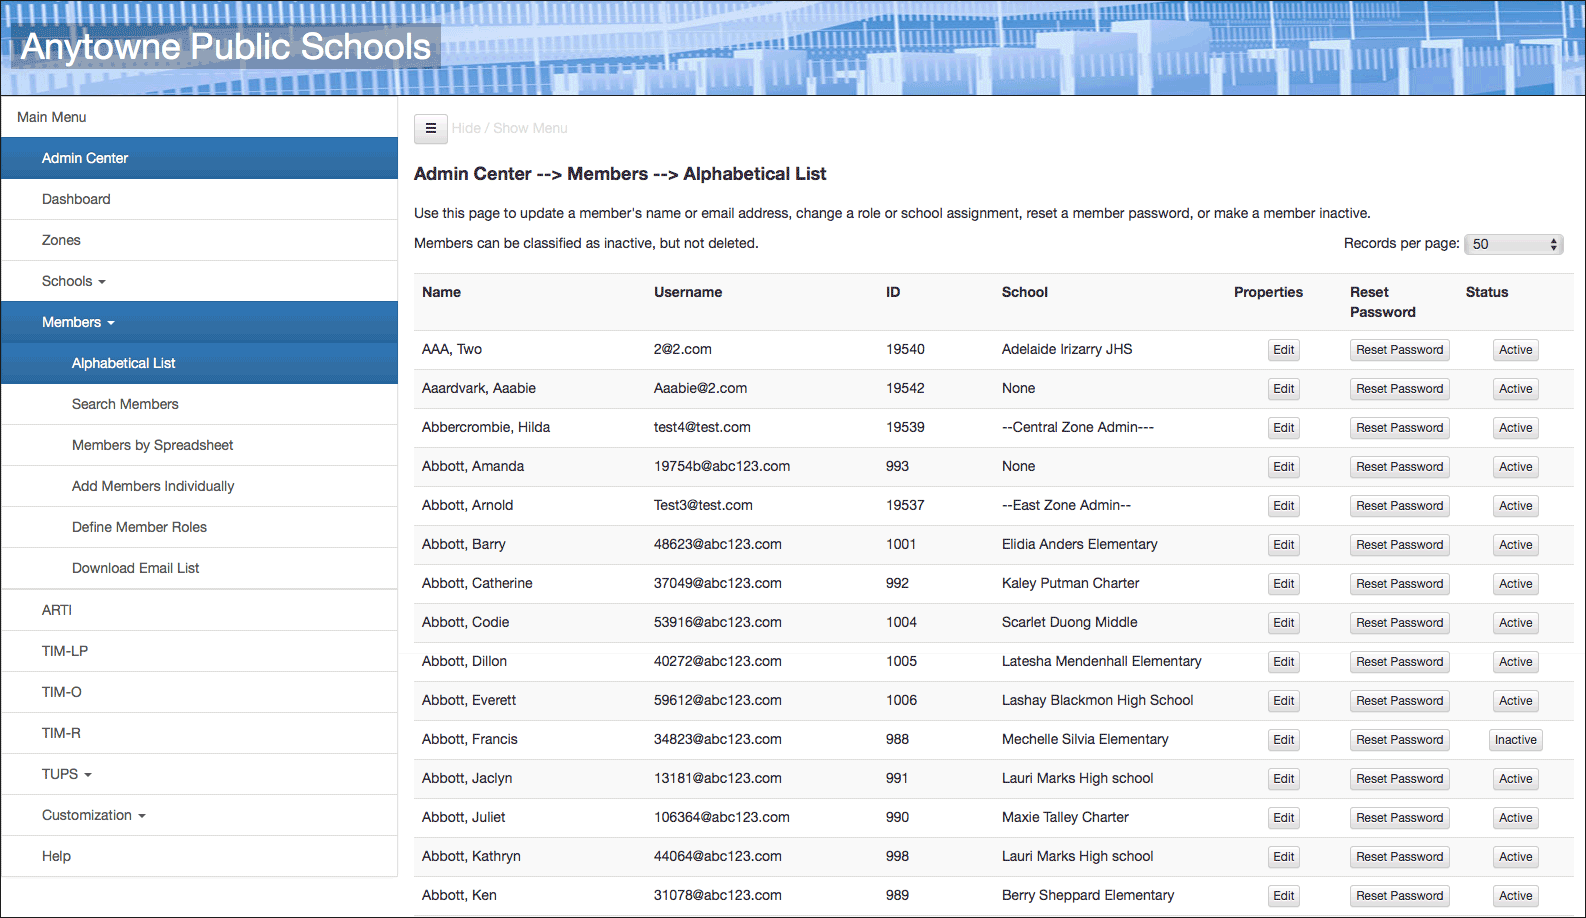 Figure 1. Alphabetical List of members.
This is a list of all members that have been entered into the system. To update any member individually, click the Edit button for that member. A new screen will appear allowing you to change the username of the member. (It must be a valid email address.) You can also make any corrections or changes to either the first or last name. Change the member’s school assignment via the School Affiliation dropdown menu. If you have permission to modify role assignments, you will also be able to change the Member Role. If you do not have role assignment privileges, you will be able to view, but not change, the member’s role. When you are finished with your edits, select the Save Member Changes button. The member information updates immediately.
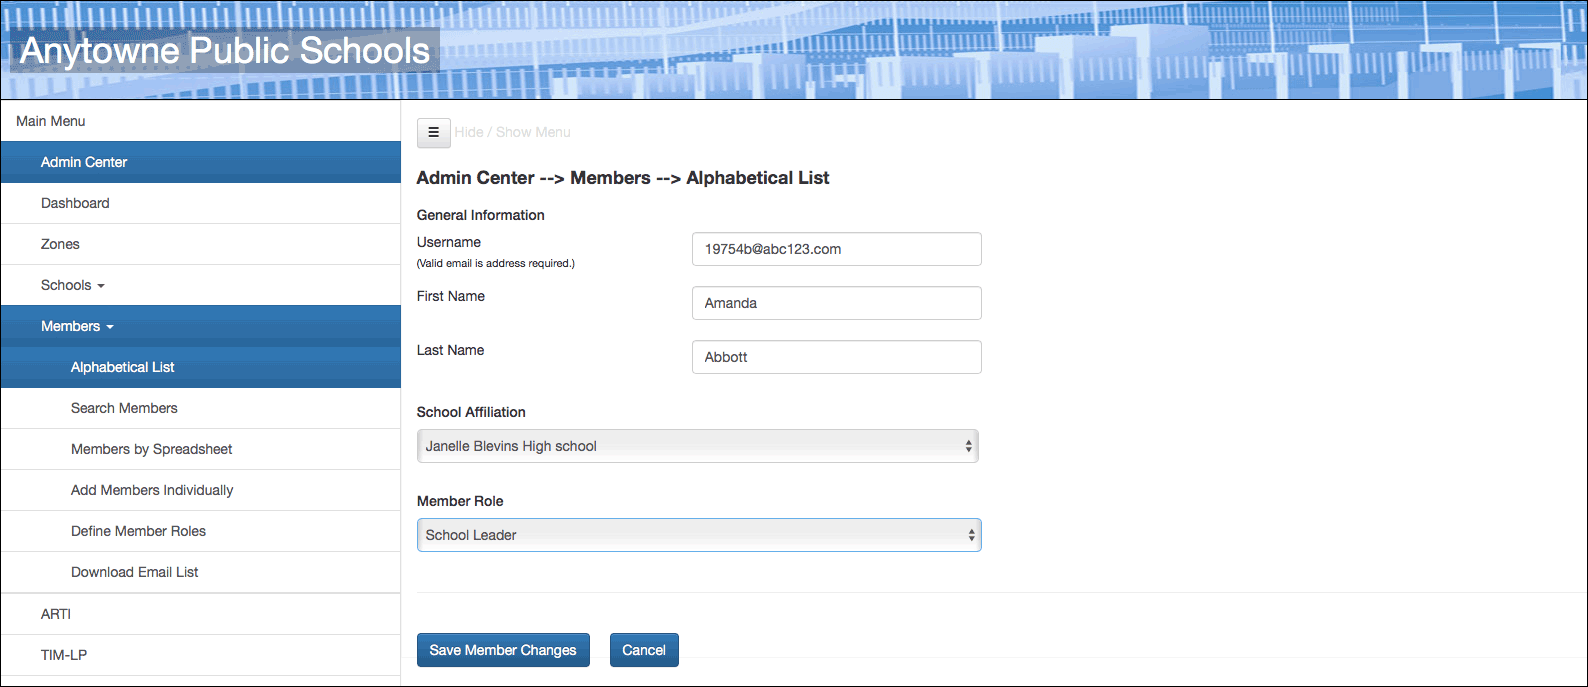 Figure 2. Member screen for Amanda Abbott. Individual edits can be made from this screen.
To reset a member’s password, simple click the Reset Password button. When the Password Reset window opens, you have two choices. You can enter the new password into the text box or you can leave the box blank. If you leave it blank, the password will be reset to a random pin number and sent via email to member. The update is made when you click the Reset Password button.
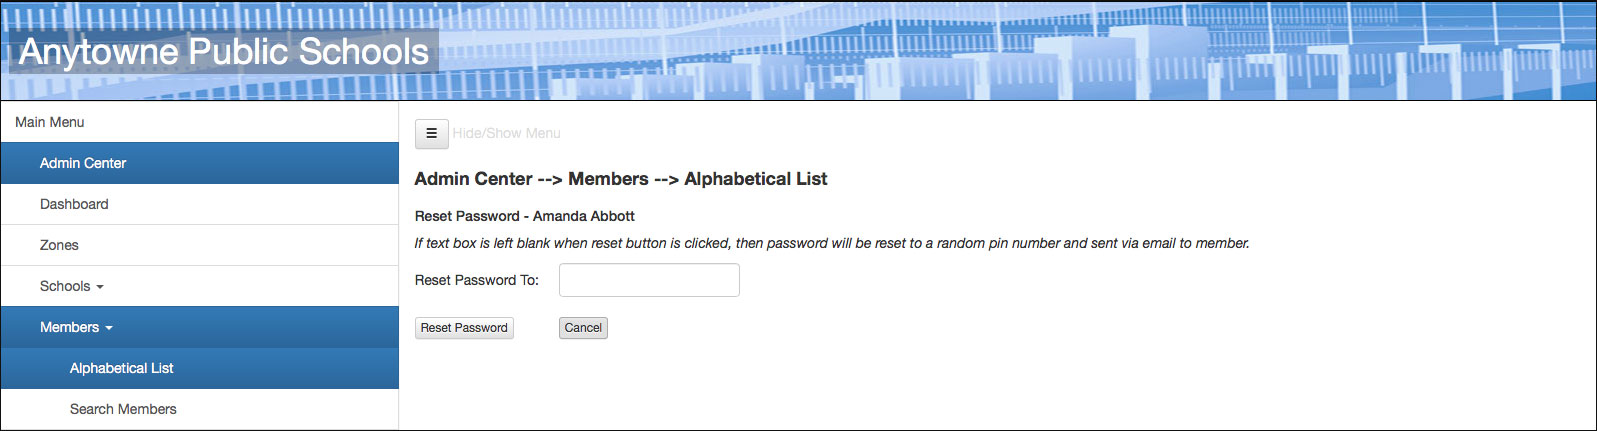 Figure 3. Password Reset window.
You can also reset the member’s Status from the Alphabetical List. For data integrity purposes, members cannot be deleted from the system. If a member leaves the school or district, simply click the Active/Inactive button so that it toggles to Inactive.
If you have a large membership, you may find it convenient to set the Records per Page setting to a higher number.
Section 2: Search Members
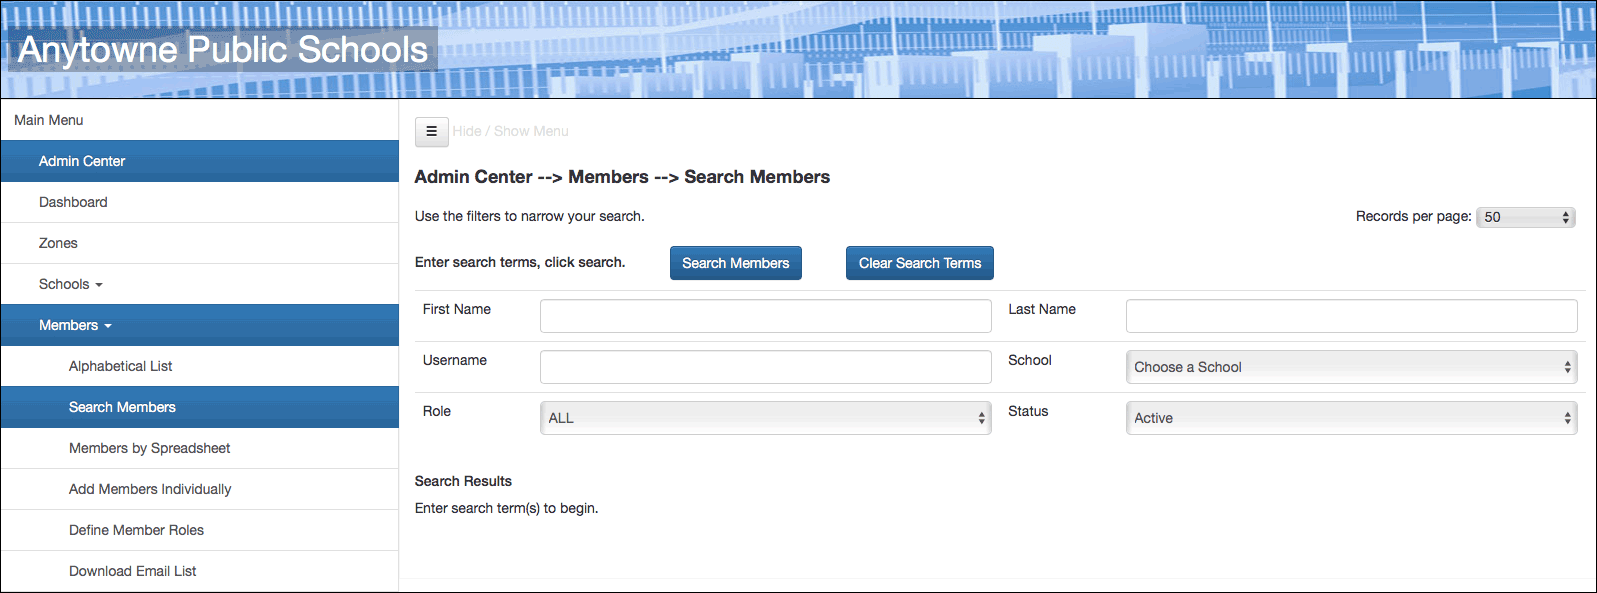 Figure 4. Search Members tab.
This section allows you to search for a specific member within your site. There are six possible search parameters: first name, last name, username, school, role, or status. You can enter information into your choice of fields to narrow your results.
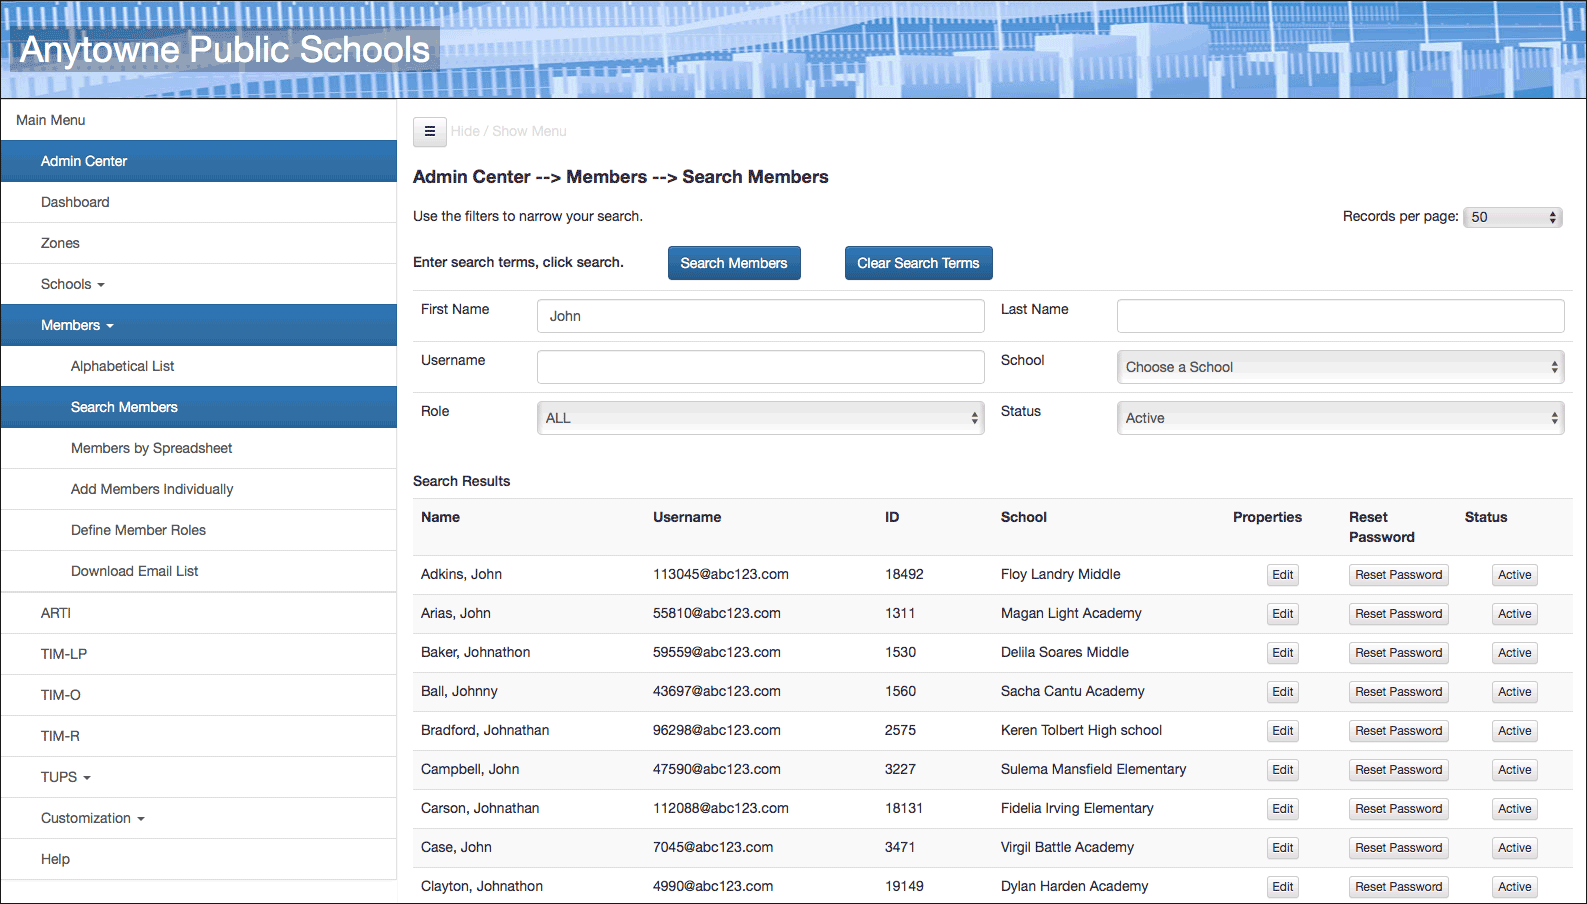 Figure 5. A search for the first name of John. This search yielded many results. The additional fields could be used to narrow the results.
Section 3: Members via Spreadsheet
You can use a spreadsheet to make edits to many members and/or add new members with a single upload.
If you are adding many members at one time, you will want to use the spreadsheet method. Select Members by Spreadsheet to open the following window.
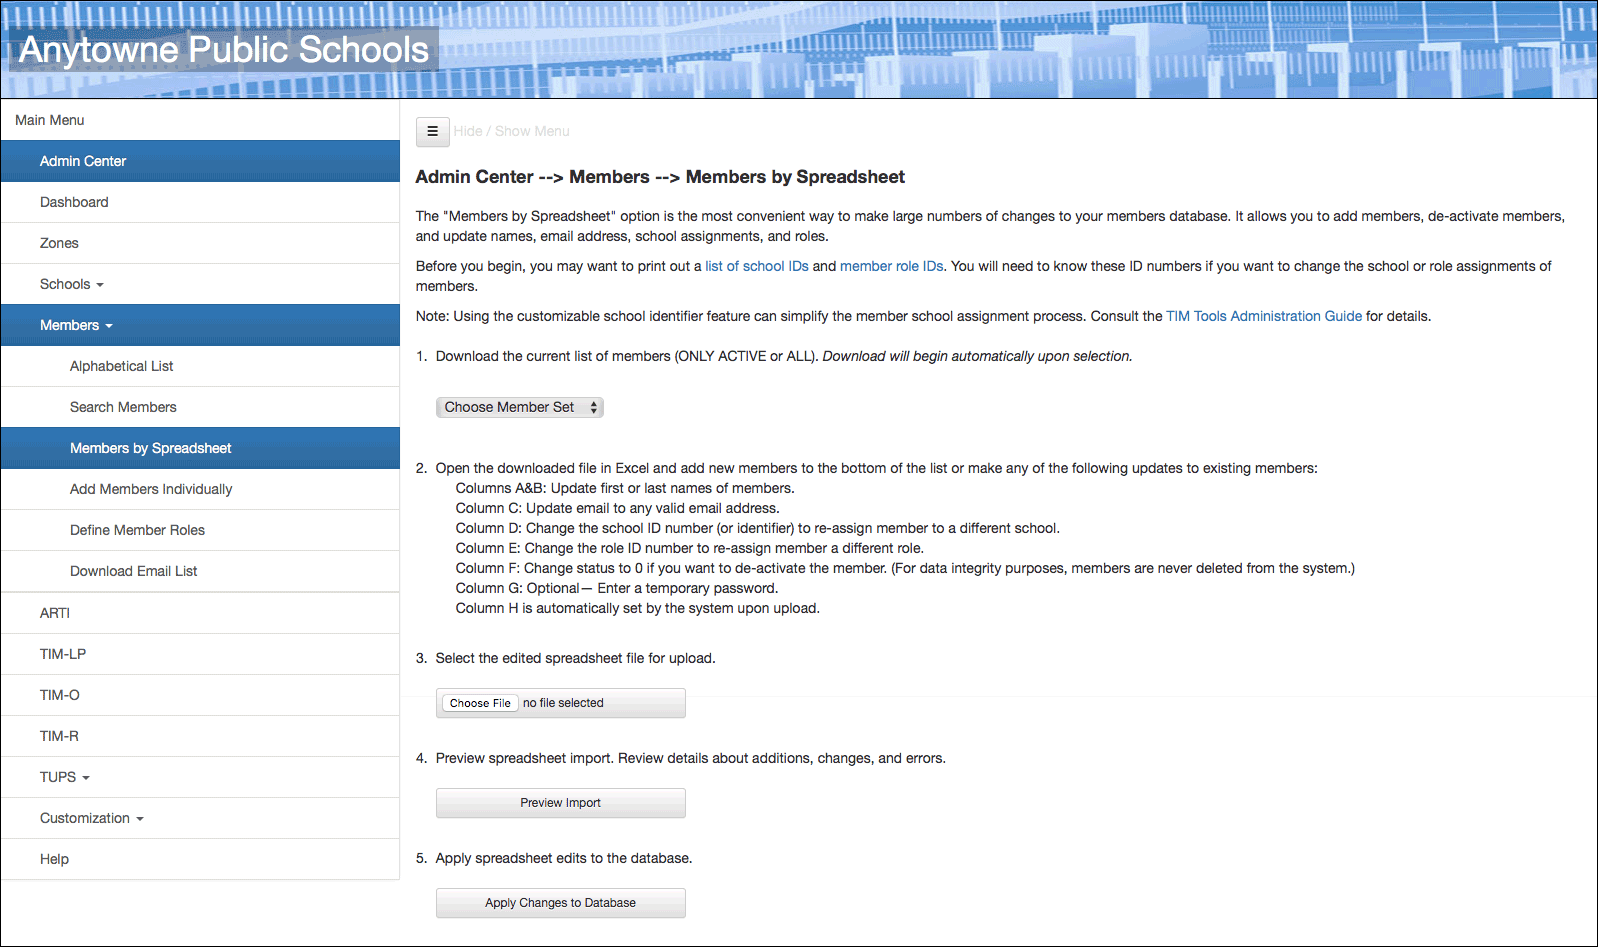 Figure 6. Importing members via spreadsheet.
1. Use the Choose Member Set dropdown menu to select either Only Active Members or All Members. As soon as you have made your selection the system will create a current spreadsheet and download it to you. This may take a moment if you have many members in the system.
TIP: You may find it helpful to print out the Alphabetical List under the Schools tab as a quick reference for finding the School ID when adding or reassigning members. You may also want to keep a list of roles and their IDs handy.
2. Open the downloaded file in Excel.
You will see all your current membership. The columns on the spreadsheet are as follows:
Column A: Last Name.
Column B: First Name.
Column C: Username. Usernames must be a valid email address.
Column D: School Identifier. Change the school ID number (or identifier) to re-assign member to a different school. Enter a zero in this column if you do not want the member to have a school affiliation.
Column E: Role. This column lists the ID number for the role of the member. 1=Teacher, 2=School Observer, 3=Zone Observer, 4=District Observer, 5=School Leader, 6=Zone Leader, 7=District Leader, and 8=SuperAdmin. If you have created additional roles, the ID numbers for the new roles will be available at the “Set Member Roles” panel.
Column F: Member Status. (1=active, 0=inactive) To maintain data integrity, members are never deleted from the system. If a member leaves the district, their status is set to inactive (zero) and they will no longer appear in any reporting.
Column G: Password. For security reasons, this column will be blank when you download the spreadsheet. It is used only to set a temporary password for any new members you add to the spreadsheet for uploading.
Column H: Member ID is set automatically by the system.
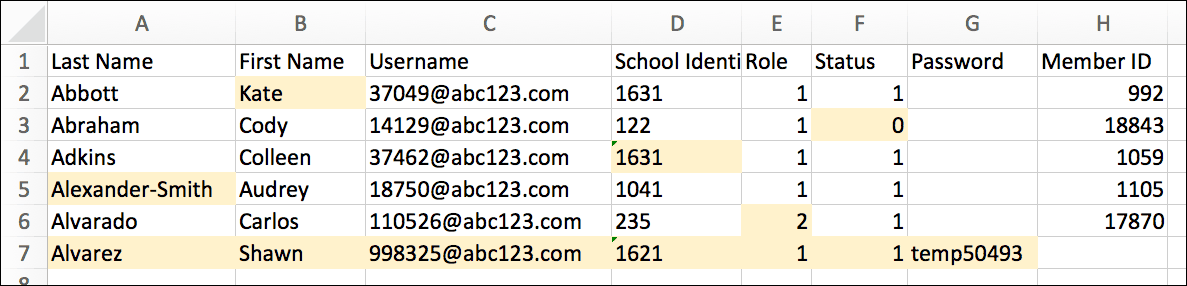 Figure 7. Sample member spreadsheet. We have highlighted the changes made so you can compare them with the report in figure 8 below. There is no need to use highlighting on your spreadsheets.
If you want to edit existing member information, simply make the desired changes in any column A through G.
If you want to add new members, add a new row for each member and enter the appropriate information for columns A through F. If you wish, you can set a temporary password in column G. You will not be able to add information in column “H” because the system will generate the Member ID automatically.
When you are finished editing existing members and/or adding new members, save your spreadsheet in either .XLS or .XLSX format.
To upload your modified spreadsheet, click the Choose File button and select your saved spreadsheet. Then click the Preview Import button. If your membership list is large, it may take a moment to upload the spreadsheet and create the Members Upload Preview report window.
TIP: One needn’t upload the entire member roster. You can simply upload a spreadsheet that contains member records that are being added or changed. Be sure to include the header row with the columns in exactly the order as the downloaded member spreadsheet. If you have a large membership list, this may streamline your update process. It’s also possible to break up a spreadsheet into smaller sections and upload them separately if you prefer.
Members Upload Preview report will display the changes and/or additions you have made. Please review them carefully. If you are satisfied with your changes, click the Apply Changes button at the bottom of the report window to update your TIM Tools member database. If you do not wish to make the changes, select the Close Preview button instead. You can also click the Apply Changes to Database button to update the database without viewing the the preview window, however we strongly recommend using the preview window and checking the pending changes carefully before appyling them to the database.
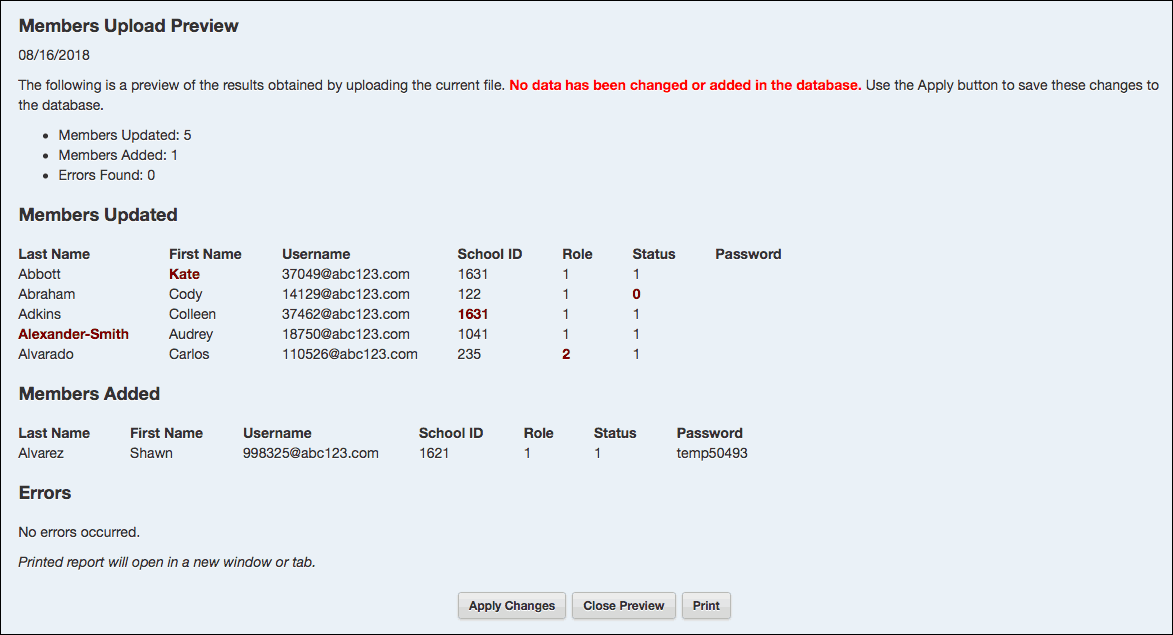 Figure 8. Members Upload Preview. This preview indicates the changes that are about to be made to the member database. Compare this preview information with the spreadsheet that was uploaded as Figure 7.
Section 4: Add Members Individually
If you are adding just a few members to your site, you may find it easier to use the Add Members Individually option rather than downloading and uploading a spreadsheet as described above. Clicking this button opens the following form.
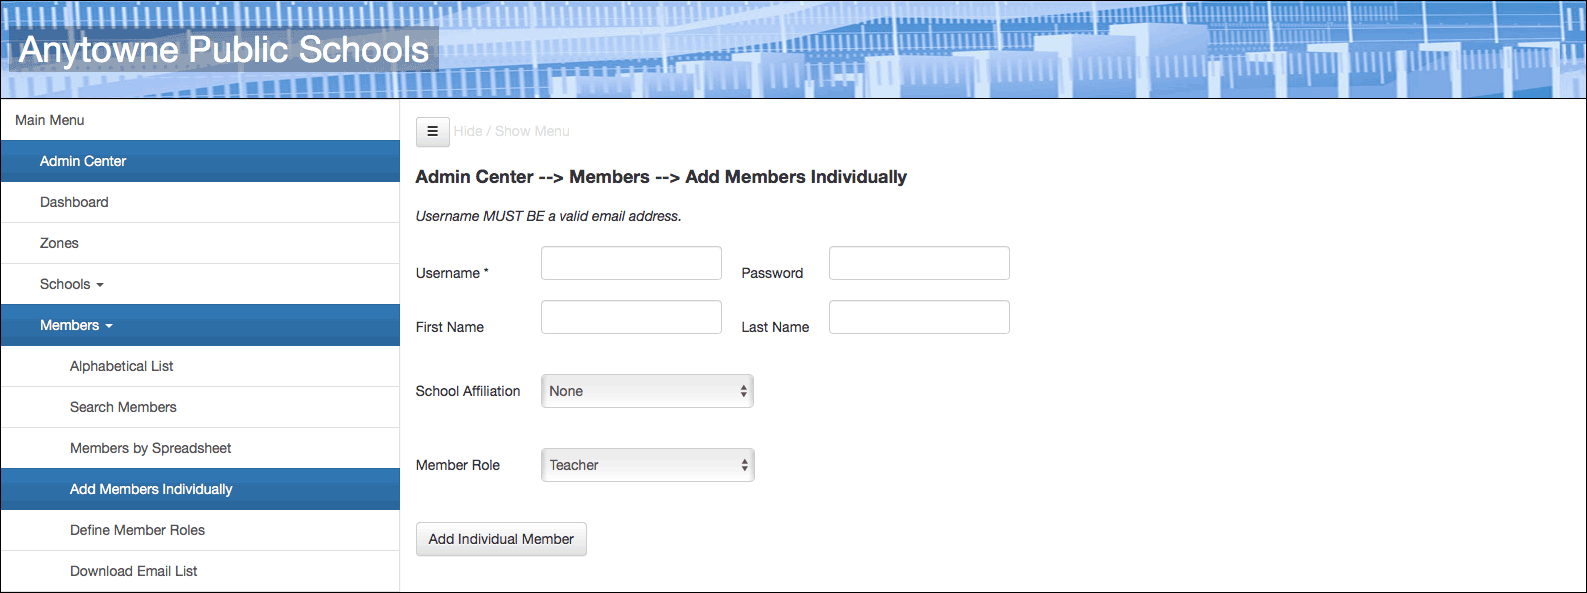 Figure 9. Adding members one at a time.
For new each member, enter a valid email address (username), password, first name, and last name.
You can also select the school affiliation and member role at this time.
Clicking the Add Individual Member button will immediately update the membership database. The system will check to ensure that the username is in a valid email format and alert you if it is not in a valid format.
Section 5: Download Email List
This option gives you the ability to download a spreadsheet of member email addresses. You can select either Active Members or All Members. The download will begin automatically once you have made your selection.
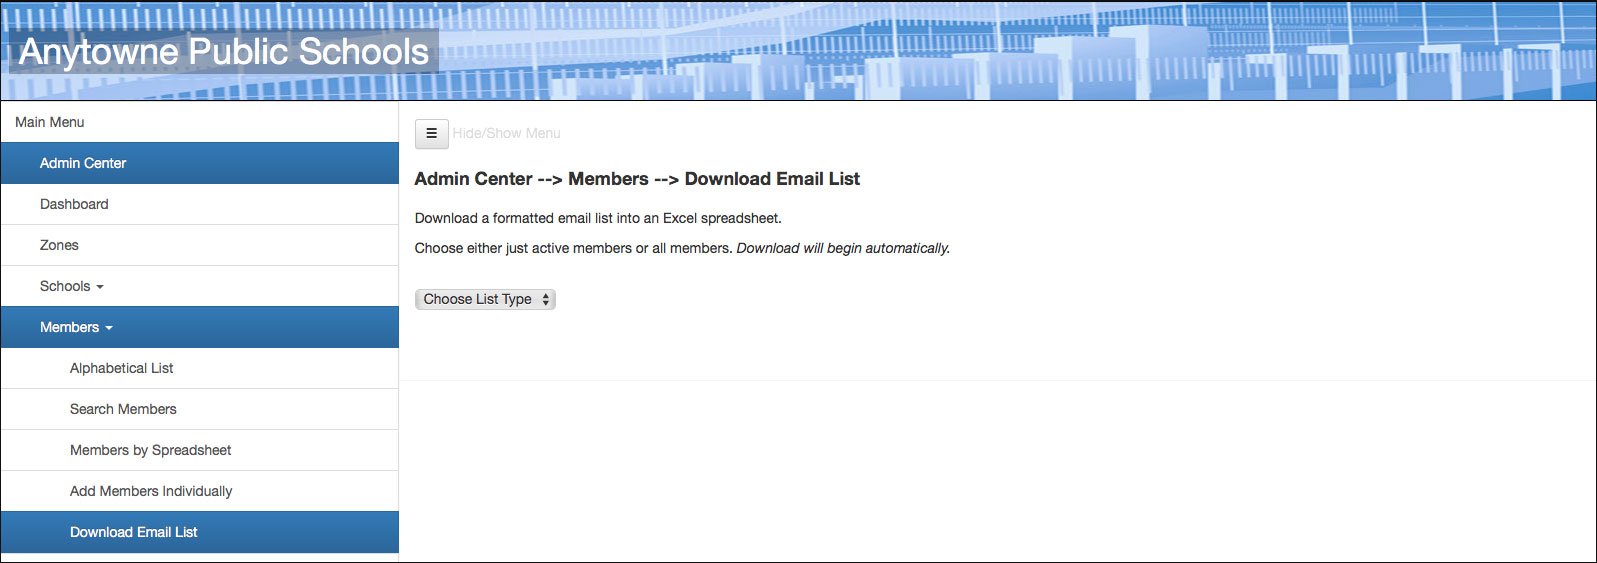 Figure 9. The Download Email List window.